

Keratin extensions can create a natural, flexible finish—but only when every bond is matched to the client’s hair, placed in its natural fall, and fused consistently.
This professional SOP explains how to apply keratin hair extensions from consultation through final quality control. It is written for trained stylists working with pre-bonded keratin, K-tip, U-tip, or similar hot-fusion systems. Adapt the bond size, strand weight, heat, spacing, and density to the client instead of forcing every client into the same placement map.
Professional note: Keratin fusion is a technical salon service. Do not treat this SOP as a substitute for hands-on certification, the instructions supplied with your fusion tool, or the bond manufacturer’s application specifications.
What Are Keratin Hair Extensions?
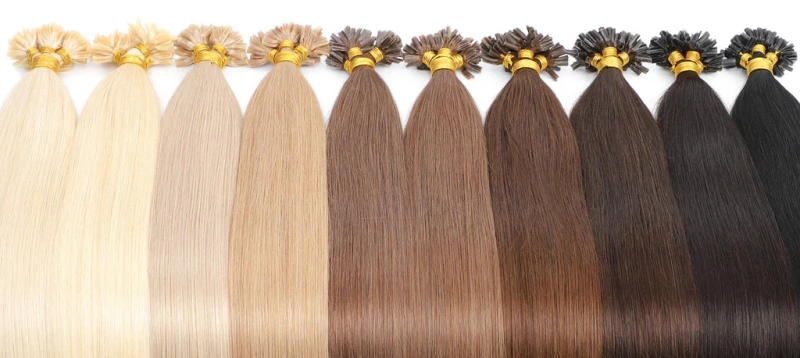
Keratin hair extensions are individual extension strands finished with a pre-formed bonding tip. During installation, you soften the tip with a compatible fusion tool and mold the keratin around a carefully selected section of natural hair. Once cooled, the small bond moves with the client’s hair and can be concealed inside the haircut.
You may also hear this method called K-tip, fusion, pre-bonded, or keratin bond extensions. Because bond shapes and formulas vary, identify the exact system and follow its instructions for heat, working time, and molding.
For product specifications and wholesale options, see Alpha Hair’s keratin hair extensions and K-tip hair extensions.
Before You Apply Keratin Hair Extensions
Use the consultation to decide whether keratin bonds are suitable, how much weight the natural hair can support, and where the finished style needs density.
Assess the client’s hair and scalp
Check the scalp, density, elasticity, breakage, chemical history, and shedding. Ask about recent chemical services, scalp sensitivity, and previous extension problems. Postpone the service if you see active irritation, unexplained hair loss, severe breakage, or hair that cannot support the proposed weight. Fine hair may still be suitable, but it usually needs smaller bonds, lighter strands, wider spacing, and a conservative plan.
Confirm the result the client expects
Clarify whether the goal is length, volume, color effects, face framing, or correction of an uneven haircut. Discuss how often the client wears the hair up, where the parting sits, and whether the client regularly changes the part. These details determine your safe zones and the amount of leave-out you need around the perimeter.
Match color, texture, length, and density
Use more than one shade when the natural hair has dimension, and match the extension texture to the client’s usual finish. Plan quantity after assessing density and the desired result; two clients asking for the same length may need very different strand counts and bond weights.
Perform a strand and bond test
Test the tool and bond on a sample strand or inconspicuous area. The keratin should soften evenly, mold cleanly, and cool securely without becoming brittle, sticky, or scorched. If it behaves unexpectedly, check compatibility, temperature, bond age, and storage.
Keratin Hair Extension Tools and Supplies
Prepare your station before sectioning the client. A complete setup helps you keep the application clean and prevents you from reaching across the client while the keratin is workable.
You will typically need:
- Pre-bonded keratin hair extensions in the selected shades, lengths, textures, and strand weights
- A fusion heat tool approved for the bond system
- A heat-protection shield or scalp protector
- A tail comb for precise partings
- Sectioning clips
- A detangling brush and extension-safe finishing brush
- A clean cape and towels
- A clarifying or extension-preparation shampoo
- A blow-dryer and styling tools
- Cutting shears, texturizing shears, or a razor when appropriate for blending
- A bond-removal tool and remover for corrections during the service
- A strand-count sheet or placement record for repeat appointments
Do not choose a heat setting because it appeared in a generic tutorial. Keratin formulas and fusion tools vary. Use the temperature and contact time specified for the exact bond and applicator you are using. Your target is to soften the keratin enough to mold it—not to overheat the natural hair.
How to Apply Keratin Hair Extensions: Step-by-Step SOP
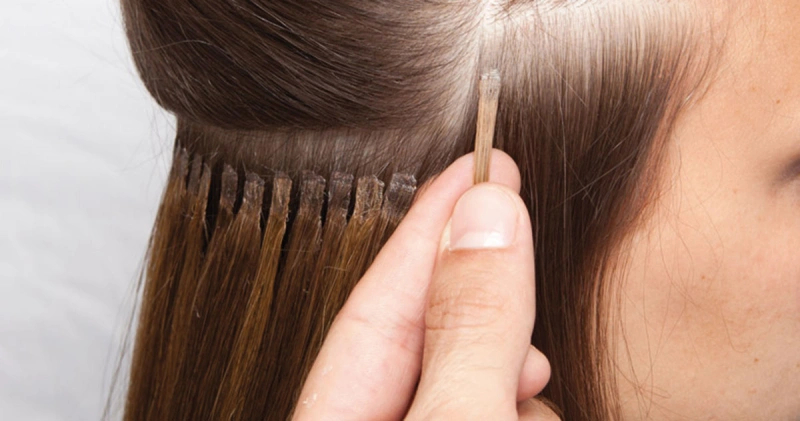
Step 1: Cleanse and dry the natural hair
Wash the hair thoroughly with an extension-preparation or clarifying shampoo. Remove oil, dry shampoo, silicone buildup, styling residue, and heavy conditioning products from the root area. Repeat the cleanse when needed, especially around the crown and nape.
Do not apply conditioner where the bonds will sit. If the ends need moisture, keep conditioner well below the planned attachment area and rinse completely.
Dry the hair fully. The root area must be clean, dry, and free of product. Detangle from ends to roots, then smooth the hair into its natural fall so you can read the density and growth pattern accurately.
Step 2: Create the perimeter and safe zones
Section out enough leave-out around the hairline, nape, temples, crown, and primary parting to conceal the bonds during normal styling. Ask the client to demonstrate a typical ponytail or updo before you finalize the perimeter.
Keep bonds away from areas where they may become visible, press against the scalp, or sit in fragile baby hair. The safe zone is not identical on every head. A client with a high ponytail, shallow crown density, or mobile parting will need more concealment space.
Clip the leave-out securely so it does not enter your working sections.
Step 3: Map the installation
Plan where you need length, where you need volume, and where the natural haircut needs support. Start with a placement map rather than adding strands until the pack is empty.
A brick-lay or staggered pattern works well for many installations because it prevents bonds from stacking directly above one another. However, you should adjust the pattern around growth changes, cowlicks, fragile areas, and the intended haircut.
At the nape, begin high enough that the bonds remain concealed when the client moves or ties the hair. Through the sides, preserve adequate density around the temples and hairline. In the crown, avoid placing bonds so high that they show through the top layer.
A placement diagram can help you keep the plan consistent, but use it as a guide rather than a fixed template. The client’s density, growth pattern, parting, and haircut should control the final layout.
Step 4: Take a clean working row
Release one horizontal working row at the lower back section. The parting should be clean enough that loose hairs cannot cross into neighboring bonds.
Place a scalp-protection shield behind the selected strand when your system or training method calls for one. Keep the remaining hair clipped away from the fusion area.
Work methodically across the row instead of taking random sections from a larger panel.
Step 5: Select the correct natural-hair section
Take a small, even section of natural hair that is appropriate for the size and weight of the extension bond. As a working rule, the natural section must be strong enough to support the extension without concentrating excessive load on a few hairs.
Remove cross hairs and flyaways before fusing; trapped hairs may pull as neighboring sections move. For fine hair, reduce extension weight instead of taking an oversized natural section, which can create a bulky, visible bond.
Step 6: Position the keratin tip in the hair’s natural fall
Place the pre-bonded tip underneath or around the selected natural strand according to your system. Leave enough clearance from the scalp for the bond to move freely and lie flat. For many systems, this is approximately 0.5 to 1 centimeter, but your training and supplier specification should take priority.
Check the direction before you apply heat. The extension should fall in the same direction as the natural hair. Avoid over-directing the strand toward your body or pulling it away from its normal growth angle. A bond can look neat while the client is sitting still and still cause tension when the hair returns to its natural position.
Step 7: Soften the bond with controlled heat
Close the fusion tool over the keratin tip for the time recommended by the extension supplier. Apply even pressure and keep the tool on the keratin—not on exposed natural hair.
Watch the bond rather than relying only on a timer. It should soften evenly without smoking, bubbling, discoloring, or becoming watery. A hard center may not seal; excessive spreading usually signals too much heat, time, or pressure. Work on one bond at a time so you can mold it before it cools.
Step 8: Mold a compact, smooth bond
Once the keratin is workable, remove the fusion tool and mold the bond with clean fingers or the molding method used in your certification. Roll or shape it into a narrow, smooth attachment that fully encloses the selected natural-hair section.
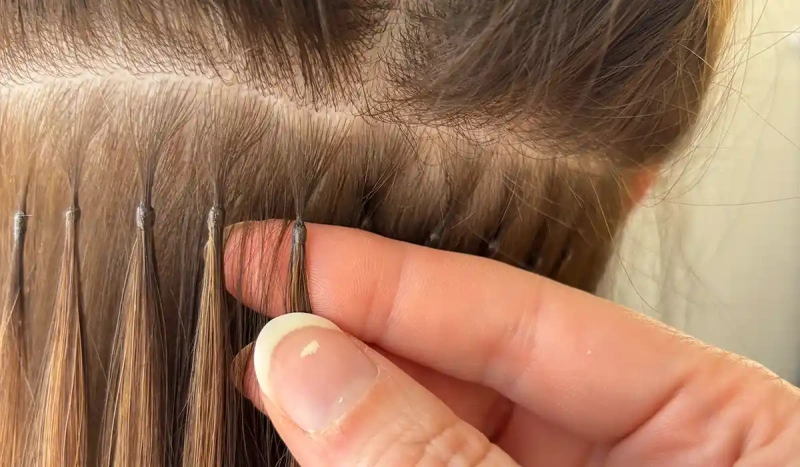
The finished bond should be compact, sealed, and comfortable, with no sharp edges, open seams, bulky wings, or loose keratin. Let it cool, then confirm that it moves naturally without touching the scalp.
Step 9: Continue in a staggered pattern
Repeat the process across the row, leaving enough space for brushing and independent movement. Stagger the next row instead of stacking bonds directly above one another. Keep checking symmetry, density, and concealment, and use smaller or lighter bonds as density decreases.
Step 10: Check every bond before blending
Before you cut the extensions, perform a bond-by-bond quality check. Use your fingers and tail comb to inspect the rows.
Confirm that:
- Each bond has enough scalp clearance to move comfortably
- No bond is fused to a neighboring bond
- No loose cross hairs are trapped
- The attachment follows the natural growth direction
- The bond is fully sealed and free of sharp edges
- Strand weight is appropriate for the natural section
- The rows remain concealed when the hair is lifted or parted
- Density looks balanced from left to right
Correct weak or uncomfortable bonds now. Do not hide a poor attachment inside the finished style.
Step 11: Blend the haircut
Release the perimeter and check the result dry and in natural movement before cutting. Blend the extensions into the haircut while preserving the fullness the client requested. Remove shelves or gaps, avoid aggressive thinning near the bonds, and check concealment from every angle and in a low ponytail.
Step 12: Record the service and complete the client handoff
Record the shades, lengths, texture, bond type, strand weight, strand count, placement notes, tool setting, and avoided areas. Explain what normal settling feels like and ask the client to return promptly for sharp pulling, persistent pain, sores, or a bond pressing against the scalp. Provide written aftercare.
Installation Quality-Control Standards
Use these checkpoints to make your application consistent across stylists and salon locations.
- Bond-to-hair ratio: Match extension weight to the strength of the natural section.
- Scalp clearance: Leave room for free movement and comfortable brushing.
- Direction and tension: Install in the natural fall, especially around cowlicks, the nape, and sides.
- Heat and working time: Use the bond system’s specified range; under-softened keratin may not seal, while overheating can spread or degrade it.
- Spacing and density: Leave room for movement and cleaning, then reassess density near the upper sides and crown.
Common Keratin Extension Application Mistakes
Using one placement map for every client
Use diagrams as guides, then adapt the rows to the client’s head shape, density, parting, and styling habits.
Applying extensions to oily or product-coated hair
Oil and silicone can reduce adhesion and contribute to slippage. Prepare the root area thoroughly and keep finishing products away from the bonds.
Choosing a generic heat setting
Use the setting specified for your tool and keratin formula. Copying another brand’s temperature can under-process or overheat the bond.
Making every bond the same size
Density changes across the head. Reduce bond size and strand weight in finer areas, and leave fragile sections unextended when necessary.
Placing bonds too close to the scalp
This restricts movement and can cause discomfort. Check clearance before the bond cools and again during your final inspection.
Trapping cross hairs
Loose hairs caught between sections create pulling and make clean maintenance difficult. Refine every section before applying heat.
Overloading the hairline and temples
The most visible areas are often the most delicate. Preserve enough leave-out and avoid chasing maximum density into weak perimeter hair.
Skipping the final bond check
A beautiful blowout can hide an uneven row for the photograph, but it cannot correct a sharp, fused, or overloaded bond. Inspect the attachments before you blend.
Keratin Extensions on Fine, Short, or Textured Hair
Fine hair
For healthy fine hair, use lighter strands, smaller bonds, wider spacing, and fewer attachments in delicate zones. Prioritize weight distribution over maximum volume.
For a deeper discussion, link readers to Do Keratin Hair Extensions Damage Your Hair?.
Short hair
Short hair requires careful distribution and advanced blending. You need enough natural length to conceal the attachments and soften the transition. See Keratin Hair Extensions on Short Hair for a dedicated guide.
Curly and textured hair
Match the curl pattern in its normal worn state and plan for shrinkage, expansion, and the client’s routine. Check the final haircut in the texture the client normally wears.
Aftercare Handoff: Keep It Brief but Specific
Keep the handoff specific, then direct the client to your detailed maintenance resources.
Tell the client to:
- Follow the waiting period specified for the exact bond system before the first wash
- Keep conditioner, oil, masks, and high-slip products away from the attachment area
- Brush the roots and bonds with an extension-safe method without dragging through the attachments
- Dry the root and bond area thoroughly after washing
- Avoid direct heat on the keratin bonds
- Sleep with dry, gently secured hair
- Return promptly if several bonds slip, matting develops, or the scalp feels persistently sore
- Schedule professional maintenance and removal based on hair growth and the system used
For step-by-step aftercare advice beyond installation, refer to the following guides:
- How to Wash Keratin Hair Extensions
- How to Brush Keratin Hair Extensions
- How to Blow-Dry Keratin Hair Extensions
- How Long Do Keratin Hair Extensions Last?
- Why Are My Keratin Hair Extensions Falling Out?
FAQ About Applying Keratin Hair Extensions
Can you apply keratin hair extensions yourself?
Hot-fusion keratin extensions are not a DIY service. Accurate sectioning, weight control, heat management, placement, and blending are difficult on your own head, and mistakes may cause slippage, matting, discomfort, or stress on natural hair.
How close should keratin bonds be to the scalp?
Leave enough space for the bond to move freely without pressing into the scalp. Many systems use roughly 0.5 to 1 centimeter of clearance, but you should follow your certification method and the instructions for the bond system you are applying.
What temperature should you use for keratin extensions?
There is no responsible universal temperature for every keratin bond. Different formulas and fusion tools behave differently. Use the range specified by the extension or tool manufacturer, test the bond before the service, and apply only enough heat to soften it evenly for molding.
How do you know whether a keratin bond is applied correctly?
A correct bond is compact, sealed, smooth, and comfortable. It follows the natural growth direction, moves without pulling, remains separate from neighboring bonds, and has no trapped cross hairs or sharp edges.
How many keratin extensions do you need for a full head?
You should calculate quantity after assessing density, head size, haircut, target length, desired volume, and the weight of each extension strand. A fixed strand count is not suitable for every client. Record the number used so you can refine the plan at the next appointment.
Can keratin extensions be applied to fine hair?
Yes, when the hair and scalp are healthy and the service is adapted correctly. Use lighter strands, smaller bonds, wider spacing, and a conservative total weight. Avoid fragile or actively thinning areas.
How long does a keratin extension application take?
Service time depends on strand count, placement complexity, density, cutting, and styling. Allow enough time for consultation, clean sectioning, bond checks, and client education.
When should the client wash the hair after installation?
Follow the setting period specified by the bond supplier. Do not publish conflicting universal advice. Give the client the exact waiting time for the system you used, then document it on the aftercare sheet.
Final Checklist for Stylists
Before the client leaves, confirm that you have:
- Assessed hair and scalp suitability
- Matched color, texture, length, and strand weight
- Used the bond system’s specified heat and working time
- Preserved appropriate perimeter and parting concealment
- Installed each bond in the natural growth direction
- Checked scalp clearance and client comfort
- Removed cross hairs and separated every attachment
- Balanced density across the head
- Blended the finished haircut in movement
- Recorded the service details and supplied written aftercare
Treating the service as a controlled SOP makes your work safer, easier to reproduce, and easier to teach. Hair quality matters, but the final result also depends on your consultation, placement decisions, bond consistency, and client handoff.
Alpha Hair has manufactured full-cuticle Remy hair extensions since 1990 and supports brands, salons, retailers, and wholesalers with OEM and ODM development. To compare professional keratin and fusion formats for your product line or salon, explore Alpha Hair’s fusion hair extensions or request specifications for a custom program.



