

To blend clip-in hair extensions, match the color, texture, and density first; place each weft where your natural hair can cover it; hide or soften any blunt natural ends; then cut and style both layers together. The goal is not simply to hide the clips. You also need to remove the visible line between your own hair and the added length.
You can follow the same seven-step system each time you wear your set. Once you find the right placement, take a quick photo or number the wefts so the result is easy to repeat.
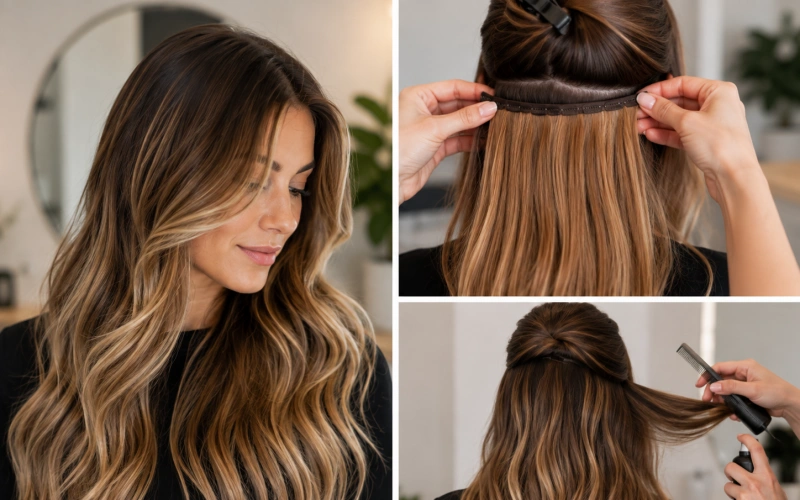
Key Takeaways
- Match your extensions to the mid-lengths and ends of your hair in natural light.
- Distribute wefts around the head instead of placing all the density at the back.
- Keep clips below the safe coverage zone and away from the visible hairline.
- Connect blunt natural ends with strategic placement, layers, or a gentle tuck.
- Style mixed sections of natural and extension hair together for one finish.
Why Clip-In Extensions Do Not Blend?
When clip-ins look obvious, the problem normally falls into one of five groups: the shade is wrong, the texture is different, the set is too light or too heavy for your density, the rows are in the wrong places, or the natural haircut creates a hard shelf. Look at your hair from the front, both sides, and the back before deciding what to change.
| Visible problem | What it usually means |
| Natural ends sit on top of the extensions | The haircut is blunt, the length jump is large, or the lower density is too low |
| Clips or weft bases show | The row is too high, too close to the hairline, or under too little cover hair |
| Back looks full but sides look thin | Wide wefts are concentrated at the back and side pieces are missing or misplaced |
| Hair separates into two textures | The curl, wave, or straight finish does not match |
| Color changes in a hard block | The shade was matched to the roots rather than the mids and ends |
Before You Start: Choose a Set That Can Blend
Match Color and Undertone
Hold the hair beside your mid-lengths and ends in indirect daylight. Compare warmth, coolness, depth, highlights, and surface shine. If your color is dimensional, alternating two neighboring shades can create a softer result. For a full shade workflow, use our hair color matching guide.
Match Texture
A close starting texture is easier to blend and needs less heat. Straight, wavy, curly, and coily hair should not be treated as interchangeable. If the pattern is close but not exact, style natural hair and extension hair together in small mixed sections.
Match Density and Length
Fine hair needs a flat, discreet base and enough cover hair above every clip. Thick or blunt hair needs more density through the mid-lengths and ends so the natural hair does not sit on top like a separate cap. A dramatic increase in length usually needs more connecting layers than a modest change.
Do not guess by total weight alone: Set design matters. A flexible mix of wide back wefts and smaller side pieces is easier to distribute than one bulky strip. Consistent density, slim weft construction, controlled return hair, and a natural surface finish all improve the final blend.
Tools You Need
- Tail comb for clean horizontal sections
- Sectioning clips
- Soft extension-safe brush or wide-tooth comb
- Light texturizing spray or dry shampoo for root grip
- Heat protectant and your preferred styling tool
- Two mirrors or a phone camera to check the back
- Professional shears if a trained stylist will customize the cut
Step 1: Match Color, Texture, and Density
Lay the full set out before installation. Group the widest pieces for the back and the narrow pieces for the sides. Check that the color disappears against the middle and ends of your hair. Compare the natural thickness at the ends with the extension density you plan to add. If the lower half will look much thinner or much fuller than the upper half, change the distribution before clipping anything in.
Step 2: Section Your Natural Hair
Brush out tangles and create a clean horizontal part in the lower back of the head. Clip the rest away. Add only enough texture at the root to stop slipping; aggressive backcombing is not necessary. If you need a basic installation refresher, see how to put in clip-in hair extensions. This guide focuses on placement decisions that affect the blend.
Step 3: Place Each Weft Correctly
Start with a narrower weft in the lower back, then use wider pieces through the middle where the head is broadest. Keep every base flat against the head. Stop before the crown becomes too exposed, and leave enough loose hair above the highest row to cover the clips when you move.
| Zone | Typical piece | Blending job | Check before moving on |
| Lower back / nape | Narrow or medium weft | Build the foundation without creating bulk | Natural ends do not hang alone below the row |
| Mid-back | Wider wefts | Create most of the length and rear density | Rows lie flat and follow head shape |
| Upper back | Medium or wide weft | Connect natural layers to the lower length | Enough crown hair remains for coverage |
| Sides | One- or two-clip pieces | Fill the gap around the face and temples | Pieces sit behind the hairline and do not pull |
Original visual asset: Create an Alpha placement map showing lower-back, mid-back, upper-back, and diagonal side zones. Photograph the same head before placement, after placement, before cutting, and after styling. These images add evidence that competing text-only guides cannot replicate.
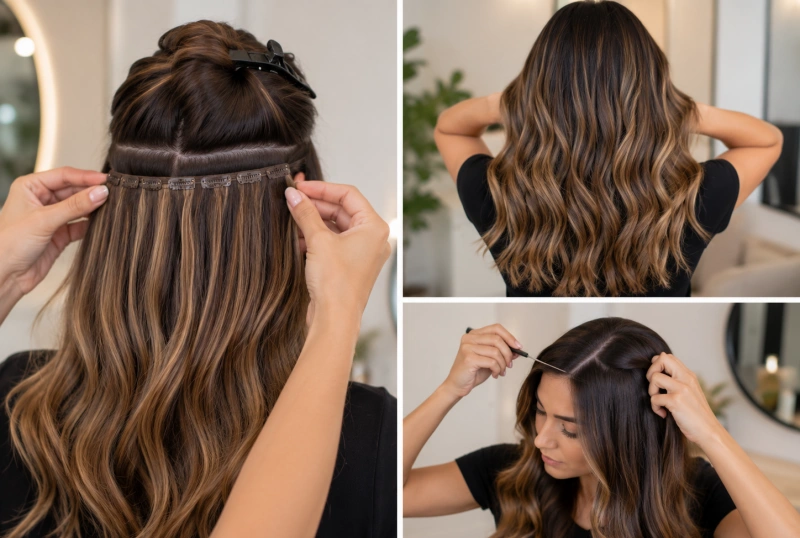
Step 4: Hide Natural Hair Ends
If the lowest natural layers show through, separate only the amount that creates the visible line. You can gently braid, twist, or pin that small lower section flat, then place the first weft above it. Do not hide so much hair that the remaining top layer becomes too thin to cover the clips. For bobs and very blunt cuts, use the dedicated short-hair guide instead of forcing a generic tuck to solve every problem.
Step 5: Blend the Side Pieces
The back often looks full first, while the front still reveals the length change. Use smaller pieces behind the temple area, far enough from the hairline to stay hidden. A slightly diagonal placement can follow the natural fall and create a high-to-low frame. Check both profiles: the side density should connect the face-framing layers to the longer hair without creating a bulky patch.
Step 6: Cut and Layer the Extensions
Clip in the set exactly where you plan to wear it, then assess the overall outline. Soft connection layers, point cutting, and face framing can remove the shelf between natural hair and extensions. Cut a small amount at a time and preserve fullness through the ends. For the complete cutting process, follow how to cut clip-in hair extensions. A stylist trained in extensions is the safest choice for a major transformation.
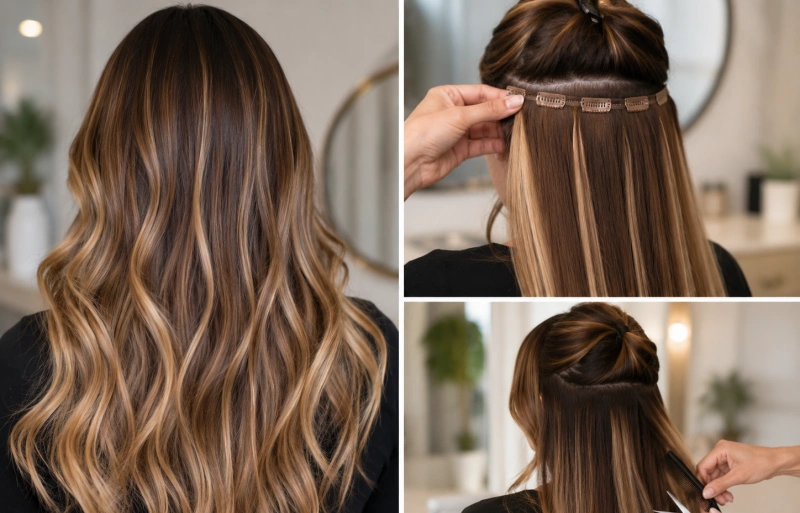
Step 7: Curl or Straighten Hair Together
Apply heat protectant and take sections that contain both natural hair and extension hair. Curling or waving mixed sections blurs the transition and creates shared movement. For a straight finish, smooth the two layers together without pressing over the clips. Let the hair cool, then loosen it with your fingers or a soft brush so the finished shape falls naturally.
Final 360-Degree Blend Check
- Move your head and check that no clip appears near the part, crown, or hairline.
- Look for a horizontal shelf where the natural hair ends.
- Compare left and right side volume.
- Separate the hair gently and confirm each weft lies flat.
- Take a photo in daylight to catch color or shine differences that mirrors can hide.
If clips slip even when the blend looks good, troubleshoot the base with our guide on how to secure clip-in hair extensions.
Troubleshooting Clip-In Blending Problems
| Problem | Cause | Fix |
| Shelf effect | Blunt natural ends or not enough connection | Adjust placement; add soft layers; reassess density and finished length |
| Visible clips | Row too high or cover section too thin | Move the row lower; leave more hair above it; use a flatter piece |
| Thin, separated ends | Set density is too low or concentrated in the wrong zone | Redistribute pieces; shorten the final length; add appropriate density |
| Bulky back | Too many wide wefts stacked in one area | Spread rows; reduce stacking; use smaller pieces where needed |
| Empty sides | No side pieces or placement is too far back | Add narrow pieces behind the hairline and balance both profiles |
| Texture line | Natural hair and extensions styled separately | Restyle in mixed sections; match the starting texture more closely |
| Color line | Root match, wrong undertone, or flat single shade | Match mids/ends; tone professionally; combine close shades |
Fine Hair vs Thick Hair
For Fine Hair
Prioritize flat weft bases, lighter distribution, and a generous cover section. Keep pieces away from sparse temples and the visible part. Tease only where needed for grip, and do not solve low density by stacking bulky pieces in one row.
For Thick or Blunt Hair
Prioritize enough extension density through the middle and sides. Spread the set so the lower half does not look narrow beneath a full natural haircut. Thick hair may need more connection cutting, but removing too much natural density can create new short pieces and make future blending harder.
Have Short Hair or a Bob?
Short, blunt hair needs a different plan because the natural ends remain visible and the cover zone is smaller. You may need to tuck the lowest section, keep the first row above that tucked base, build more side density, and customize the finished length. Read how to blend clip-in extensions with short hair for the bob-, lob-, and blunt-end process.
Care Without Losing the Blend
Brush the set before and after wear, remove it before sleeping, and store it fully dry. Wash only when needed and keep heavy product away from the clip base. Use the separate guides for clip-in care, washing clip-ins, and storing clip-in extensions.
FAQ
How do I make clip-in extensions look natural?
Match the color, texture, and density; keep wefts inside a safe coverage zone; distribute pieces around the head; connect the haircut with soft layers; and style mixed sections together.
Where should the highest clip-in row sit?
There is no single height for every head. Stop where you still have enough crown hair to cover the entire weft during movement. If the base appears near your part, move it lower.
Can I blend clip-ins without cutting them?
Sometimes, especially when your natural hair is already long and layered. A short or blunt cut usually needs at least light connection cutting or a closer finished length.
Should I straighten or curl first?
Match the starting textures before installation, then do the final styling after the set is clipped in. Work with mixed sections of natural and extension hair for the most unified finish.
Can I stack clip-in wefts?
You can stack compatible pieces to increase density while using fewer attachment rows, but too much weight in one place can feel bulky or pull on the natural hair. Spread density whenever coverage allows.
Conclusion
The best clip-in blend is repeatable. Match the set, map the rows, hide only the natural ends that cause a line, balance the sides, customize the cut, and style everything together. Save your placement with photos or numbered wefts, and your next installation will be faster and more consistent.



