

If you want to master HD lace wig installation, you need to follow a few key steps to get that flawless, professional look. You start by customizing your wig and plucking the hairline. Next, you remove ear tags, prepare your skin and the wig, then apply adhesive.
After that, secure and seal the wig, style your baby’s hair, and finish with final touches. Good preparation, careful customization, and knowing how to fix small issues will help you create a style that looks natural and lasts all day.
Key Takeaways
Start with clean hair and scalp for a secure wig installation. This ensures the adhesive sticks well and keeps your wig in place all day.
Customize your HD lace wig by tinting the lace to match your skin tone and plucking the hairline for a natural look. These steps enhance the wig’s realism.
Use high-quality adhesive and apply it in thin layers. This technique provides a stronger hold and prevents messy buildup during installation.
Secure your wig with an elastic band after placement. This step helps the lace blend seamlessly into your skin for a flawless finish.
Regularly maintain your wig by washing it gently and storing it properly. This keeps your HD lace wig looking fresh and extends its lifespan.
HD Lace Wigs Overview
Features of HD Lace Wigs
When you want your hair to look as real as possible, you should check out an HD lace wig. These wigs use ultra-thin, high-definition lace that blends right into your scalp. The lace is so fine that it almost disappears, giving you a natural hairline and a flawless appearance.
You can wear an HD lace wig and feel confident that no one will spot the lace, even up close.
Here’s a quick look at how HD lace wigs compare to other types:
Feature | HD Lace | Transparent Lace |
|---|---|---|
Material | Ultra-thin, high-definition lace | Transparent lace |
Blendability | Seamlessly blends with all skin tones | Blends well with light to medium skin tones |
Visibility | Nearly invisible, most natural look | Slightly visible on darker skin tones |
Durability | Delicate, needs extra care | Moderate, needs careful handling |
The fine mesh structure of an HD lace wig has tiny holes, which means better ventilation and a more natural density along the hairline. You get a wig that feels light and lets your scalp breathe. The lace mimics your real scalp, so the hair looks like it’s growing right from your head.
Tip: If you want the most natural look, always go for an HD lace wig with human hair. This combo gives you a soft feel and a realistic appearance.
Why Choose HD Lace Wigs?
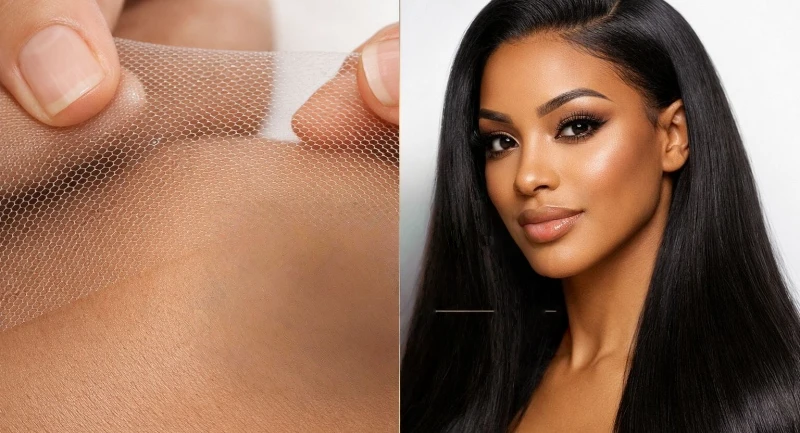
You might wonder why so many people love HD lace wigs. The answer is simple: they give you the most natural appearance possible. The lace is almost invisible, so your wig looks like your own hair. You can style it any way you want, and the hairline stays undetectable.
Here are some reasons you’ll want to pick an HD lace wig:
The lace blends with every skin tone, so you never worry about mismatched edges.
You get a natural hairline that boosts your confidence.
The wig feels comfortable, even if you wear it all day.
Better breathability means your scalp stays cool.
The natural appearance makes it perfect for daily wear or special events.
When you choose HD lace wigs, you invest in a look that’s both beautiful and believable. You get the freedom to style your hair, enjoy a natural finish, and trust that your appearance will always look on point.
Wig Types: Closure vs Frontal
HD Closure Wig Basics
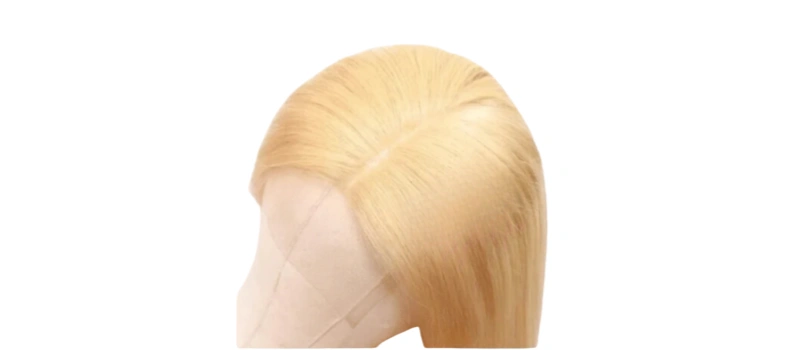
If you want a wig that’s easy to install and maintain, you might like an HD closure wig. This type of wig has a small lace piece, usually placed at the center or side of your head. The lace covers only a small area, so you get a natural part without much fuss.
You can part your hair in the middle or slightly to the side, but you won’t have as many styling options as with a frontal.
Here’s a quick look at how closure and frontal wigs differ in installation:
Wig Type | Installation Technique |
|---|---|
Closure | Small lace piece around the middle or side |
Frontal | Large lace piece that runs across the wig from edge to edge |
Closure wigs work well if you want a simple, everyday style. You’ll spend less time on maintenance, and the installation feels straightforward.
HD Lace Frontal Wig Basics
If you love to switch up your look, you’ll want to check out HD lace frontal wigs. These wigs have a large lace piece that stretches from ear to ear. This design lets you part your hair anywhere along the front, so you can try different styles like ponytails, updos, or deep side parts.
Frontal wigs give you the most freedom to style your hair. You can pull your hair back without worrying about visible wefts. The installation takes a bit more time, but the results look super natural and versatile.
Choosing the Right Wig Type

Not sure which wig to pick? Think about your lifestyle and how you like to style your hair. Here’s a table to help you compare:
Feature | Closure Wigs | Frontal Wigs |
|---|---|---|
Lace Area | Smaller | Larger |
Styling Options | Middle or side part | Any part, updos, ponytails |
Versatility | Less versatile | Highly versatile |
Maintenance | Easier | More time-consuming |
Frontal wigs let you try high ponytails, sleek buns, and creative parts.
If you change your hairstyle often, a frontal wig gives you more options.
Closure wigs keep things simple and easy to manage.
Tip: If you want a quick, low-maintenance style, go for a closure wig. If you love experimenting with new looks, a frontal wig is your best friend!
Materials Needed
Essential Tools for Installation
Before you start installing your HD lace front wig, you need to gather the right tools. Having everything ready makes the process smoother and helps you get that flawless finish. Here’s what you’ll want to have on hand:
Wig glue
Makeup wipes
Elastic band
Rat-tail comb
Edge control product
You might wonder why these tools matter so much. The answer is simple. Each one plays a big role in how your wig looks and how long it stays in place. For example, cleaning your hairline with makeup wipes removes oils and residue. This step helps the adhesive stick better and keeps your wig secure all day.
If you skip this, your wig might lift or shift before you want it to.
Choosing a high-quality adhesive designed for lace front wigs makes a huge difference. It gives you a stronger bond, so your wig lasts longer and looks more natural. You don’t want your lace lifting at the edges or your hairline looking obvious. A good adhesive helps you avoid those problems.
A well-fitted wig cap is another must-have. It creates a smooth base for your wig. This prevents bumps and keeps your style looking sleek. The elastic band helps melt the lace into your skin, making the hairline look even more real. The rat-tail comb lets you part and style your wig with precision.
Edge control products help you lay down your baby hairs for a polished finish.
Here’s one of the best tips: Always use clean tools and products made for wigs. This keeps your HD lace wig looking fresh and helps it last longer.
When you use the right tools, you make the whole installation process easier and get results that look professional every time.
Preparing Hair and Scalp
Cleaning and Braiding
Getting your hair and scalp ready is the first step to a flawless HD lace wig install. If you skip this part, your wig might not stay in place or feel comfortable. Here’s a simple routine you can follow to prepare your natural hair:
Wash your hair so it’s clean and free of oils.
Moisturize your scalp, but don’t overdo it—just enough to keep it healthy.
Braid your hair to keep it flat and manageable under the wig.
If your hair is short, you can tie it up in a bun or do small braids.
When you braid or pin your hair down, you create a smooth surface for the wig. This helps prevent bumps and makes the lace lie flat. You’ll also notice that a clean, dry scalp helps the adhesive stick better, so your wig stays put all day.
Here’s a quick look at why scalp prep matters:
Step | Description |
|---|---|
1 | Begin with a clean, dry scalp to ensure optimal adhesion. |
2 | Wash and condition your hair, then allow it to dry completely. |
3 | For best results, braid or pin down your natural hair tightly against your head. |
4 | This creates a smooth foundation and prevents bumps under the wig. |
Tip: Take your time with this step. A little extra effort now means your wig will look and feel better later!
Wig Cap Tips
Once your hair is flat, you’re ready for the wig cap. The wig cap acts as a barrier between your hair and the wig, keeping everything in place. Make sure you choose a cap that matches your skin tone for the most natural look. Pull the cap over your head and tuck in any stray hairs. Smooth it out so there are no wrinkles or lumps.
To secure the wig cap, use a little gel or spray along your hairline if needed. This keeps the cap from sliding back during the day. When you take these steps, you set yourself up for a seamless install and a comfortable fit.
Note: If you want your wig to look extra natural, try using a thin, breathable cap. It feels lighter and helps your scalp stay cool.
HD Lace Wig Customization
You want your HD lace wig to look as real as possible. Customization is the secret to a natural-looking hairline and a flawless finish. Let’s walk through the steps to customize your wig for the best results.
Lace Tinting
Lace tinting helps your wig blend with your skin tone. You can use lace tint spray, foundation, or powder to match the lace to your scalp. HD lace adapts to all skin tones, so you only need minimal customization. If you have a transparent lace wig, you might need extra tint or makeup for darker skin tones.
Lace tinting enhances the blending of wigs with various skin tones.
Transparent lace wigs often need additional customization for darker skin tones.
HD lace adapts to all skin tones with minimal customization, making it versatile.
Transparent lace requires lace tint or makeup for a perfect match with darker skin tones.
HD lace provides a superior melting capacity for convincing hairlines across different skin colors.
Tip: Always check your lace in natural light before you finish. This helps you see if the color matches your skin.
Hairline Plucking
You want to customize the hairline for a natural look. Plucking the hairline removes extra density and creates a softer, more realistic edge. Use tweezers and work slowly. Don’t overpluck. You can customize the hairline by thinning out the front and spacing the hairs unevenly.
This gives you a natural-looking hairline that mimics real hair growth.
Key techniques for customizing HD lace wigs include using makeup to blend the lace with your skin tone, plucking the hairline for a more natural appearance, bleaching the knots to reduce visibility, and applying tint spray to achieve a scalp-like finish.
Cutting Lace and Ear Tabs
Cutting the lace is a big step. Trim the lace close to the hairline, but leave a tiny bit for blending. Cut around the ears to create ear tabs. This helps the wig fit snugly and keeps the hairline looking natural. Use small scissors and take your time. If you rush, you might cut too much and ruin the look.
Baby Hair Styling
Baby hairs make your wig look even more real. You can customize your wig by creating baby hairs along the hairline. Use a rat-tail comb to section out small pieces. Trim them short.
Style the baby hairs with edge control or gel. Lay them flat or swoop them for a soft finish. Baby hairs hide the lace edge and help you achieve a natural-looking hairline.
If you want your wig to look professional, always style your baby hairs. This step adds realism and gives your hairline a polished touch.
When you customize your wig, you get a style that fits you perfectly. You can match the lace to your skin, customize the hairline, cut the lace for a snug fit, and style baby hairs for a flawless finish.
How to Install an HD Lace Wig: Step-by-Step Guide
Ready to transform your look? This step-by-step guide will walk you through HD lace wig installation so you can achieve a flawless, salon-quality finish at home. Let’s break down each part of the process so you feel confident every time you install your wig.
Skin Preparation
You want your HD lace wig installation to last all day, so start with a clean base. Wash your face and focus on your forehead and hairline. Use makeup wipes to remove any oil, sweat, or leftover product. This step helps the adhesive stick better and keeps your skin healthy under the wig.
Next, grab an alcohol-based scalp protector. Dab it along your hairline. This creates a barrier that prevents irritation and helps the glue hold strong. If you have sensitive skin, don’t skip this part. Let the protector dry before you move on.
Tip: If you want to avoid lifting or itching, always prep your skin before installing an HD lace wig.
Adhesive Application
Now it’s time to apply the adhesive. You can use wig glue or gel, depending on your preference. Squeeze a small amount onto a makeup brush or your fingertip. Spread a thin layer along your hairline where the lace will sit.
Wait for the first layer to dry completely before adding another. Two or three thin layers work best for a secure hold.
Patience pays off here. Let each layer dry completely. This step keeps your hd lace wig installation neat and prevents messy buildup. If you rush, the glue might not hold, and your wig could shift during the day.
Note: Thin layers dry faster and give you a stronger bond. Don’t pile on too much at once.
Wig Placement and Adjustment
Once the adhesive is tacky, position the wig on your head. Line up the lace with your natural hairline. Use your fingers or a rat-tail comb to gently press the lace into the glue. Start at the center of your forehead and work your way out to the sides. This helps you avoid wrinkles or bubbles.
If you need to adjust, lift the lace gently and reposition the wig. Take your time. A perfect fit makes your HD lace wig installation look seamless. Use hair clips to hold the wig in place while you work on the sides and ear tabs.
Try this: Mark where you want the wig to sit with a little foundation or eyebrow pencil before you start. This trick helps you position the wig exactly where you want it.
Securing the Wig
You want your wig to stay put all day, so let’s lock it in. After you position the wig, wrap an elastic band around your hairline. Leave it on for about 10 minutes. This step melts the lace into your skin and gives you that “scalp” effect everyone loves.
While the band sets the lace, you can use a blow dryer on a cool setting to speed up the drying process. Once the time is up, remove the band and check your hairline. If you see any extra lace, trim it carefully with small scissors or an eyebrow razor.
Finish your HD lace wig installation by styling your baby hairs and blending the edges with a little foundation or powder. This last touch hides any visible lace and makes your wig look like it’s growing right from your scalp.
Pro Tip: Don’t skip the elastic band step. It’s the secret to a flawless, professional finish that lasts all day.
By following these steps, you’ll master installing an HD lace wig and enjoy a secure, natural look every time. Practice makes perfect, so don’t worry if it takes a few tries to get it just right. With this step-by-step guide, you’ll feel like a pro in no time!
Styling Tips for a Natural Look
Makeup Blending
You want your HD lace wig to have a natural appearance. Makeup blending helps you achieve this effect. Start by applying a small amount of foundation or powder along your hairline.
Choose a shade that matches your skin. Use a soft brush or sponge to dab and blend the makeup into the lace. This step hides any visible edges and makes the lace melt into your skin.
If you notice the lace looks lighter or darker than your scalp, adjust the makeup until it seamlessly blends. You can also use a concealer stick for touch-ups. Try to keep the product light so your wig stays fresh.
When you blend and style your hairline, you create a smooth transition from the wig to your skin. This trick boosts your confidence and helps your wig look like your own hair.
Tip: Always check your hairline in natural light. You can spot areas that need more blending and fix them before heading out.
Final Styling
Now you get to have fun with your wig. You can style baby hairs along the front for a soft finish. Use edge control or gel to shape them. This step adds realism and covers any lace edges. If you want a natural appearance, keep the baby hairs light and wispy.
You can use heat styling tools to change the texture. For human hair wigs, grab a flat iron and straighten small sections for a sleek style. If you prefer curls or waves, try a curling wand or flexi-rods.
For synthetic wigs, stick to low heat settings to protect the fibers. Updos and accessories let you switch up your look while keeping the lace intact.
Here are some ways to style your HD lace wig for a natural look:
Use low heat for synthetic wigs and regular heat tools for human hair wigs.
Create curls or waves with curling wands or flexi-rods.
Straighten small sections with a flat iron and heat protectant.
Try updos and add accessories for variety.
When you style your wig, you make sure it seamlessly blends with your features. You can change your style every day and still enjoy a natural appearance.
Troubleshooting Common Issues
Fixing Visible Lace
You might notice the lace showing after you install your wig. This can ruin your natural look, but you can fix it with a few easy steps. Start by cleaning your skin with an alcohol wipe. This removes oils and helps the glue stick better. Apply thin layers of lace adhesive. Let each layer get tacky before you press the lace down.
You can use a lace melting spray or gel. Press the lace with a satin scarf for about 10–20 minutes. Secure the wig with an elastic melt band until everything sets.
If you see gaps or rough edges, try sewing or gluing a lace patch to extend the edge. Add a wig band or elastic inside the cap for a snug fit. Re-blend the hairline with baby hairs to cover imperfections.
Always use thin layers of glue or adhesive spray for the strongest hold. Avoid using too much product. This keeps your application clean and prevents buildup.
Preventing Lifting Edges
Lifting edges can make your wig look obvious. You want your wig to stay flat and secure. Make sure your skin is dry before you apply the lace wig. Wipe your skin with alcohol to remove oil. If you sweat a lot, pick a water-resistant glue. This helps your wig stay in place even on busy days.
Managing Tangling and Frizz
Tangling and frizz can make your wig look messy. You can manage these issues and keep your wig looking professional. Wash your wig every 7–8 uses. Use a sulfate-free and residue-free shampoo. This prevents dryness and frizz. Be gentle when you wash.
Avoid scrubbing and use a wide-tooth comb to detangle. Start combing from the ends and work your way up. This stops breakage and keeps your wig smooth.
You can handle fixing common problems with these simple tricks. Your HD lace wig will look fresh and natural every day.
Maintenance and Restyling
Safe Removal
Taking off your HD lace wig the right way keeps both your natural hair and the lace in great shape. You want to avoid pulling or rushing this step. Start by using a glue remover. Dab it gently around your hairline and let it sit for a few minutes. The remover will break down the adhesive, so you can lift the lace without any tugging.
If you prefer a natural option, try massaging a little natural oil, like coconut or olive oil, into your hairline. This helps loosen the glue and makes the wig slide off easily.
Here’s a simple removal routine:
Apply glue remover or natural oil along the lace edge.
Wait until the adhesive softens.
Gently lift the lace, starting at the corners.
Take your time—never force the wig off.
Rushing this process can damage the lace or your own hair. Patience pays off with a longer-lasting wig and a healthy scalp.
Restyling and Reinstallation
Once you remove your wig, you can get it ready for your next look. Start by brushing out any tangles with a wide-tooth comb. Wash the wig with cool water and a gentle shampoo. Avoid alcohol-based sprays or heavy oils, since these can build up on the lace and knots.
Let your wig air dry on a mannequin head or padded stand. This keeps its shape and prevents tangling.
For the best results, follow these tips:
Store your wig on a mannequin head or padded stand.
Use lace protectors or adhesives made for wigs.
Clean your wig regularly and use cool water.
Schedule professional maintenance for deep cleaning and repairs.
Investing in professional maintenance not only keeps your wig looking fresh but also teaches you how to care for it at home.
When you follow these steps, you keep your HD lace wig looking flawless and ready for any style you want to try next.
Conclusion
You can install an HD lace wig like a pro by following these steps: prepare your hair and skin, customize your wig, apply adhesive, secure the lace, and style for a natural finish. Practice makes perfect, so don’t stress if you need a few tries. Use this guide every time you want a flawless look.
Remember: Mastering these techniques boosts your confidence and helps you create styles that look and feel amazing!
FAQ
How long does an HD lace wig install last?
You can expect your HD lace wig install to last about one to two weeks with proper care. If you use a strong adhesive and avoid moisture, your wig stays secure longer.
Can I sleep with my HD lace wig on?
Yes, you can sleep with your wig on. Use a silk or satin scarf to protect the lace and hair. This keeps your wig looking fresh and prevents tangling.
What’s the best way to clean my HD lace wig?
Wash your wig with cool water and a sulfate-free shampoo. Gently detangle with a wide-tooth comb. Let your wig air dry on a mannequin head for the best results.
Do I need to bleach the knots on my HD lace wig?
You don’t always need to bleach the knots. Many HD lace wigs come pre-bleached. If you see dark knots, use a light bleach or tint spray for a more natural look.
Can I style my HD lace wig with heat tools?
You can use heat tools on human hair HD lace wigs. Keep the temperature low and use a heat protectant. For synthetic wigs, stick to cool settings to avoid damage.



