

Installing I-Tip Hair Extensions is a popular method for achieving long, voluminous, and natural-looking hair without heat or glue. These extensions are versatile, reusable, and gentle on natural hair. Whether for daily wear or special occasions, knowing the proper installation techniques ensures a seamless blend and professional finish every time.
I-Tip Hair Extensions allow for precise placement, giving full control over volume and length. They are applied using microbeads or small tubes, making them safe and damage-free. With the right tools, preparation, and technique, anyone can achieve salon-quality results at home or in a professional setting, enhancing both style and confidence effortlessly.
What are I Tip Hair Extensions?

I-Tip Hair Extensions are individual strands of hair attached to your natural hair using small, reusable beads or tubes, without the use of heat or glue. Each extension has a small tip, shaped like the letter “I,” that is threaded through a bead and clamped onto a section of your natural hair, creating a secure and natural-looking hold.
These extensions are highly versatile and gentle on natural hair, allowing for easy removal, repositioning, or reuse. They are ideal for adding length, volume, or highlights without damaging your hair. With proper installation and care, I-Tip extensions blend seamlessly, giving a polished, salon-quality finish suitable for everyday wear or special occasions.
How to Install I-Tip Hair Extensions
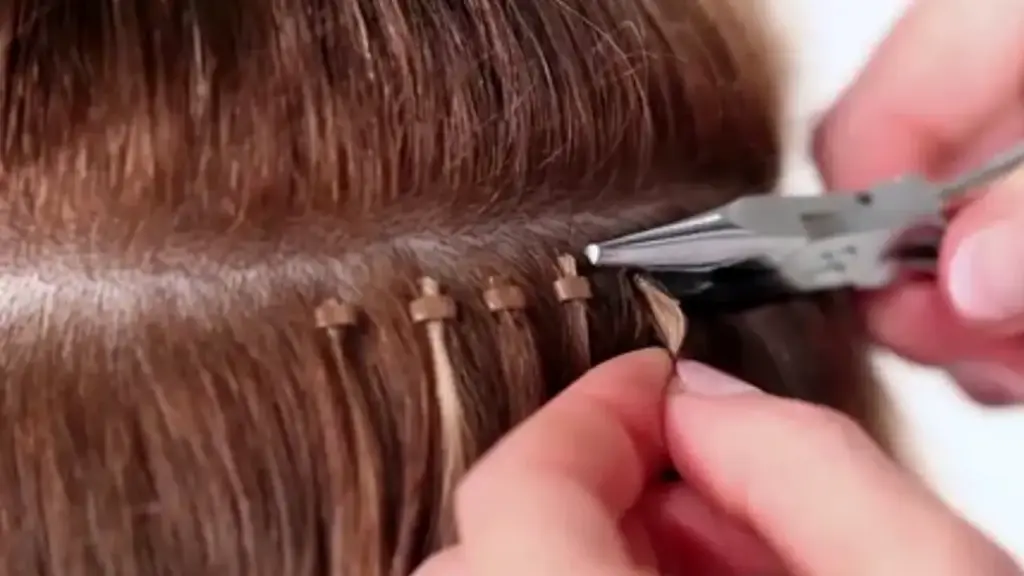
Installing I-Tip hair extensions is a popular method to achieve instant length, volume, and a natural look without heat or glue. These small, keratin-free extensions use tiny silicone-lined microbeads to attach individual strands to your natural hair. Proper installation is critical to ensure comfort, durability, and a seamless finish. Follow these detailed steps carefully to achieve professional results and long-lasting wear.
Tools Needed
- I-Tip hair extensions
- Silicone-lined microbeads
- Loop tool or threading tool
- Sectioning clips
- Fine-tooth comb
- Pliers for extensions
- Hair moisturizer or detangler
Step 1: Prepare Your Hair
Start with clean, dry hair free of oils or residue. Wash and condition your hair with a sulfate-free shampoo to maintain scalp health and remove build-up. Dry your hair completely, as wet hair can cause beads to slip and compromise the installation.
Use a fine-tooth comb to detangle your hair thoroughly, starting from the tips and moving upward. Section your hair into manageable rows using clips. Begin at the nape and work your way up. Well-prepared hair reduces tension on the scalp and ensures that each extension lays smoothly and securely.
Step 2: Section Hair Strategically
Divide your hair into small, even sections about the width of a pencil or slightly thinner. This ensures the microbeads can hold securely without weighing down your hair or causing discomfort. The more precise your sections, the more natural the final look.
Clip the upper layers of hair away and focus on one row at a time. Proper sectioning allows for even placement of extensions, prevents bulkiness, and ensures a uniform distribution of volume. It also makes blending extensions with natural hair effortless after installation.
Step 3: Thread the Microbead
Use a loop tool to thread a silicone-lined microbead onto a small strand of your natural hair. The bead should sit approximately 0.5–1 cm from the scalp, avoiding contact with the skin to prevent irritation. Accurate bead placement is essential for comfort and durability.
Hold the bead steady as you slide the hair through it. Twisted or uneven strands can compromise the bead’s grip, causing the extension to slip. Correct threading ensures that the I-tip remains firmly in place while allowing natural movement, minimizing tension on the hair shaft.
Step 4: Attach the I-Tip Extension
Take one I-tip strand and slide it carefully into the microbead, using the loop tool to guide it. Ensure the extension aligns with the natural hair direction to prevent tangling or an unnatural appearance. Proper alignment is crucial for a seamless finish.
Once in position, gently pull the extension down to sit snugly within the bead. The extension should feel secure without causing any pulling or discomfort on the scalp. Check for evenness among all extensions to maintain a balanced look across the head.
Step 5: Clamp the Bead Securely
Using specialized pliers, compress the microbead gently to secure the extension in place. The silicone lining grips the natural hair, holding the I-tip firmly while protecting hair from breakage. Proper clamping ensures that extensions stay intact for weeks.
Apply steady pressure without over-crushing the bead. Too much force can damage your natural hair or deform the bead, while insufficient pressure may cause slippage. Mastering the right pressure ensures longevity and protects hair health.
Step 6: Continue Installation Row by Row
Move systematically from the nape upward, repeating the threading and clamping process for each small section. Space extensions evenly to achieve a natural, voluminous look that blends seamlessly with your natural hair. Avoid clustering beads in one area to prevent bulkiness.
Check each row as you go, ensuring all extensions are securely clamped and properly aligned. Take breaks if needed to avoid fatigue and maintain precision. The more meticulous you are during this step, the more natural and durable the final result will be.
Step 7: Blend and Style Extensions
Once all I-tip extensions are installed, gently comb through your hair to blend extensions with your natural strands. Trim or layer extensions to match your natural hairstyle, creating a seamless, professional finish that looks natural from every angle.
Style carefully using heat tools if desired, always applying heat protectant. Extensions allow flexibility for curls, waves, or straightening, but excessive heat may weaken the beads over time. Proper styling ensures that the extensions move naturally and remain undetectable.
Step 8: Maintain and Care for Your Extensions
Wash and condition your hair with care, avoiding rough handling near the beads. Detangle gently using a soft-bristle brush, starting from the tips and working upward. Inspect beads regularly and re-clamp any that become loose.
Avoid sleeping with wet hair or tight hairstyles that strain the beads. Use sulfate-free products and deep-condition weekly to maintain hair health. Consistent care prolongs the life of I-tip extensions and keeps your natural hair strong and healthy.
How to Apply I Tip Hair Extensions With Heat?
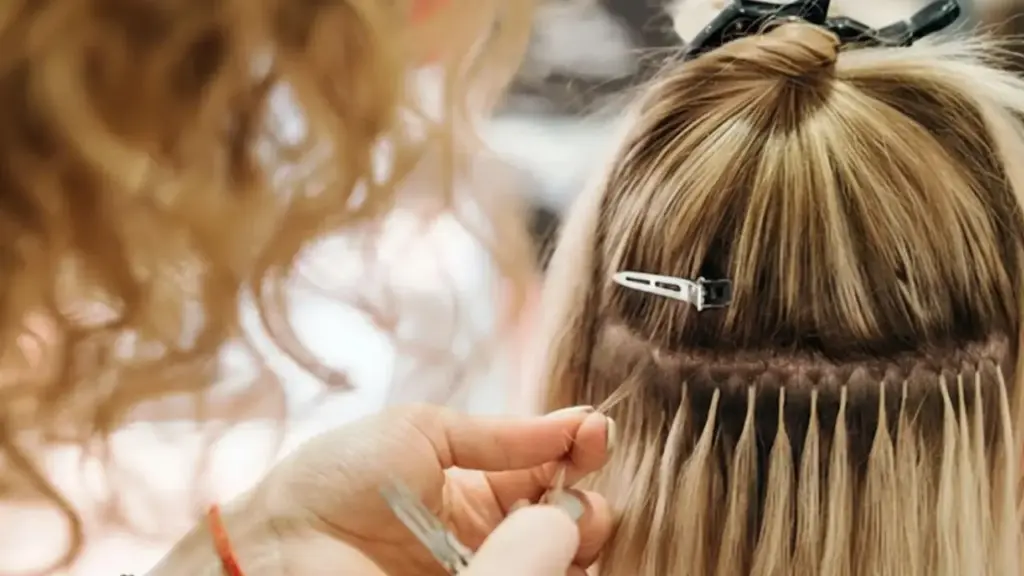
Applying I-Tip hair extensions with heat can create a secure, long-lasting bond while allowing for a seamless blend with natural hair. Proper technique, careful preparation, and the right tools are essential to ensure safety, prevent damage, and achieve professional-looking results.
Tools Needed
- I-Tip hair extensions with heat-activated tips
- Heat fusion or flat iron tool
- Sectioning clips
- Comb
- Heat protectant spray
- Pliers (optional for adjustments)
- Hair detangler
Step 1: Prepare Your Hair
Wash and condition hair thoroughly, then dry completely. Detangle your hair using a comb to ensure smooth strands. Apply heat protectant to prevent damage during the fusion process. Section hair horizontally, starting from the nape, to maintain organized and precise installation.
Divide hair into thin, even layers using clips. Working in small sections allows accurate placement of extensions while reducing heat exposure to surrounding hair. Proper preparation ensures that each extension adheres smoothly, prevents uneven bonding, and minimizes stress or breakage on natural strands.
Step 2: Thread the I-Tip Strand
Using a loop or fusion tool, place the I-Tip strand onto a small section of natural hair. Position the tip near the root but not directly on the scalp. Proper alignment ensures a natural look and reduces tension on hair follicles.
Hold the extension carefully as you prepare for heat activation. Twisted or uneven hair can compromise the bond, causing slippage or discomfort. Correct threading ensures the heat-sealed bond is secure, durable, and moves naturally with your hair for a seamless finish.
Step 3: Activate the Heat Bond
Using a fusion or flat iron tool, apply heat to the I-Tip tip, melting the bond and securing it around your natural hair. Follow manufacturer guidelines for temperature and duration to avoid overheating or damaging hair strands.
Work quickly but carefully, ensuring the molten bond encases the natural hair completely. Smooth with fingers or a tool if needed to shape the bond. Proper heat application creates a strong, flexible attachment while maintaining a natural, undetectable appearance.
Step 4: Cool and Set the Bond
Allow the fused I-Tip to cool completely before moving or styling. Cooling solidifies the bond, locking the extension in place securely while preventing slipping or weakening from premature movement.
Check the bond for tightness and alignment with natural hair. If necessary, gently adjust or re-fuse using the heat tool. Proper cooling ensures a durable, long-lasting attachment and prevents stress on both extensions and natural strands.
Step 5: Repeat Installation
Continue applying extensions row by row, from the bottom to the top. Install evenly, spacing extensions according to desired volume and length, ensuring a natural, uniform finish across the entire head.
Check each extension as you go, confirming secure fusion and smooth alignment. Taking time during installation prevents bulkiness, uneven placement, and potential damage. Precision in this step is essential for professional-looking results and long-lasting wear.
Step 6: Blend and Style
After all extensions are applied, comb gently to blend with natural hair. Trim or layer extensions if necessary to achieve a seamless, natural look. Apply heat styling carefully with a protectant if desired.
Styling enhances movement and ensures the extensions integrate flawlessly with your hair. Avoid excessive heat directly on bonds to maintain longevity. Proper blending and styling give a polished, professional finish that looks natural and beautiful.
How Long Does It Take to Install I Tip Hair Extensions?

Installing I-Tip hair extensions requires patience and precision to ensure a seamless, natural look. The time it takes depends on hair length, thickness, desired volume, and the installer’s experience. Proper preparation and methodical application are essential to avoid discomfort and achieve long-lasting results.
Factors Affecting Hair Installation Time
- Hair length and thickness: Longer, thicker hair requires more sections and beads, increasing installation time.
- Number of extensions: Adding more strands for volume or length naturally takes longer to install.
- Skill level: Experienced stylists can install I-tip extensions faster and more efficiently than beginners.
- Sectioning and preparation: Careful parting and detangling add to overall time but ensure a flawless result.
For an average application:
- Small volume (50–100 strands) may take 1–2 hours.
- Medium volume (100–150 strands) may take 2–3 hours.
- Full volume (150–250 strands) may take 3–5 hours or more, depending on hair density and stylist speed.
Tips to Reduce Installation Time
- Pre-section hair before starting to save time during installation.
- Detangle thoroughly to prevent snags while threading beads.
- Have all tools ready and organized to avoid interruptions.
- Enlist a professional stylist for faster, precise application if possible.
Taking the time to install extensions correctly ensures comfort, longevity, and a natural finish. Rushing can lead to uneven placement, slippage, or stress on natural hair, compromising both appearance and health.
Are I-Tip Hair Extensions Damaging to Hair?
I-Tip hair extensions are a popular, non-adhesive method for adding length and volume without using heat or glue. When applied and maintained properly, they are generally safe for natural hair. However, improper installation or care can lead to stress, breakage, or scalp irritation.
Potential Risks of I-Tip Extensions
- Tension on natural hair: Tight beads or excessive weight can pull on hair follicles, causing breakage or discomfort over time.
- Incorrect placement: Clustering beads or using too many in one area can create uneven stress on strands.
- Neglecting maintenance: Not regularly checking beads can lead to slippage, tangling, or matting near the scalp.
- Rough handling: Aggressive brushing or sleeping with tightly secured extensions may damage both extensions and natural hair.
How to Minimize Damage
- Space extensions evenly and avoid overloading sections to reduce tension.
- Ensure beads are clamped properly—secure but not overly tight.
- Maintain hair with gentle brushing and deep conditioning treatments regularly.
- Remove extensions carefully using proper tools and techniques to prevent pulling or breakage.
With correct application, proper care, and regular professional checks, I-tip extensions can enhance hair without significant damage. Prioritizing scalp health and gentle handling ensures long-lasting extensions while keeping natural hair strong and healthy.
Conclusion
Proper installation of I-Tip Hair Extensions ensures a natural look, long-lasting wear, and hair protection. Following step-by-step techniques and using the right tools allows for effortless styling and maintenance. With care and precision, these extensions can transform hair, adding instant length, volume, and texture for a flawless, polished appearance.
Whether you are a stylist or doing it yourself, understanding the placement, blending, and secure attachment of I-Tip extensions is essential. Regular maintenance and careful handling extend their lifespan, keeping the hair silky, tangle-free, and looking natural. Mastering installation techniques ensures every extension complements your hair beautifully and lasts longer.
Get wholesale I-Tip Hair Extensions from Alphahair for consistent quality and a wide range of colors, lengths, and textures. Our extensions are designed to blend seamlessly, offering durability, softness, and a natural finish. Perfect for salons or personal use, Alphahair provides reliable, professional-grade hair for every styling need.



