

Removing nano hair extensions requires care and precision to protect your natural hair from breakage or damage. Using the right tools and techniques ensures a smooth, safe removal process while preserving the health and integrity of your hair, making it ready for future styling or reinstallation.
Improper removal can cause tangling, breakage, or weakened strands, which is why professional guidance is highly recommended. Understanding step-by-step removal methods, including loosening beads and detangling hair gently, helps maintain natural hair strength and ensures the extensions can be reused safely and efficiently.
What Time to Remove Nano Ring Hair Extensions?
Nano ring hair extensions are designed for long-lasting wear, but timely removal is essential to protect natural hair health. Leaving extensions in too long can cause tangling, bead slippage, and hair stress. Understanding the ideal removal timeframe ensures safe detachment, prevents damage, and maintains both the integrity of your natural hair and the extensions.
- Recommended Duration: We suggest removing or repositioning nano ring extensions every 8–12 weeks. This prevents beads from slipping down the hair shaft as natural hair grows, maintaining proper placement and ensuring the extensions continue to look seamless and natural.
- Hair Growth Consideration: We monitor natural hair growth carefully. As hair grows, beads can pull on roots, causing discomfort or breakage. Timely removal prevents tension, keeps hair healthy, and prepares the scalp for new or repositioned extensions without damage.
- Avoid Tangling and Matting: We emphasize that extensions left in too long can tangle near the beads. Regular removal or adjustment prevents mats, knots, and uneven hair distribution, ensuring both the extensions and natural hair remain smooth and easy to manage.
- Professional Check-Ups: We recommend periodic professional inspections. Stylists can assess bead placement, hair condition, and decide whether repositioning or removal is necessary, ensuring safe wear and optimal longevity for both natural hair and nano ring extensions.
- Signs to Remove Early: We advise removal if you notice discomfort, pulling, or bead slippage before the usual 8–12 weeks. Prompt attention prevents hair damage, reduces scalp stress, and keeps extensions looking fresh, secure, and healthy.
How to Remove Nano Hair Extensions?
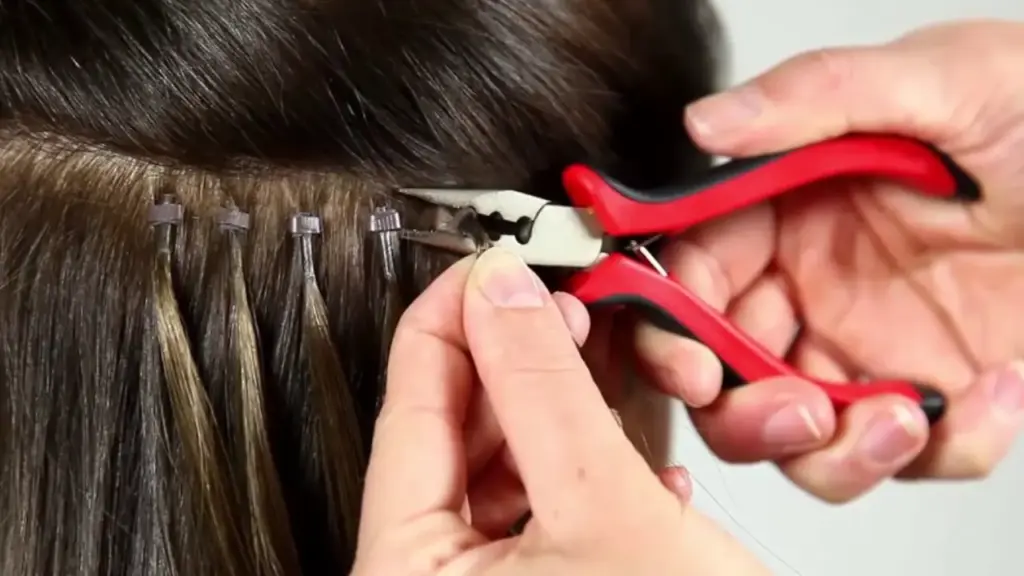
Nano hair extensions require careful removal to protect natural hair and maintain extension integrity. Using the correct tools and techniques prevents breakage, tangling, and discomfort. Following step-by-step instructions ensures a safe, smooth process, allowing natural hair to remain healthy while keeping extensions reusable for future use.
Tools Needed:
- Nano pliers
- Fine-tooth comb or loop brush
- Sectioning clips
- Detangling spray (optional)
Step 1: Section Your Hair
We start by dividing hair into small, manageable sections using clips. This allows precise access to each bead, prevents tangling, and ensures that no strand is missed. Working section by section keeps the removal process organized, controlled, and reduces the risk of accidental hair breakage or uneven tension.
Next, we carefully inspect each section for bead placement. Ensuring all beads are visible before removal prevents missed extensions and protects natural hair. Proper sectioning also helps maintain hair order and smoothness, making it easier to detangle afterward and prepare for reinstallation or styling.
Step 2: Loosen Nano Beads
We use professional nano pliers to gently open each bead. Applying controlled pressure releases the bond without pulling on natural hair. This careful approach ensures extensions slide out smoothly, minimizing stress on hair roots and preserving the overall health of both extensions and natural strands.
After loosening, we slowly slide the extension strand out of the bead. Working patiently prevents tangling and breakage, ensuring both hair and extensions remain intact. Extensions can be cleaned and reused, while natural hair retains its strength, smoothness, and readiness for new styling or future extension application.
Step 3: Detangle Natural Hair
We gently comb through each section with a fine-tooth comb or loop brush to remove any knots or tangles. This step prevents matting and prepares hair for re-styling or reinstallation of extensions. Detangling restores smoothness and ensures hair remains healthy and manageable after removal.
We apply detangling spray if necessary to ease combing. Working from the ends upward, we carefully release tension without pulling, preventing breakage. This process maintains natural hair integrity, leaving it soft, smooth, and ready for daily styling or future extension wear.
Step 4: Clean and Store Extensions
We recommend cleaning extensions with a gentle shampoo or conditioner before storing. This removes product buildup, maintains softness, and ensures the extensions remain reusable and hygienic for the next application. Proper care extends their lifespan and preserves quality.
Extensions should be stored in a dry, organized container to prevent tangling. Keeping them separated and in their natural shape ensures they stay smooth and ready for reinstallation. Regular maintenance preserves their shine, softness, and durability for long-term use.
How Long Does It Take to Remove Nano Hair Extensions?

Removing nano hair extensions requires patience, precision, and proper technique to ensure the health of your natural hair. The time needed depends on the number of extensions, hair thickness, and whether a professional stylist or DIY method is used. Proper removal ensures minimal damage while maintaining the extensions for potential reuse.
- Number of Extensions: We note that the total number of nano extensions directly impacts removal time. More strands require longer processing, as each bead must be carefully loosened and removed to prevent breakage or pulling on natural hair.
- Hair Thickness: We find that thicker hair can increase removal duration. Dense hair requires more time for sectioning, bead access, and detangling. Each step must be performed slowly and carefully to protect natural strands and prevent knots or tangling.
- Removal Method: We observe that professional removal tends to be faster than DIY approaches. Stylists use specialized tools like nano pliers, ensuring beads are opened efficiently and safely while reducing the likelihood of damage to natural hair.
- Sectioning and Preparation: We emphasize that properly sectioning hair before removal helps save time. Organized, manageable sections provide easy access to beads and allow for systematic removal, preventing missed extensions and maintaining a smooth, controlled process.
- Detangling and Finishing: We account for additional time needed to comb, detangle, and clean hair after bead removal. This ensures natural hair remains smooth, healthy, and ready for styling or new extensions, contributing to overall removal time.
How to Use Nano Hair Remover?
Using a nano hair remover properly ensures safe, damage-free removal of nano hair extensions. With the right tools and step-by-step method, you can gently detach extensions without pulling or breaking natural hair. Following proper technique preserves hair health and keeps extensions reusable for future styling.
Tools Needed:
- Nano hair remover tool or pliers
- Sectioning clips
- Fine-tooth comb or loop brush
- Detangling spray (optional)
Step 1: Section Your Hair
We begin by dividing hair into small, organized sections using clips. This provides clear access to each nano bead and prevents tangling. Working systematically allows for controlled removal, reduces the risk of missing extensions, and ensures even tension, keeping natural hair safe and healthy during the process.
Next, we carefully inspect each section to locate all beads. Ensuring each bead is visible before starting removal prevents missed extensions or accidental hair pulling. Proper sectioning maintains hair order, reduces knots, and makes the removal process efficient and gentle on both hair and scalp.
Step 2: Apply Nano Hair Remover
We gently insert the nano hair remover tool onto each bead, carefully squeezing or unlocking it according to the manufacturer’s instructions. This loosens the bond without pulling, protecting natural strands and preventing damage while allowing the extension to slide out smoothly.
After loosening the bead, we slowly slide the extension strand out. Taking time with each strand prevents tangling and breakage, ensuring natural hair stays intact. The extension can then be cleaned and reused, while hair remains healthy, soft, and ready for styling or reinstallation.
Step 3: Detangle Hair
We carefully comb through each section using a fine-tooth comb or loop brush. This step removes any leftover tangles, knots, or residue near the beads, ensuring hair remains smooth, manageable, and free from stress or damage caused by leftover extensions.
We work from ends upward and use detangling spray if needed to reduce friction. This gentle approach keeps natural hair strong and prevents breakage, preparing it for daily styling or future nano extension applications, while maintaining its natural shine and health.
Step 4: Clean and Store Extensions
We clean removed extensions with gentle shampoo or conditioner to remove product buildup and maintain softness. Proper cleaning ensures extensions remain hygienic, smooth, and ready for reuse in future installations.
Extensions should be stored carefully in a dry, organized container to prevent tangling and deformation. Keeping them separated preserves their natural texture, shine, and durability, allowing for long-term reuse and maintaining professional-quality results.
How to Take Nano Extensions Out Without Pliers?
Removing nano extensions without pliers requires patience, the right technique, and careful handling to prevent hair damage. Using gentle methods ensures natural hair remains healthy while extensions can be safely removed for reuse. Following proper steps reduces breakage, tangling, and unnecessary strain on the scalp and hair.
Tools Needed:
- Nano bead removal solution or conditioner
- Sectioning clips
- Fine-tooth comb or loop brush
- Spray bottle with water (optional)
Step 1: Section Your Hair
We begin by dividing hair into small, manageable sections using clips. Sectioning provides easy access to each bead, prevents tangling, and allows for precise removal. Organized sections make the process efficient and minimize stress on natural hair, ensuring a smooth, safe detachment of all extensions.
Next, we inspect each section carefully to identify all beads. Confirming bead placement ensures no extensions are missed and prevents accidental pulling. Proper sectioning keeps hair orderly, reduces knots, and prepares strands for gentle detachment using solution or conditioner.
Step 2: Apply Nano Removal Solution
We gently apply a nano bead removal solution or conditioner to each bead. This softens the silicone or adhesive coating, allowing the bead to loosen naturally without pliers, reducing strain on hair and roots while facilitating safe, easy extension removal.
After applying, we let the solution sit for a few minutes to ensure the bond is softened. This step ensures extensions slide out easily without tugging or breaking natural hair, protecting strands while maintaining extension integrity for reuse.
Step 3: Slide Out Extensions
We carefully slide each extension strand out of the loosened bead. Slow, controlled movements prevent tangling, breakage, or hair stress, ensuring the hair remains intact and smooth while preserving the extensions for future use.
Using a fine-tooth comb, we gently detangle each strand as it comes out. Starting from the ends and moving upward ensures knots are removed without pulling. This process maintains natural hair health and prepares it for styling or new extensions.
Step 4: Clean and Store Extensions
We clean removed extensions with a gentle shampoo and conditioner to remove residue and restore softness. Proper cleaning ensures extensions remain hygienic, smooth, and ready for reuse while prolonging their lifespan.
Extensions should be stored in a dry, organized container to prevent tangling or deformation. Keeping them separated preserves their natural texture, shine, and durability, allowing them to be safely reapplied in future installations.
How Do You Remove Bonding Glue Without Damaging Your Hair?
Removing bonding glue from hair requires careful handling to prevent breakage, tangling, or thinning. Using the right tools, products, and techniques ensures that extensions or glued sections are removed safely, preserving natural hair strength, texture, and shine. Proper preparation and patience are key to a damage-free removal process.
- Use Professional Bond Remover: We recommend using a high-quality bond remover designed specifically for hair glue. It softens adhesive gently, allowing strands to be separated without tugging, reducing stress on hair and ensuring the scalp remains unharmed during the removal process.
- Work Section by Section: We divide hair into small, manageable sections for precise application. Working in layers prevents tangling, allows targeted bond removal, and ensures no strand is overlooked, protecting hair from accidental pulling or breakage.
- Gently Detangle Hair: After the glue softens, we carefully comb through the hair using a fine-tooth comb. Gentle strokes from the ends upward prevent knots and minimize hair breakage, ensuring strands remain smooth, healthy, and ready for styling or future extensions.
- Avoid Heat and Harsh Tools: We avoid using high heat or metal tools to scrape glue. Excessive heat or force can damage the hair cuticle and weaken strands. Gentle, patient removal is key to maintaining hair integrity and shine.
- Deep Conditioning After Removal: We recommend applying a nourishing conditioner or hair mask after glue removal. This restores moisture, repairs minor damage, and strengthens the hair, leaving it soft, healthy, and resilient for daily styling or future extension applications.
Conclusion
Nano hair extensions can be removed safely when proper techniques and tools are used. Gentle handling, careful bead loosening, and sectioned work prevent hair damage and maintain healthy natural strands, ensuring your hair remains strong, smooth, and ready for styling or new extensions.
Professional removal is the key to protecting hair integrity. Skilled stylists ensure each bead is opened carefully, extensions are slid out without tugging, and hair is detangled properly. This method reduces stress on natural hair while preserving the longevity of reusable nano extensions.
For salons, stylists, and individuals, get wholesale nano hair extensions from our Alphahair. We provide premium, high-quality extensions in various lengths, colors, and textures. Our products blend seamlessly, are durable and reusable, and ensure clients enjoy safe, comfortable, and long-lasting hair enhancement results.



