

You might feel nervous about taking out your extensions at home, but you can do it safely with the right approach. Many people worry about breakage, tangling, or leaving behind sticky residue. Here’s a quick look at common concerns:
Concern | What Can Happen |
|---|---|
Breakage | Hair snaps or short pieces appear |
Tangling and Knots | Removal gets tricky and messy |
Incomplete Removal | Glue or beads stay in your hair |
Alpha brings years of experience with premium extensions, so you can trust these tips on how to remove micro weft extensions while keeping your hair healthy and strong.
Key Takeaways
Gather essential tools like a rat-tail comb, scissors, and pliers before starting. This preparation makes the removal process smoother and safer.
Section and detangle your hair carefully before removal. This step prevents knots and breakage, ensuring a healthier outcome for your natural hair.
Follow a step-by-step guide for removing extensions. Take your time to avoid missing any threads or beads, which can lead to damage.
Use a sulfate-free shampoo and deep conditioner after removal. This helps restore moisture and keeps your hair soft and healthy.
Avoid rushing the process and pulling on the wefts. Patience and gentle handling protect your hair and ensure a successful removal.
Tools for Hair Extension Removal
Before you start, you need the right tools for a smooth hair extension removal. Having everything ready will help you avoid stress and keep your natural hair safe.
Essential Tools for Alpha Micro Weft Extensions
You do not need a lot of fancy equipment. Here’s what you should gather:
Rat-tail comb: This helps you section your hair and find the wefts.
Small scissors or thread snips: You use these to cut the threads if your extensions are sewn in.
Pliers (for beaded wefts): These open the microbeads gently without pulling your hair.
Sectioning clips: These keep your hair organized and out of the way.
Wide-tooth comb: This helps you detangle your hair before and after removal.
Tip: Always use clean, sharp tools. Dull scissors or old pliers can snag or damage your hair.
Optional Items for Comfort
You might want to add a few extras for a more comfortable experience:
Mirror: A second mirror or a handheld one lets you see the back of your head.
Spray bottle with water: Lightly misting your hair can make sectioning easier.
Acetone-based remover: Only use this if you find glue or adhesive. Use it sparingly and avoid your scalp.
Soft towel or cape: This keeps your clothes clean and dry during the process.
Getting set up with these tools makes hair extension removal much easier. You’ll feel more confident and ready to protect your natural hair. Take your time, and you’ll get salon-quality results at home.
Prepare to Remove Weft Extensions
Sectioning and Detangling Hair
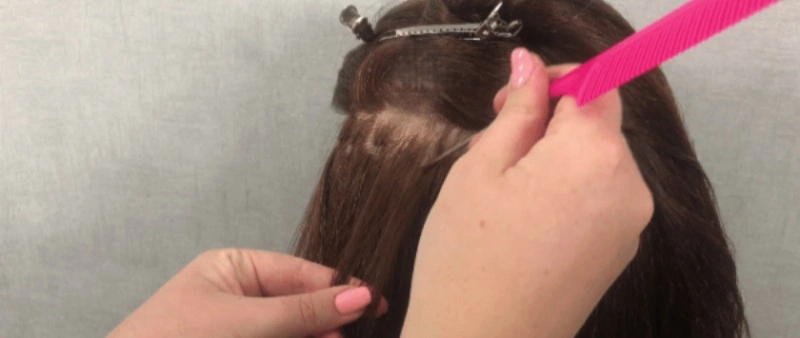
You want to make sure your hair is easy to work with before you start removing your micro weft extensions. Sectioning and detangling help you avoid knots and breakage. Here’s how you can get started:
Gather all your tools, including a rat-tail comb, sectioning clips, and a wide-tooth comb.
Use the rat-tail comb to part your hair into small, manageable sections. Clip each section out of the way so you can focus on one area at a time.
Gently detangle each section with a wide-tooth comb. Start at the ends and work your way up to the roots. This keeps your hair smooth and prevents pulling.
Locate the micro rings or threads near your scalp. Take your time and feel for each attachment so you don’t miss any.
If you notice any adhesive residue, use a fine-toothed comb to gently work it out. Don’t rush this step—patience helps keep your hair healthy.
After you finish removing the extensions, wash and condition your hair with a sulfate-free shampoo and a nourishing conditioner. This restores moisture and keeps your hair soft.
Tip: Detangling before removal makes the process much easier and protects your natural hair from unnecessary stress.
Setting Up Your Space
A comfortable workspace helps you stay organized and focused. You don’t want to scramble for tools or struggle with poor lighting. Here’s what you should do:
Tool | Purpose |
|---|---|
Adhesive remover | Removing old bonds |
Fine-toothed comb | Detangling and separating hair |
Sharp scissors | Trimming excess weft material |
Rat-tail comb | Precise parting and sectioning |
Small brush | Applying adhesive |
Ponytail holder | Securing natural hair |
Make sure you have good lighting and a mirror so you can see every section clearly.
Sit in a comfortable chair and keep a table nearby for your tools.
Place everything within easy reach. This saves time and keeps you from getting frustrated.
Take breaks if you need to. Removing extensions can take a while, and you want to stay relaxed.
Note: A tidy setup helps you focus on gentle removal and keeps your hair looking its best.
How to Remove Micro Weft Extensions?
Taking out your extensions at home can feel intimidating, but you can do it safely and gently with the right steps. Let’s walk through how to remove micro weft extensions, whether you have sewn-in or beaded wefts. This guide will help you protect your natural hair and keep your Alpha extensions in great shape for future use.
Loosening Threads or Beads
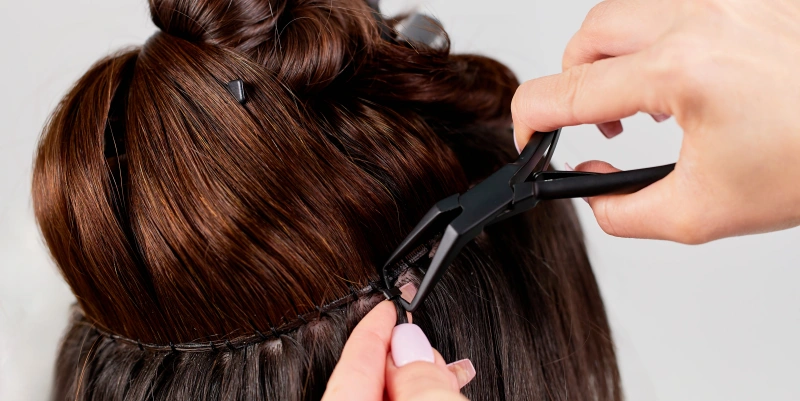
Start by figuring out which type of attachment you have. If you have sewn-in wefts, you’ll see small threads holding the extensions to your braids. If you have beaded wefts, you’ll notice tiny beads or microlinks near your scalp.
For Sewn-In Wefts:
Clip up your natural hair so it stays out of the way. This keeps your hair from mixing with the extensions.
Use your fingers to feel for the thread attachment points at the top of your head.
Slide the tip of your scissors or thread snips under the thread. Hold the extension steady.
Snip the thread carefully. Make sure you don’t cut your natural hair.
Gently tug the weft to see if it loosens. If it doesn’t, check for more threads and repeat the process.
Move layer by layer until you remove all the wefts.
Once all extensions are out, use the tip of a rat-tail comb to undo your braids. Detangle your hair before washing to avoid matting.
For Beaded Wefts:
Section your hair with clips so you can see the beads clearly.
Use hair extension pliers to gently squeeze each bead or microlink. This opens the bead and lets it slide out easily.
Slide the bead down and off the hair. Avoid pulling or yanking.
Repeat for each bead until you remove all the extensions.
Tip: Always work in small sections. This helps you avoid missing any threads or beads and keeps your hair safe.
Gently Removing the Weft
Once you loosen the threads or beads, you’re ready to remove weft extensions. Take your time with this step. Alpha’s micro weft extensions use premium materials, so they slide out smoothly when handled with care.
Isolate the area where the weft is attached. Use sectioning clips to keep the rest of your hair out of the way.
Hold the base of the weft firmly. With your other hand, gently slide the weft out of your hair. Never pull straight up or yank.
If you feel resistance, check for any missed threads or beads. Remove them before trying again.
Use a wide-tooth comb to detangle your hair before and after removing each weft. This prevents knots and breakage.
If you used a slip-enhancing solution or detangler, wipe away any residue with a soft towel.
Note: Following a step-by-step guide for how to remove micro weft extensions helps you avoid breakage, keeps your natural hair healthy, and ensures safe hair extension removal every time.
Handling Glue or Adhesive
Sometimes, you might find a bit of glue or adhesive left behind, especially if your extensions had extra security. Here’s how to handle it:
Only use an acetone-based remover if you see glue or sticky spots. Apply a small amount with a fine-tip applicator, keeping it away from your scalp.
Let the remover sit for a few seconds, then gently work out the adhesive with a fine-toothed comb.
Wash your hair with a clarifying shampoo to remove any leftover product.
Deep condition your hair to restore moisture and softness.
Caution: Use acetone-based remover sparingly. Too much can dry out your hair or irritate your scalp.
Setting | Average Time Required |
|---|---|
At Home | Requires patience; time varies by experience |
In Salon | Under 30–40 minutes for a full head |
Taking your time with how to remove micro weft extensions makes a big difference. Rushing can lead to breakage or missed beads. By following these steps, you’ll master how to remove micro weft extensions and keep your hair looking and feeling its best.
If you ever feel stuck or unsure, remember that Alpha’s micro weft extensions are designed for easy, gentle removal. You can always reach out to a professional for help with sew-in weft hair extension removal or beaded weft hair extension removal if needed.
Why follow a guide?
You ensure safe removal of extensions.
You prevent hair breakage during the process.
You maintain the health of your natural hair after removing hair extensions.
Now you know how to remove micro weft extensions at home, whether you need to remove beaded weft hair extensions or tackle a full sew-in. With patience and the right technique, you’ll get salon-quality results every time.
Aftercare for Natural Hair
Taking out your micro weft extensions feels great, but your natural hair needs a little extra love right after. Good aftercare helps your hair bounce back, stay strong, and look shiny. Let’s break down what you should do next.
Cleaning and Detangling
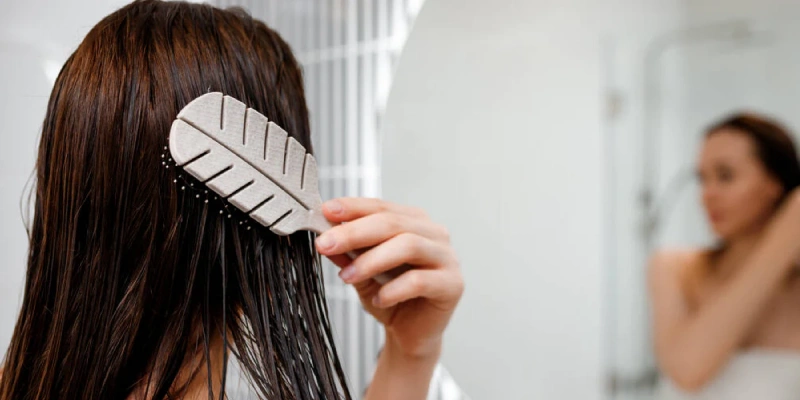
Start with a gentle cleanse. You want to remove any leftover product or residue from your scalp and hair. Here’s a simple routine to follow:
Use a sulfate-free shampoo. Massage it gently into your scalp and rinse well.
Apply a deep conditioner. Focus on the mid-lengths and ends, not the roots.
Grab a 2-in-1 hybrid hair extension brush. This brush glides through tangles without pulling or breaking your hair.
Rinse out the conditioner and gently towel-dry your hair.
Spray a leave-in conditioner or detangling spray on damp hair. Work through knots with your brush, starting at the ends and moving up.
Tip: Always detangle your hair when it’s damp, not soaking wet. This helps prevent breakage.
Here’s a quick look at the best products and how often to use them:
Product | Benefit | Tips | Frequency |
|---|---|---|---|
Cleanses without stripping | Focus on the scalp | Every wash | |
Lightweight Conditioner | Moisturizes and prevents tangles | Avoid roots | Every wash |
Leave-In Conditioner/Spray | Smooths and eases brushing | Spray on ends | Daily/as needed |
Deep-Conditioning Mask | Restores moisture and shine | Use on mid-lengths and ends | Weekly |
Silk/Satin Pillowcase/Bonnet | Reduces friction and breakage | Sleep on silk or wear a bonnet | Every night |
Scalp and Hair Health Tips
Your scalp might feel a little sensitive after removing extensions. Show it some TLC with these easy steps:
Massage your scalp with your fingertips two or three times a week. This boosts blood flow and helps your hair grow.
Try a lightweight oil like jojoba or a rosemary-mint blend. Use just a few drops to soothe dryness.
Exfoliate your scalp gently with a scrub once in a while. This keeps your scalp fresh and flake-free.
Stick to gentle shampoos to keep your scalp clean and healthy.
You should also give your hair a break before reinstalling extensions. Most stylists recommend waiting at least 6-8 weeks. This pause lets your hair recover and helps prevent issues like matting or breakage.
If you follow these steps for hair care after hair extension removal, you’ll keep your hair and scalp in top shape. Healthy hair starts with good habits!
Tips for Safe Hair Extension Removal
What to Avoid?
You want your hair to stay healthy and strong, so it’s important to know what not to do during removal. Many people make simple mistakes that can lead to breakage or scalp irritation. Here’s what you should avoid:
Pulling or yanking on the wefts. This can cause your hair to snap or pull out at the root.
Skipping the detangling step. If you don’t detangle first, you might end up with knots and breakage.
Using dull scissors or the wrong tools. Always use sharp, precise scissors or a seam ripper to cut threads. Never try to remove beads without proper extension pliers. Pliers help open beads safely and prevent damage to your hair.
Rushing through the process. Take your time and work in small sections.
Ignoring leftover adhesive. If you see glue, use a remover sparingly and avoid your scalp.
Tip: Be gentle with your hair at every step. Patience and the right tools make all the difference.
Caring for Alpha Micro Weft Extensions Post-Removal
You can get more life out of your Alpha Micro Weft Extensions if you care for them properly after removal. Here’s how you can keep them looking their best:
Clean the extensions: Wash them with a gentle, sulfate-free shampoo. Rinse well and apply a lightweight conditioner. Let them air dry on a towel.
Detangle carefully: Use a wide-tooth comb or a special extension brush. Start at the ends and work your way up.
Store them safely: Lay the extensions flat in a clean, dry place. You can use a silk or satin bag to prevent tangling and keep them dust-free.
Check for damage: Look for any loose threads or beads. Fix these before your next use.
Reuse with confidence: Alpha’s high-quality micro weft extensions are designed for multiple uses. With proper care, you can enjoy them again and again.
Note: Giving your natural hair a break between installs helps keep your scalp healthy and your hair strong. Micro weft extensions, when used and maintained correctly, support long-term hair health and comfort.
By following these tips, you’ll protect your hair and get the most out of your Alpha extensions. Safe removal and smart aftercare go hand in hand for beautiful, healthy results!
Conclusion
Take your time and use a gentle touch when you remove your micro weft extensions. You protect your hair and keep it looking healthy by following each step. If you ever feel unsure, you can always reach out to a professional. Look for someone who:
Holds a certification in hair extension removal
Uses the right tools and products
Removes all extensions and cleans any residue
Ready for your next style? Alpha’s premium Micro Weft Extensions give you salon-quality results at home.
FAQ
How long does it take to remove micro weft extensions at home?
You can expect the process to take 30 to 60 minutes. If you work slowly and carefully, you protect your natural hair and avoid mistakes. Take breaks if you need to.
Can I reuse my Alpha Micro Weft Extensions after removal?
Yes! If you clean and store them properly, you can reuse your Alpha extensions. Check for loose threads or beads before reinstalling. Store them in a silk bag or box.
What should I do if I find glue or sticky residue?
Use a small amount of acetone-based remover on the sticky area. Avoid your scalp. Gently comb out the residue. Wash and condition your hair afterward.
Will removing extensions damage my natural hair?
If you follow each step and use the right tools, you keep your hair healthy. Never pull or rush. Detangle before and after removal for best results.
How soon can I install new extensions after removal?
Give your hair a break for at least 6 to 8 weeks. This rest period helps your scalp recover and keeps your hair strong for your next install.



