

You can achieve safe and effective hair extension removal with the right approach. Trust Alpha’s premium flat tip hair extensions for quality and reliability. Begin by preparing your workspace and gathering professional tools. Avoid shortcuts or household products, as these may damage your natural hair.
Patience and gentle handling protect both your extensions and your scalp, ensuring a smooth removal process.
Key Takeaways
Prepare your workspace and gather professional tools before starting the removal process to ensure safety and efficiency.
Condition the keratin bonds a few days before removal to soften them, making the process easier and more comfortable.
Use a high-quality professional remover solution to break down keratin bonds safely, avoiding harsh household products.
Take your time during the removal process; rushing can lead to hair damage and discomfort.
Follow up with deep conditioning treatments after removal to restore moisture and maintain healthy hair.
Hair Extension Removal: Preparation Steps
Sectioning and Surface Protection
You need to divide your hair into manageable sections before starting the removal process. This step helps you stay organized and prevents unnecessary tangling. Use hair clips to secure each section. Work with small areas at a time for better control.
Protect your workspace by placing a towel or cape over your shoulders and covering any surfaces where you will work. This prevents spilled remover solution or stray hair from causing stains or messes.
Tip: Sectioning your hair reduces stress on the bonds and makes removal easier. Always keep your tools within reach to avoid interruptions.
Pre-Soften Keratin Bonds
Professional stylists recommend preparing your hair a few days before removal. Apply a concentrated hair conditioner directly onto the keratin bonds every night. The protein in the conditioner gradually softens the bonds, making removal safer and more comfortable.
Avoid mixing the conditioner with water. If you prefer, you can use olive or coconut oil instead. Never go to bed with wet hair, as this can cause tangling at the attachment points.
Preparation Steps:
Begin conditioning the bonds nightly for several days before removal.
Use a concentrated conditioner or natural oil for best results.
Keep hair dry before sleeping to prevent matting.
Allow the conditioner to penetrate and soften the keratin.
Detangle and Comb
Detangling your hair is essential before removing flat tip extensions. Use a soft-bristled brush and start from the ends, working up toward the roots. Hold the hair about two to three inches from the ends to avoid pulling and reduce strain on the bonds.
Move slowly and carefully, holding the section above the area you are detangling. Apply a small amount of leave-in conditioner or hair oil to the ends to reduce dryness and friction.
Brush extensions daily to maintain smoothness.
Use a detangling product if you encounter stubborn knots.
Glide your brush gently through tangles without snagging.
If a knot persists, let the detangling product sit and use your fingers to work through it.
Note: Proper detangling prevents stress on your natural hair and ensures a seamless removal process.
Tools for Removing Flat Tip Hair Extensions
Professional Remover Solutions
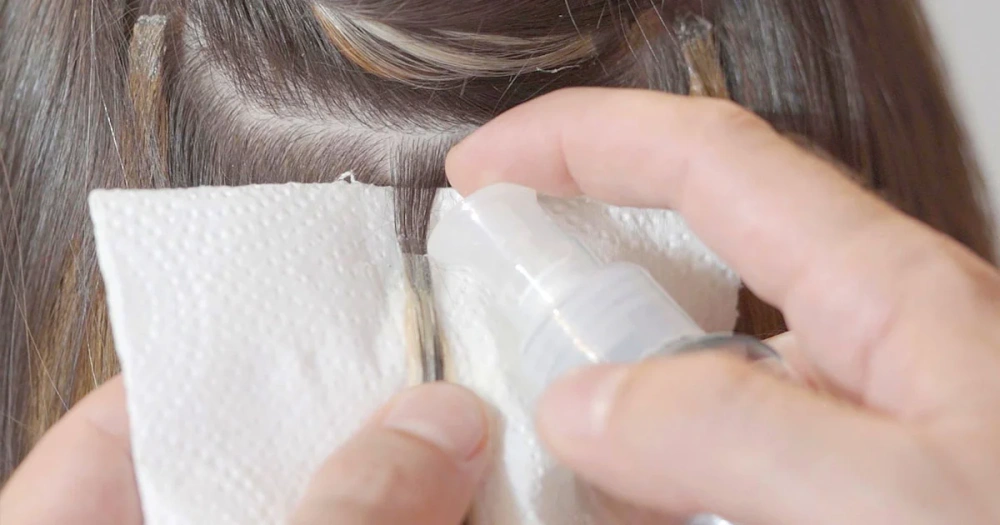
You need a high-quality removal solution to break down the keratin bonds in flat tip hair extensions. Alpha recommends using a professional-grade remover that protects your natural hair and scalp.
Many industry formulas contain nourishing additives like argan oil or vitamin E, which help reduce friction and shield your hair during the process. Some removers use natural ingredients such as coconut oil or aloe vera for sensitive scalps.
Avoid harsh or high-acetone formulas, as these can dry out your hair and strip away natural oils.
Ingredient Type | Description |
|---|---|
Harsh Ingredients | Quick results, but may damage hair integrity over time. |
High-Acetone Formulas | Effective but can dry out hair and strip natural oils, leading to brittleness. |
Nourishing Additives | Argan oil and vitamin E protect hair during removal and reduce friction. |
Natural and Organic Options | Coconut oil and aloe vera are ideal for sensitive scalps. |
Tip: Always choose a removal solution designed for professional use to ensure safe and gentle removal.
Removal Pliers and Tail Comb
You need specialized tools for removing flat-tip hair extensions. Professional removal pliers feature padded handles for comfort and a curved tip for precise work. These tools allow you to clamp down on the keratin bonds and break them apart after applying the removal solution.
A tail comb helps you section hair and detangle strands before and after removal. Follow these steps for safe removal:
Grasp the padded handles of the removal pliers for a comfortable hold.
Use the curved tip to clamp down on the keratin bond.
Apply the removal solution and wait at least ten seconds.
Clamp the bond again to break it down further.
Gently pull the extension down in the direction of your natural hair.
Note: Always detangle with a tail comb before pulling out the extension to prevent breakage.
What Not to Use?
You should never use household products like alcohol or acetone for removing flat tip hair extensions. These substances can dry out your hair, weaken the keratin bond, and cause scalp irritation.
Avoid using metal tools not designed for hair extension removal, as they may snag or damage your natural hair. Stick to professional products and tools recommended by Alpha for the safest results.
🚫 Using the wrong products can lead to hair damage and discomfort. Trust professional solutions and tools for a seamless removal experience.
How to Remove Flat Tip Hair Extensions? Step-by-Step Guide
Removing flat tip extensions requires patience, the right tools, and a gentle touch. You can protect your natural hair and scalp by following a professional process. Here’s how to remove keratin hair extensions like a pro:
Apply Remover Solution
Start by sectioning your hair and securing each part with clips. Work with one small section at a time. Use a professional keratin bond remover, as recommended by Alpha, to break down the adhesive.
Apply the remover directly onto each bond. Let it sit for two to three minutes so the solution can penetrate and soften the keratin. This step makes it easier to remove keratin hair extensions without pulling or causing discomfort.
Tip: Always use a remover designed for hair extensions. Avoid household products, which can damage your hair and scalp.
Crack and Loosen Bonds
Once the remover has softened the bonds, use removal pliers to gently crack each keratin bond. Hold the pliers with a firm grip and squeeze the bond until you hear a slight crack. Do not rush this step.
Move slowly to avoid breaking your natural hair. Specialized tools give you precise control and reduce the risk of hair breakage. You can see the effectiveness of different methods for loosening keratin bonds in the table below:
Method | Advantages | Limitations |
|---|---|---|
Remover Solutions | Fast, effective, minimizes pulling on natural hair | Chemical exposure may dry out hair |
Heat Application | No chemicals, immediate softening | High risk of heat damage |
Specialized Tools | Precise control reduces hair breakage | Initial cost, learning curve |
Natural Oils & Conditioners | Non-toxic, nourishes hair | Time-consuming, less effective on tight bonds |
You should always choose remover solutions and professional tools for the safest results when you remove keratin hair extensions.
Slide Out Extensions
After you crack and loosen the bonds, hold your natural hair close to the scalp. Gently slide the extension down and away from your hair. Never pull or yank. If you feel resistance, apply a bit more remover and wait another minute. Repeat the process until the extension slides out smoothly.
This method prevents unnecessary tension and protects your hair from breakage. You can follow these steps to remove keratin hair extensions safely:
Comb your hair to remove tangles before starting.
Apply the keratin bond remover and let it sit.
Use pliers to crack the bond gently.
Hold the root of your hair and slide the extension out.
Repeat for each bond, working section by section.
Note: Patience is key. Rushing can lead to damage or discomfort.
Remove Residue
After you remove keratin hair extensions, you may notice some sticky residue left behind. You can use a clarifying shampoo to wash away any leftover remover or adhesive. Sometimes, you need to shampoo more than once for the best results.
Follow up with a deep conditioning mask to restore moisture and softness. Choose a mask with nourishing ingredients like argan oil or shea butter. Leave it on for 15–20 minutes to help your hair recover.
Clarifying shampoo removes residue from keratin removers and oils.
Deep conditioning masks restore moisture and shine.
Oil-based solutions can help remove glue in hair extensions gently.
Professional keratin bond removers dissolve stubborn adhesive.
Dish soap and oil can work as a last resort for removing glue in hair extensions, but always rinse thoroughly.
Tip: Always finish with a gentle detangling session to keep your hair smooth and healthy.
By following these steps, you can remove keratin hair extensions safely and effectively. You protect your natural hair and prepare it for future styling. Remember, patience and proper technique make all the difference when removing hair extensions.
Troubleshooting Hair Extension Removal Issues
Stubborn Keratin Bonds
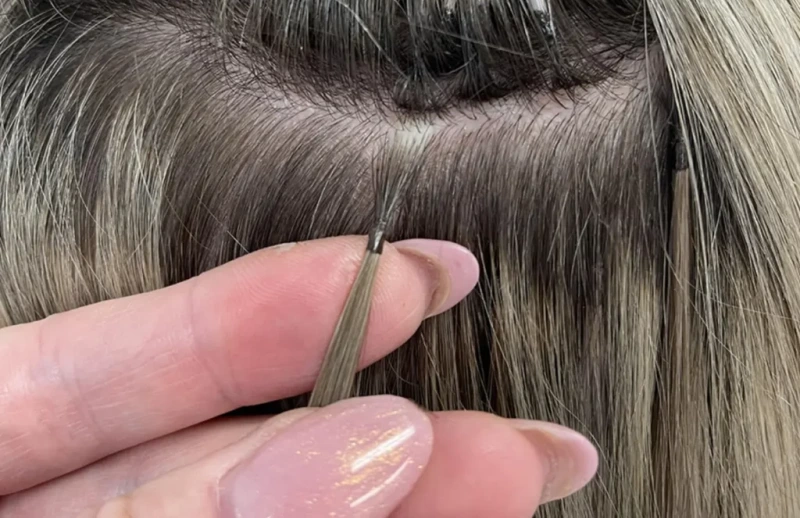
You may encounter stubborn bonds that resist standard removal methods. When this happens, you need to use a keratin bond remover and let it soak directly on the bonds. This softens the adhesive and prepares it for removal.
You can also use pliers to gently crack the softened bonds, making it easier to slide out keratin-bonded extensions. If you prefer a homemade approach, mix 3 ounces of 50% rubbing alcohol with 1 ounce of Aloe Vera Gel.
This solution helps break down tough bonds. Always apply the keratin bond remover patiently and avoid excessive force. Repeat the process if the bond remains firm.
Keratin bond remover: Apply and let soak for maximum effect.
Pliers technique: Crack softened bonds gently.
Homemade solution: Alcohol and Aloe Vera Gel mixture for bond breakdown.
Tip: Never rush the removal process. Take your time to protect your natural hair and scalp.
Matted Hair Solutions
Matted hair can complicate the removal of keratin-bonded extensions. You should start with dry hair to prevent further damage. Gather tools like a wide-tooth comb or loop brush to minimize breakage.
Use a detangling spray or leave-in conditioner to soften knots. Section your hair into manageable parts for easier detangling. Work from the ends up to the roots to reduce pulling. Be gentle throughout the process to avoid breaking the extensions.
Begin with dry hair.
Use a wide-tooth comb or loop brush.
Apply detangling spray or leave-in conditioner.
Section hair for control.
Detangle from ends to roots.
Handle gently to prevent breakage.
Note: Patience and gentle handling are essential for preserving both your extensions and natural hair.
Managing Discomfort
You may feel discomfort during removal, especially if the bonds are tight or the hair is matted. If you experience pain, stop and reassess your technique.
Signs that you need professional help include constant knotting, excessive shedding, split ends, pain or tightness, uneven or slipping extensions, dry or brittle strands, and sticky or greasy residue.
Alpha-certified stylists can resolve these issues safely and efficiently. You protect your hair by seeking expert assistance when needed.
Tangling and knots that resist detangling
Excessive shedding
Split ends or fraying tips
Pain or tightness in the scalp
Extensions slipping or appearing uneven
Dry or brittle extensions
Sticky or greasy feel
Alert: If you notice any of these signs, consult an Alpha-certified stylist for professional removal.
Aftercare for Natural Hair and Extensions

Wash and Condition
You need to start your aftercare routine with a thorough wash. Use a clarifying shampoo to remove any residue left from the removal process. Choose sulfate-free shampoos and conditioners to protect your hair’s natural oils and maintain moisture balance.
These products help reduce frizz, enhance smoothness, and support scalp health. You should cleanse your scalp to remove buildup from sweat and styling products. Consider a scalp scrub treatment if you notice irritation or inflammation.
Sulfate-free formulas maintain moisture and keep hair shiny.
Clarifying shampoos detoxify strands and remove minerals.
Scalp scrubs soothe and refresh your skin.
Tip: Consistent cleansing keeps your hair healthy and prepares it for deep conditioning.
Deep Conditioning Treatments
After removing keratin-based hair extensions, your hair needs extra hydration. Apply a deep conditioning mask once or twice a week. You can use an aloe vera and coconut oil mask to soothe your scalp and nourish strands.
Mix two tablespoons of aloe vera gel with one tablespoon of coconut oil, apply to damp hair, and leave for thirty minutes. An avocado and honey hair mask provides vitamins and proteins for repair. Mash half an avocado with one tablespoon of honey, spread evenly, and leave for twenty to thirty minutes.
Hydrating masks replenish moisture and repair damage.
Natural ingredients like aloe vera, coconut oil, avocado, and honey restore softness.
Regular trims remove weak ends and maintain hair integrity.
Note: Deep conditioning treatments help your hair recover from the stress of keratin-based hair extensions.
Prevent Matting and Damage
You need to prevent matting and breakage after extension removal. Focus on hydrating masks and protein-based products to rebuild hair structure. Perform regular scalp massages to promote circulation and encourage new growth. Apply leave-in conditioners for ongoing hydration and protection.
Avoid heat styling tools to minimize further damage. Opt for low-manipulation hairstyles such as braids or buns. Sleep on silk or satin pillowcases to reduce friction and prevent breakage.
Method | Benefit |
|---|---|
Scalp Massage | Promotes circulation |
Leave-in Conditioner | Hydrates and protects |
Silk Pillowcase | Reduces friction and breakage |
Regular Trims | Maintains hair health |
🛡️ Patience and consistency are essential. Restoring hair health takes time, but your efforts will pay off.
Professional vs. DIY Hair Extension Removal
Risks of At-Home Removal
You may feel tempted to remove flat-tip hair extensions yourself. DIY removal can seem convenient, but it carries risks. You might use improper tools or harsh products that damage your natural hair. Pulling or rushing the process can cause breakage, scalp irritation, or uneven results.
Many household solutions, such as acetone or alcohol, strip moisture and weaken keratin bonds. You risk matting, excessive shedding, and even pain if you do not follow a professional method. Alpha-trained stylists use specialized tools and gentle techniques to protect your hair and scalp.
⚠️ At-home removal often leads to avoidable damage. Professional guidance ensures safe, effective results.
When to Choose a Professional?
You should seek professional removal when you notice persistent issues with your extensions. Alpha-certified stylists have the expertise to handle complex cases and prevent further damage. Consider professional help if you experience:
Constant tangling or knots that resist detangling.
Excessive shedding beyond normal daily loss.
Split ends or visible damage at the tips.
Pain or tightness in your scalp.
Extensions slipping out of place or appearing uneven.
Dry or brittle extensions despite conditioning.
Sticky or greasy residue that does not wash out.
A stylist can assess your hair, use the correct remover solution, and ensure a seamless process. You protect your investment and maintain healthy hair by choosing expert care.
Cost and Time Factors
You may wonder about the cost and time involved in professional versus DIY removal. Professional removal usually costs more upfront, but it saves you from expensive repairs or treatments later.
You spend less time worrying about mistakes or complications. DIY removal may seem faster, but you risk spending extra hours fixing errors or dealing with discomfort. The table below compares key factors:
Removal Method | Cost | Time | Safety | Results |
|---|---|---|---|---|
Professional | Higher | Efficient | Very Safe | Consistent |
DIY | Lower | Variable | Risky | Unpredictable |
💡 Investing in professional removal with Alpha-trained stylists gives you peace of mind and preserves your hair’s integrity.
Conclusion
You ensure safe and effective hair extension removal by following these essential steps:
Recognize when hair extension removal is necessary to protect your natural hair.
Use proper tools like keratin bond remover and fusion pliers for safe hair extension removal.
Follow a careful, step-by-step hair extension removal process to avoid breakage.
Deep condition your hair after hair extension removal to restore strength.
Aftercare matters. Neglecting it can lead to shedding, tangling, and damage. Professional guidance helps you maintain healthy hair after hair extension removal and supports future styling success.
FAQ
How long does it take to remove flat-tip hair extensions?
You can expect the removal process to take 45–90 minutes. The time depends on the number of extensions and the condition of your hair. Working in small sections helps you finish efficiently.
Can you reuse flat-tip hair extensions after removal?
You can reuse Alpha Flat Tip Hair Extensions if you maintain them well. Clean the extensions thoroughly and check the bonds. Consult your stylist for professional reinstallation.
What should you do if you experience pain during removal?
Stop immediately if you feel pain. Check your technique and tools. Seek help from an Alpha-certified stylist if discomfort persists. You protect your scalp and hair by avoiding force.
Which products should you use for aftercare?
Choose sulfate-free shampoos and conditioners. Apply deep conditioning masks weekly. Use leave-in treatments to hydrate and protect your hair. These products help you restore softness and prevent damage.



