

You can confidently proceed with flat-tip hair extensions installation by following a precise step-by-step guide. This process requires attention to detail to ensure a natural finish and long-lasting results. Alpha’s flat tip hair extensions feature premium Remy hair with secure keratin bonds that blend seamlessly.
When you engage in flat tip hair extensions installation, you elevate your style and achieve extensions that look and feel natural. Trust Alpha for professional results every time.
Key Takeaways
- Start with a consultation to choose the right flat tip hair extensions that match your natural hair for a seamless blend.
- Prepare your hair by washing and drying it thoroughly, and sectioning it properly to ensure a strong bond during installation.
- Use the right tools, such as a flat iron and sectioning clips, to achieve a professional finish and maximize the longevity of your extensions.
- Check the security of each bond after installation to ensure comfort and prevent slippage, adjusting as necessary for a natural look.
- Follow a consistent aftercare routine, including gentle brushing and using sulfate-free products, to maintain the quality and appearance of your extensions.
Preparation for Flat Tip Hair Extensions Installation
Consultation and Choosing Alpha Flat Tip Hair Extension
You start the installation process with a thorough consultation. Discuss your goals for length, color, and style. Matching the extensions to your natural hair texture ensures a seamless blend. If you have fine hair, select lightweight options for comfort. Thick hair benefits from heavier wefts for extra volume.
Curly or textured hair requires extensions that match your curl pattern. Consider both base shades and highlights for perfect color integration. Alpha flat tip hair extensions offer a wide range of colors and thicknesses, making them ideal for every hair type.
You gain access to premium Remy hair with secure keratin bonds, ensuring durability and a natural look.
Tip: Always choose extensions that closely match your natural hair for the best results.
Hair Prep Steps
Proper preparation is essential for a strong bond and lasting results. You must prepare your hair by washing it thoroughly. Avoid using conditioner or oils, as these can make the extensions slippery and reduce their grip. Dry your hair completely before starting.
Section your hair into manageable parts using clips. Begin working in small sections at the nape of your neck and move upward. Clean, dry hair provides the best foundation for flat tip hair extensions.
Recommended Hair Prep Steps:
- Wash and dry your hair thoroughly.
- Section your hair with clips.
- Start at the nape and work upward.
Tools Checklist
You need the right tools for a smooth installation. Gather the following items before you begin:
- Flat tip hair extensions
- Flat iron or heating tool
- Sectioning clips
- Comb
- Sectioning the comb for precise parting
These tools help you prepare the hair, create clean sections, and securely attach the extensions. Using the correct tools ensures a professional finish and maximizes the longevity of your extensions.
| Tool | Purpose |
|---|---|
| Flat tip hair extensions | Adds length and volume |
| Flat iron/heating tool | Secures keratin bonds |
| Sectioning clips | Keeps hair organized |
| Comb | Detangles and smooths |
| Sectioning comb | Creates precise partings |
Sectioning for Install Flat Tip Hair Extensions
Creating Clean Partings
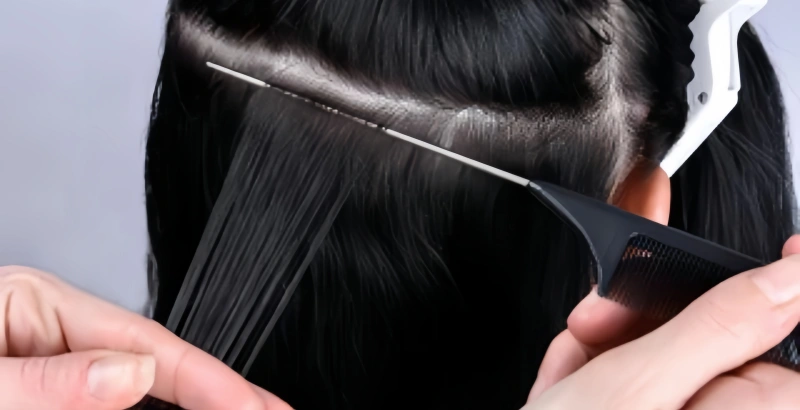
You achieve a flawless installation by starting with precise sectioning. Begin with clean, dry hair. Use a tail comb to create horizontal partings, starting at the nape of your neck. This technique helps you maintain control and accuracy throughout the process.
Secure each section with clips, working methodically from the bottom upward. Release only one row at a time to keep the rest of the hair out of the way. This approach ensures that each extension sits in the correct position and blends seamlessly with your natural hair.
Pro Tip: Consistent partings make blending easier and help you avoid uneven placement.
Step-by-step guide for sectioning your hair:
- Wash and dry your natural hair thoroughly.
- Use a tail comb to create a straight, horizontal parting at the nape.
- Clip away the upper sections, leaving only the bottom row exposed.
- Work upward, releasing one section at a time as you progress.
Working with Small Sections
When sectioning the hair for flat tip extensions, focus on precision. The ideal section size is about one inch. Smaller sections allow the extensions to sit closer to your scalp, which creates a more natural and comfortable result. You avoid bulky or uneven areas by keeping each section uniform.
This method also helps the keratin bonds attach securely and last longer.
- One-inch sections provide the best foundation for each extension.
- Small, even sections ensure a seamless blend with your natural hair.
- Close placement to the scalp gives a discreet, undetectable finish.
Careful sectioning not only improves the look of your extensions but also makes the installation process smoother. By taking your time and working with small, controlled sections, you set yourself up for a professional, salon-quality result.
Attachment Process for Flat Tip Hair Extensions
Placing the Keratin Bond
You begin the flat tip hair extensions installation by carefully placing the keratin bond. Start with a small section of your natural hair, about the same size as the extension strand. Hold the flat tip extension close to the root, but leave a small gap to prevent tension on your scalp.
This gap allows for natural movement and reduces the risk of discomfort. Make sure the keratin bond sits flat and parallel to your scalp. Proper placement is key for a seamless blend and a successful application.
Tip: Always double-check the color match and section size before attaching the flat tip extensions. This step helps you avoid visible bonds and ensures a natural look.
Heating and Securing Extensions
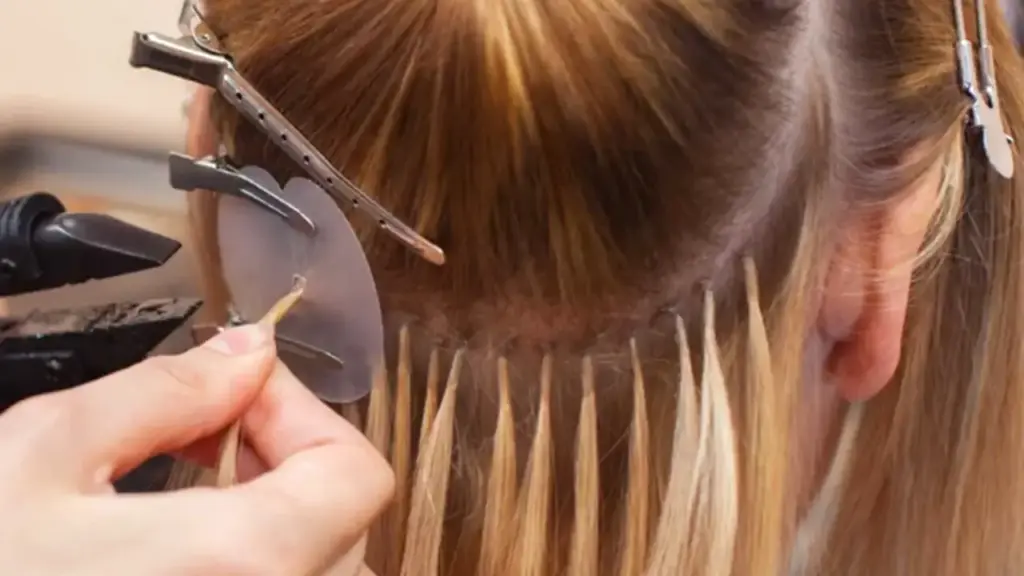
After placing the keratin bond, you move to the next step: heating and securing the extension. Use a professional flat iron or heating tool designed for keratin bonds. Gently clamp the tool over the bond for a few seconds. The heat melts the keratin, allowing it to fuse with your natural hair.
Roll the bond between your fingers while it is still warm. This action shapes the bond and locks the extension in place.
- Do not overheat the bond. Too much heat can damage both the extension and your natural hair.
- Work methodically, attaching the flat tip extensions row by row.
- For a full-head install, expect the process to take at least two hours in a salon setting.
A secure bond is essential for long-lasting results. Take your time with each section to ensure a successful application and minimize the risk of slippage.
Managing Tension and Comfort
Managing tension during flat tip hair extension installation is crucial for comfort and durability. You must avoid pulling the natural hair too tightly when attaching the flat tip extensions. Excessive tension can lead to several problems:
- Scalp irritation and discomfort, such as itching or soreness, often result from bonds that are too tight.
- Bond failure and slippage may occur if the extension is not attached with the right amount of tension.
- Uneven weight distribution can cause stress on your natural hair and affect the ergonomics of the install.
You achieve the best results by working slowly and checking each bond for comfort. If you feel any pulling or tightness, adjust the placement before moving on. Remember, a successful application depends on patience and attention to detail.
Note: Rushing through the attachment process or using too much force can compromise both comfort and the longevity of your extensions.
Common Challenges and Solutions
You may encounter several challenges during the attachment process. Addressing these issues ensures a smooth and professional result:
- Select high-quality extensions, such as Alpha flat tip hair extensions, to avoid problems during installation.
- Match the color of the extensions to your natural hair for a seamless appearance.
- Place each bond correctly to prevent discomfort and ensure the extensions stay secure.
- Blend and trim the extensions as needed for a cohesive look.
- Maintain your extensions regularly to keep them looking their best and extend their lifespan.
By following these steps and focusing on proper technique, you set the foundation for a flawless and comfortable flat tip hair extension installation. Take your time, use the right tools, and always prioritize the health of your natural hair during every stage of the attachment.
Blending and Styling for a Natural Look

Checking Extension Security
You need to check the security of your flat tip hair extensions before you begin blending the extensions. Gently tug each strand to confirm the bond feels firm and comfortable. If you notice any slipping or uneven tension, adjust the bond immediately.
You should inspect the placement along your scalp to ensure the extensions sit flat and do not cause discomfort. Secure bonds help you achieve a natural look and prevent issues during styling.
Tip: Always check the bonds row by row. This step helps you avoid missed spots and ensures every extension stays in place.
Cutting and Blending
You achieve a seamless blend and style by using precise cutting and blending techniques. Start by selecting extensions that match the texture and color of your natural hair. Use layering to create a smooth transition between your hair and the extensions.
Proper color matching enhances the natural appearance and makes the extensions undetectable. Position the extensions strategically to align with your hairline and layers. Incorporate layering in your haircut to improve the flow and texture.
- Match the texture and color of your extensions to your natural hair.
- Use layering techniques for blending the extensions.
- Position extensions to align with your hairline and layers.
- Incorporate layering in your haircut for a seamless blend.
You can ask your stylist to use thinning shears or razors for blending the extensions. This approach helps you avoid blunt edges and creates a soft, natural finish.
Styling Tips
You can style your flat tip hair extensions just like your natural hair. Use heat tools, but keep the temperature moderate to protect the keratin bonds. Choose sulfate-free products to maintain softness and shine. Avoid heavy oils or serums near the bonds. You can curl, straighten, or wave the extensions for a personalized look.
Always brush gently from the tips upward to prevent tangling.
| Styling Tool | Recommended Use |
|---|---|
| Curling Iron | Create waves or curls |
| Flat Iron | Smooth and straighten |
| Round Brush | Add volume and shape |
You achieve a natural appearance by blending the extensions and styling them to match your preferred look. Consistent care and attention to detail help you maintain the quality and longevity of your extensions.
Flat Tip Hair Extensions Aftercare
Brushing and Washing
You protect your investment in flat tip hair extensions by following a consistent aftercare routine. Start by brushing your extensions every morning and evening. Use a wide-tooth comb or a loop brush.
Begin at the tips and work your way up. Hold the roots as you brush to prevent pulling on your natural hair. This method helps you avoid tangling and shedding.
When you wash your hair, choose sulfate-free and alcohol-free shampoos and conditioners. Wash gently in a downward motion. Do not rub or twist the hair. Rinse thoroughly and let your hair air dry when possible. These steps keep your extensions soft and manageable.
Tip: Detangle your hair before washing to make the process easier and prevent knots.
Heat and Styling Care
You can style your extensions with heat tools, but you must take precautions. Set your styling tools to 250°F or lower. High temperatures can weaken the keratin bonds and shorten the lifespan of your extensions. Always apply a heat protectant spray before using any hot tools.
This product locks in moisture and shields the keratin from damage.
| Styling Tool | Safe Temperature | Precaution |
|---|---|---|
| Flat Iron | ≤ 250°F | Use heat protectant spray |
| Curling Wand | ≤ 250°F | Avoid direct heat on bonds |
Limit the use of hot tools to maintain the integrity of your extensions. You keep your hair looking healthy and vibrant with proper aftercare for flat tip extensions.
Maintenance and Move-Ups
You maintain the health of your natural hair and extensions by scheduling regular salon visits. Plan to see your stylist every 6 to 8 weeks for a checkup and move-up service. This routine prevents tension on your scalp and reduces the risk of breakage or thinning, especially around the hairline.
Repeated installations can cause stress on your hair follicles if not managed properly. Always trust a professional for installation and removal. Follow your stylist’s advice for aftercare to ensure your extensions last and your natural hair stays strong.
Note: Consistent aftercare helps you enjoy beautiful, long-lasting results with Alpha flat tip hair extensions.
Expert Tips for Flat Tip Hair Extensions Installation
Choosing Quality Extensions
You set the foundation for a flawless look by selecting quality hair extensions. Always inspect the cuticle alignment and softness. Choose extensions made from Remy human hair for durability and a natural appearance.
Alpha flat tip hair extensions offer consistent thickness and secure keratin bonds, making them ideal for professional results. When you prioritize quality, you ensure seamless blending and long-lasting wear.
If you want extra tips for how to install flat tip extensions, consult with your stylist about color matching and strand thickness before purchase.
Tip: Quality hair extensions last longer and maintain their shine with proper care.
Avoiding Common Mistakes
You avoid common mistakes by following a careful installation process. Many people place extensions too close to the hairline, which can make them visible. Leave 1 to 1.5 inches around the hairline for a natural finish. Focus on the nape area and use slide-cutting techniques to blend your natural hair with the extensions.
Maintain a healthy hair care routine to prevent dryness and breakage. Deep conditioning treatments keep your hair strong and nourished.
- Do not rush through installation or removal. Take your time for a gentle process.
- Seek professional help if you lack experience. This prevents unnecessary stress on your natural hair.
Note: If you need extra tips for how to install flat tip extensions, always ask your stylist for guidance.
Best Practices for Professionals
You achieve the best results by following proven practices. Use sulfate-free, moisturizing shampoos and conditioners to maintain hair health. Brush gently with a loop brush or soft bristle brush. Avoid applying conditioners or oils directly to the bond or root area.
Tie your hair into a loose braid or ponytail before sleeping to minimize tangling. Schedule regular visits to your stylist for maintenance and adjustments. Apply a heat-protectant spray before using hot tools. Limit exposure to chlorine and salt water, or take protective measures.
| Practice | Benefit |
|---|---|
| Sulfate-free products | Maintains hair health |
| Gentle brushing | Prevents damage |
| Regular maintenance | Extends the extension lifespan |
You create a comfortable, natural look and preserve the integrity of your flat tip hair extensions by following these best practices.
Conclusion
You achieve a natural, long-lasting result when you follow each step of flat tip hair extensions installation. Review the key takeaways in the table below to ensure you install flat tip hair extensions correctly and maintain their quality.
| Key Takeaway | Description |
|---|---|
| Proper Preparation | Selecting the right extensions and prepping natural hair are essential for a successful installation. |
| Professional Installation Techniques | Using heat-safe tools and ensuring the extensions are secured properly contribute to durability. |
| Ongoing Maintenance | Daily care routines and professional removal help maintain the quality and natural look of extensions. |
You maintain your extensions by daily detangling, regular moisturizing, and avoiding excessive heat. These habits help you install flat-tip hair extensions for a flawless finish. Trust Alpha flat tip hair extensions for premium results and elevate your style with confidence.
FAQ
How long do Alpha flat tip hair extensions last?
You can expect Alpha flat-tip hair extensions to last 3 to 6 months with proper care. High-quality Remy hair and secure keratin bonds ensure durability. Schedule regular maintenance for the best results.
Can you style or dye Alpha flat-tip hair extensions?
You can curl, straighten, or professionally dye Alpha flat-tip hair extensions. Always use heat protectant spray and keep the temperature below 250°F. For coloring, consult a professional stylist for optimal results.
What makes Alpha flat tip hair extensions different?
You receive 100% cuticle-intact Remy human hair with Alpha. The flat keratin bond creates a seamless, natural look. Alpha offers a wide range of colors, thicknesses, and custom options for every client.
Tip: Choose Alpha for premium quality and a comfortable, long-lasting wear.
How do you remove flat-tip hair extensions safely?
You should visit a professional stylist for removal. The stylist applies a remover solution to soften the keratin bond, then gently slides the extension off your natural hair. This method protects your hair from damage.



