

Hi, I’m Henry Xiang. I have worked in the hair extension industry for decades, and I want to help you remove micro loop hair extensions without unnecessary pulling, breakage, or damage to the extension hair.
You remove micro loop hair extensions by isolating each bead, supporting your natural hair at the root, and using professional micro ring pliers to squeeze the bead in the opposite direction from the way it was clamped. Once the bead reopens, the extension should slide out with very little resistance.
You do not need glue remover, acetone, or heat because a standard micro loop installation is secured with a small metal or silicone-lined ring rather than adhesive.
You may remove a few visible strands yourself with the correct tool. For a full head, heavy matting, scalp discomfort, or hard-to-see beads, professional removal is safer.
Key Takeaways
- Use professional micro ring removal pliers, not scissors or ordinary household pliers.
- Work on dry, detangled hair in small sections, usually beginning at the nape.
- Hold your natural hair above the bead so you do not pull on the root.
- Reopen each bead before sliding the extension out. Never force an extension through a closed or crushed ring.
- Expect to find some trapped shed hair and product buildup near the attachment point.
- Clean, inspect, and store reusable extension strands only after every bead has been removed.
- Stop and contact a stylist if you find severe matting, scalp soreness, broken strands, or a bead that will not open safely.
What Are Micro Loop Hair Extensions?
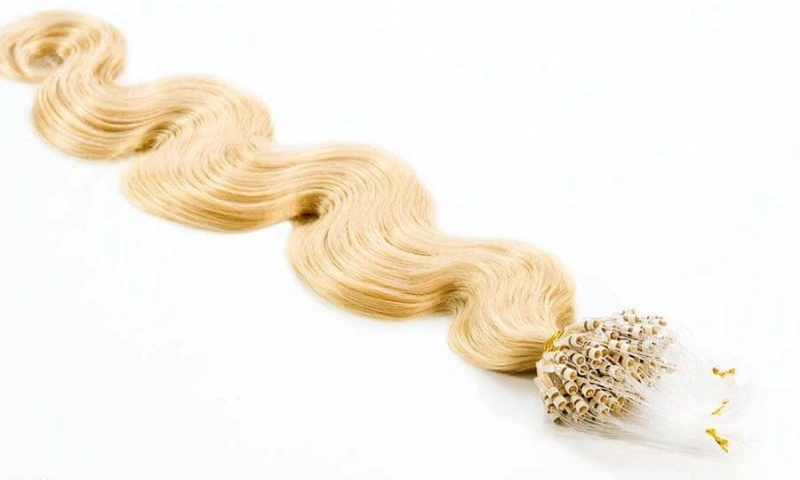
Micro loop hair extensions are individual extension strands supplied with a small loop and bead already attached. During micro loop installation, you pull a small section of your natural hair through the guiding loop, move it through the micro ring, position the ring a short distance from the scalp, and clamp it flat with extension pliers.
You may also see related terms such as micro ring extensions, micro bead extensions, micro link extensions, and microlink extensions. These names are often used interchangeably in consumer searches, although the exact tip, bead size, lining, and installation system can vary by supplier.
Before removal, look closely at your own installation instead of assuming every beaded method is identical.
The important point is simple: a standard micro loop strand is held by mechanical pressure from a bead. It is not a keratin bond and it is not a tape attachment. That is why the correct removal method is to reopen the bead, not dissolve it with a chemical remover.
When Should You Remove Micro Loop Hair Extensions?
You should follow the maintenance schedule given by your stylist because your hair growth, density, installation pattern, and home-care routine all affect timing. Many clients need a professional check or move-up appointment around every six to eight weeks.
Your exact schedule should also reflect how long micro loop hair extensions last on your hair and how well the attachments have been maintained.
You may be ready for removal or refitting when:
- The beads have moved noticeably away from your scalp as your natural hair has grown.
- Several strands are slipping, twisting, or sitting at different heights.
- You see tangling or compacted shed hair around the attachment points.
- The extensions no longer blend as smoothly as they did after installation.
- A bead feels uncomfortable, pulls when you brush, or creates scalp tenderness.
- You are changing the color, length, density, or placement of your extension set.
- Your stylist has recommended a full removal and reinstallation rather than another move-up.
Do not wait until the attachments are heavily grown out and matted. The longer the beads hang below the original placement, the easier it is for neighboring strands to twist together. Timely maintenance usually makes the removal process faster and more comfortable.
Tools You Need for Micro Loop Hair Extension Removal
Prepare your tools before you begin. If you are building a salon kit, review the available hair extension tools and accessories before the service. Stopping halfway through to find a comb or clip makes it harder to keep the rows organized.
Professional micro ring removal pliers
This is the essential tool. Use pliers designed to open micro rings or micro beads. The jaw shape should let you reverse the original clamp without catching the natural hair.
Do not use scissors, wire cutters, or sharp household tools. Standard hardware pliers may crush the bead into an uneven shape or slip against the scalp.
Pin-tail comb or fine-tooth comb
Use the pointed tail for clean sectioning and the teeth for gently separating trapped shed hair after an extension has been released. Avoid pulling a fine-tooth comb directly through a compacted root area. Loosen the hair with your fingers first.
Sectioning clips
Clips keep the top layers away from the row you are removing. Clear sectioning helps you see the bead and prevents loose hair from becoming caught in the pliers.
Extension-safe brush or wide-tooth comb
Use this before removal to detangle the mid-lengths and ends. You want the extension hair smooth enough to handle without tugging at the attachments.
Good lighting and two mirrors
A full-head removal is difficult when you cannot see the back of your head. Use bright, even lighting and a second mirror, or ask a trained person to assist you. Poor visibility can turn a simple bead removal into a pulling problem.
Optional detangling spray
A lightweight detangling spray can help with the loose lengths and with small knots after the bead is removed. It does not open the micro ring. Keep heavy oil or conditioner away from the working area until the attachment has been safely released.
How to Prepare Your Hair Before Removal?
Remove micro loop extensions from dry hair unless your stylist has given you a different product-specific instruction. Wet hair stretches more easily and makes it harder to judge how much tension you are applying.
Start by brushing the ends. Work upward in short strokes while supporting the hair near the attachment area. Do not drag a brush across the beads. Your goal is to remove loose tangles from the lengths, not to comb through the root attachments.
Next, divide your hair into four broad sections. Clip the sides and crown out of the way. Expose the lowest row at the nape so you can work in a clear, controlled sequence.
Before opening the first bead, check the condition of the row. If several attachments have joined into one dense mat, if you see irritated skin, or if the natural hair feels extremely fragile, stop. A professional stylist can separate the area with better visibility and less stress on the root.
Tip: Take a photo of the rows before removal if you plan to reinstall the same set. The image can help you or your stylist review placement, density, and any areas that showed unusual slippage.
How Do You Remove Micro Loop Hair Extensions Step by Step?
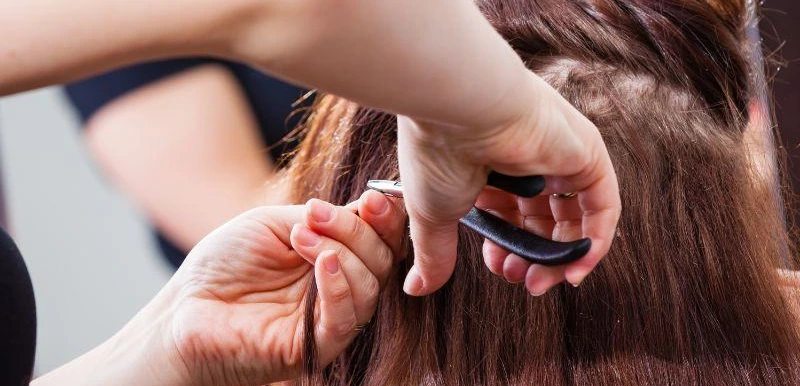
The safest approach is methodical. Remove one strand at a time and finish one row before releasing the next section.
Step 1: Expose the first row
Begin at the nape. Use the tail of your comb to create a clean horizontal part directly above the first row of beads. Clip all remaining hair securely above it.
Choose one bead that you can see and reach easily. This lets you confirm the direction and pressure before moving to harder areas.
Step 2: Isolate the bead and extension strand
Separate the selected extension from the strands beside it. Make sure no loose natural hair is lying across the bead. If neighboring hairs are caught in the pliers, you may create unnecessary tension even when the bead opens correctly.
Hold the extension strand in one hand. With your other hand, place two fingers against your natural hair just above the bead. This support keeps the movement at the attachment point instead of transferring it to the scalp.
Step 3: Identify how the bead was clamped
A properly installed micro ring is normally flattened during application. To remove it, you need to squeeze across the narrow or compressed sides so the bead returns toward its original rounded shape.
Look at the bead before you position the pliers. Do not repeatedly squeeze it from random angles. If you apply pressure in the same direction as the original clamp, you may flatten it further and trap the hair more tightly.
Step 4: Open the micro ring with removal pliers
Place the plier jaws around the bead only. Keep natural hair, the extension tip, and your fingers clear of the jaws.
Apply slow, even pressure in the opposite direction from the original clamp. You should see the flattened bead begin to reopen. You do not need to crush it or make it perfectly round; you only need enough space for the natural hair and extension tip to move freely.
If the bead does not change shape, release the pliers and check your angle. Repositioning is safer than adding more force.
Step 5: Slide out the extension
Continue supporting your natural hair above the ring. Gently move the extension strand downward while keeping the bead steady. In many installations, the extension tip and bead will slide away together. In others, the strand may release first and the bead may remain on the natural hair until you slide it off separately.
The extension should come out with minimal resistance. If it feels stuck, stop. Open the bead a little more and check for hair wrapped around the tip. Pulling harder is not the solution.
Step 6: Separate trapped shed hair and buildup
After the strand is removed, you may see a small cluster close to the root. This does not automatically mean the extension has caused sudden hair loss. Natural hairs that shed during normal daily wear can remain trapped inside the bead and attachment area until removal.
Use your fingertips to loosen the cluster gently. Start at the outer edge and separate a few hairs at a time. Once the area is loose, use the tail or teeth of your comb to remove remaining tangles and product residue.
Do not scrape the scalp or force a comb through a hard knot. Apply a small amount of detangling spray to the released hair if needed. If the cluster is tight, painful, or connected to several neighboring beads, leave it for a professional.
Step 7: Repeat row by row
Lay each removed extension in the same direction on a clean towel or extension mat. Keeping roots and ends aligned reduces tangling and simplifies inspection.
Continue across the first row, then release the next horizontal section. Work from the nape toward the crown. Count the removed strands if you need accurate records for reinstallation, salon inventory, or a client service file.
Take short breaks during a full-head removal. Tired hands are more likely to grip the wrong part of the bead or pull an extension before it is fully open.
Step 8: Check your scalp and natural hair
When every extension is out, run your fingers slowly across the scalp. Check behind the ears, around the sides, and through the crown for missed beads.
Finger-detangle the natural hair before you wash it. Then use a wide-tooth comb, beginning at the ends and working upward. A final check prevents a hidden bead or knot from tightening in the shower.
Common Removal Problems and How to Handle Them
The bead will not open
Check that you are squeezing across the compressed sides rather than flattening the bead again. Confirm that you are using micro ring removal pliers with the correct jaw shape. If the bead is heavily distorted, corroded, or too close to the scalp to grip safely, let a stylist handle it.
The extension will not slide out
Do not pull. The bead may not be open far enough, or natural hair may be wrapped around the extension tip. Support the root, reopen the bead slightly, and use your fingers to separate any caught strands.
Several attachments are matted together
Remove the beads you can clearly isolate around the outside of the mat. Do not cut into the center. Heavy matting is easier to manage when a stylist can see the area directly and use both hands without working backward in a mirror.
The bead has been crushed
Stop squeezing from multiple angles. A sharply folded bead can catch hair. A trained stylist may be able to open it with precision pliers. Never use scissors close to the scalp to cut through the ring.
Your scalp feels sore
Mild sensitivity can occur when a grown-out or twisted attachment is handled, but removal should not require sharp pain. Stop if you feel burning, strong pulling, or persistent tenderness. Check for redness, broken skin, or a bead tangled close to the scalp and seek professional help.
You see more loose hair than expected
Remember that shed hairs can remain held in the attachment for weeks. Look at the condition of the released strands rather than the size of the loose cluster alone. If you see broken short hairs, thinning patches, scalp inflammation, or shedding that continues after removal, speak with a qualified stylist or healthcare professional.
Mistakes to Avoid When Removing Micro Loop Extensions
You can prevent most removal damage by avoiding a few common shortcuts:
- Do not pull an extension because the bead looks loose.
- Do not cut close to a bead with scissors.
- Do not use acetone, keratin bond remover, or tape remover on a standard micro loop attachment.
- Do not soak the roots in oil and expect the metal ring to release.
- Do not remove the extensions from wet, tangled hair.
- Do not grip natural hair inside the plier jaws.
- Do not comb through a compacted root cluster before loosening it with your fingers.
- Do not rush through the back of the head when you cannot see the bead position.
- Do not reuse a bead that has become cracked, sharply folded, or difficult to clamp evenly.
Alert: “No glue” does not mean “no technique.” Micro loop extensions can be straightforward to remove, but the natural hair still needs support and the ring still needs to be opened in the correct direction.
At-Home Removal or Professional Salon Removal?
You may be able to remove a small number of visible, well-maintained strands at home. A full set is different. You need to work accurately across areas you cannot easily see, and you may need to separate weeks of trapped shedding around dozens or hundreds of attachments.
| Situation | At-home removal | Professional removal |
| A few loose, visible strands | Reasonable with the correct tool and technique | Optional |
| Full-head removal | Possible, but assistance is strongly recommended | Usually the safest choice |
| Heavy matting or joined attachments | Not recommended | Recommended |
| Scalp irritation or pain | Stop the process | Recommended |
| Crushed or damaged beads | High risk of catching hair | Recommended |
| Removal followed by immediate refitting | Difficult to assess placement and strand condition yourself | Recommended |
| Salon client service or brand demonstration | Requires trained, insured personnel and a documented process | Essential |
Choose professional removal when you are unsure. A careful service costs less than correcting avoidable breakage or replacing damaged extension hair.
How to Care for Your Natural Hair After Removal?
Your first task is to separate all trapped shed hair before shampooing. For the next wear cycle, follow a consistent micro loop hair extension care routine so the beads remain easier to isolate at removal. Once your hair is fully detangled, rinse with lukewarm water and cleanse the scalp gently. Use a clarifying shampoo only when you have noticeable product buildup and your hair condition allows it.
Follow with a moisturizing conditioner through the mid-lengths and ends.
Pat your hair dry instead of rubbing it. Limit high heat immediately after removal, especially if the hair feels dry or the scalp feels sensitive. A lightweight leave-in conditioner can make the lengths easier to comb.
Check the areas where the beads were placed. Your natural hair should not show open sores, persistent redness, or concentrated broken patches. Give your scalp time to settle before a new installation if it feels tender.
You may be able to reinstall extensions on the same day when your hair and scalp are healthy and the service is being handled professionally. If you have matting, irritation, or significant breakage, wait until the condition has been assessed and corrected.
How to Clean, Inspect, and Reuse Micro Loop Hair Extensions?
High-quality human hair extensions may be reusable when they are removed and maintained correctly. Review the complete guide on how to reuse micro loop hair extensions when planning the next fitting. Reusability depends on the strand construction, the condition of the tip or loop, previous chemical processing, heat exposure, and daily care.
After removal:
- Keep every strand aligned from root to end.
- Remove all old beads that are not part of a reusable pre-looped construction.
- Inspect the attachment area for cracking, unraveling, shedding, or distortion.
- Detangle the extension hair from the ends upward.
- Wash the loose extension strands in the direction of the cuticle without rubbing them into a bundle.
- Apply conditioner to the hair lengths, avoiding any attachment component that must remain clean for refitting.
- Rinse thoroughly and lay the strands flat to air-dry.
- Sort them by shade, length, texture, and usable condition.
- Store the completely dry hair flat in a clean, breathable package.
Do not hold or wash an individual micro loop strand as if it were a weft. Keep the strands organized and avoid twisting the attachment ends together.
For the next installation, use new replacement beads when the system requires them. Old beads may have lost their shape or lining and may not clamp with consistent pressure.
A Removal Protocol for Salons and Hair Extension Brands
If you are a salon, educator, distributor, or hair extension brand, removal should be treated as a controlled service rather than an informal final step.
Before the appointment, record the installation date, method, number of strands, shade mix, length, and any previous maintenance. Ask the client about slippage, tenderness, product use, and areas that have been difficult to brush.
During removal, work in a consistent order and separate reusable hair from rejected hair. Inspect each attachment for abnormal shedding, tip failure, bead damage, discoloration, or heavy product buildup. Replace distorted beads instead of trying to save a low-cost component at the expense of a secure refit.
After removal, document the condition of the client’s natural hair and scalp. Photographs can help you monitor repeated stress in the same placement area and improve future section size or weight distribution.
For branded aftercare, give clients clear instructions that distinguish beaded systems from adhesive systems. A client should know that micro loop removal uses pliers and controlled pressure—not bond remover. This small detail reduces misuse and protects the reputation of both the salon and the product brand.
Alpha hair extension manufactures 100% full cuticle Remy hair extensions and supports OEM and ODM services for hair brands, salon chains, retailers, and wholesalers. When you develop a micro loop range, you can also standardize bead specifications, color matching, replacement components, salon instructions, and removal training materials so the customer experience remains consistent after the initial installation.
FAQ
How long does it take to remove micro loop hair extensions?
A full set often takes about 45 to 90 minutes, but the timing depends on the number of strands, bead condition, regrowth, visibility, and matting. A well-maintained installation usually comes out faster than an overdue set with joined attachments.
Can you remove micro loop hair extensions without pliers?
You should not remove a full set without proper micro ring removal pliers. Fingers, ordinary pliers, and improvised tools give you less control and can crush the bead or catch natural hair. If you do not have the correct tool, book a professional removal.
Do you need hair extension remover solution?
Not for a standard micro loop installation. The attachment is mechanical, so you reopen the bead with pliers. Chemical remover is used for certain adhesive or keratin-bonded methods, not for a normal micro ring attachment.
Should you wash your hair before removing micro loop extensions?
Your hair should be dry and reasonably clean, but it does not need to be freshly washed. Avoid starting with wet hair or heavy oil around the beads. Detangle the lengths and make sure you can see each attachment clearly.
Is hair shedding normal after micro loop extension removal?
Some loose hair is expected because naturally shed strands can remain trapped at the bead until the extensions are removed. Gently separate the cluster before washing. Seek professional advice if you see bald areas, scalp inflammation, continuing excessive shedding, or large amounts of broken short hair.
Can you reuse micro loop hair extensions?
You can often reuse quality human hair extensions when the hair, tip, and loop remain in good condition. Clean and inspect every strand, keep the cuticles aligned, and replace damaged beads or components before refitting.
Can you remove and reinstall micro loop extensions on the same day?
Yes, when your scalp and natural hair are healthy and the extension strands pass inspection. A stylist should adjust the placement to your current regrowth and use suitable replacement beads. Delay reinstallation if you have tenderness, matting, or breakage.
Does micro loop removal hurt?
Correct removal should not be painful. You may feel light movement at the root, but you should not feel sharp pulling or burning. Pain usually means the hair is tangled, the bead is not fully open, or the attachment is being handled at the wrong angle.
Conclusion
So, how do you remove micro loop hair extensions safely? You isolate one bead, support the natural hair above it, reopen the ring with professional removal pliers, and slide the extension out without pulling. Then you separate trapped shed hair, work through each row, and give both your natural hair and reusable extensions the correct aftercare.
The technique is simple when the installation is well maintained and the bead is easy to reach. The judgment is knowing when to stop. If you cannot see the attachment, the bead will not open, several strands are matted together, or your scalp feels sore, let a trained stylist complete the removal.
With the right tools, patient handling, and a clear salon protocol, you protect the natural hair, preserve the extension strands, and prepare the set for a cleaner, safer reinstallation.



