

You want a flawless look with added length and volume. Begin by selecting high-quality micro hair extensions for the best results. Alpha Micro Loop Hair Extensions make the process simple and efficient.
Prepare your natural hair to ensure a smooth installation. > Tip: Gather all necessary tools before you start to save time and achieve a seamless finish.
Key Takeaways
Choose high-quality Alpha Micro Loop Hair Extensions for a natural look and easy maintenance.
Prepare your hair properly by washing, drying, and sectioning it before installation to ensure a secure fit.
Follow a step-by-step installation process, starting from the nape of your neck and spacing extensions evenly for a seamless finish.
Maintain your extensions with daily brushing, sulfate-free products, and regular professional check-ups to extend their lifespan.
Avoid common mistakes like washing too soon after installation or using heat near the micro rings to keep your extensions looking fresh.
Micro Hair Extensions Overview
Types of Micro Extensions
You can choose from several types of micro hair extensions to achieve your desired look. Each method offers unique benefits and suits different hair needs. The most popular options include micro loop, micro-link, and micro ring extensions. The table below highlights the main differences among these varieties:
Feature | Micro Links | Micro Rings | Micro Beads |
|---|---|---|---|
Hair Type | Various hair types | Primarily Russian and Slavic | Remy human hair |
Application Type | Small metal loops | Small metal rings | Small metal loops |
Installation Time | 2 to 4 hours | 2 to 4 hours | 2 to 4 hours |
Average Cost | $800 to $2,000 | $800 to $2,000 | $800 to $2,000 |
Lifespan | 3 to 6 months | 3 to 6 months | 3 to 6 months |
Maintenance | Minimal | Minimal | Minimal |
Micro Links give you an integrated attachment process, which enhances natural movement and blend.
Micro Rings remain virtually undetectable and damage-free, allowing for easy removal or repositioning.
Micro Beads deliver vibrant, voluminous hair without heat or chemicals.
Micro loop hair extensions use a plastic tab to thread your hair through a pre-attached copper ring. You clamp the ring to secure the extension. This method stands out for its ease of use and speed. You need fewer tools and less time compared to other methods.
Alpha Micro Loop Hair Extensions Features
Alpha Micro hair extensions set a new standard for quality and convenience. You receive 100% Remy human hair with intact cuticles, which ensures softness and durability. The tiny, color-coded micro rings provide a secure fit without glue or heat. You can customize the length, color, and texture to match your natural hair.
Alpha micro hair extensions blend seamlessly, giving you a natural and voluminous look. You can reuse these extensions, making them a cost-effective choice for long-term style. Alpha’s strict quality control and ethical sourcing guarantee a premium product every time.
Tip: Choose Alpha micro hair extensions for a flawless finish and easy maintenance. You will enjoy a natural look with minimal effort.
Selecting and Preparing Extensions
Choosing Alpha Micro Loop Extensions
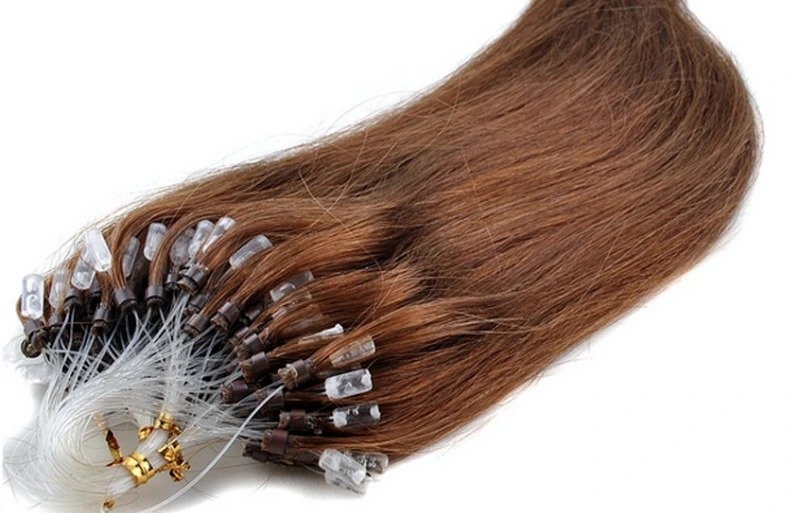
Selecting the right Alpha micro loop extensions is essential for a seamless and natural result. You should assess your hair’s texture, porosity, and curl pattern before making a decision. The table below helps you match your natural hair with the best extension options and avoid common mismatches:
Factor | What to Assess | Best Micro Loop Match | Risk of Mismatch |
|---|---|---|---|
Texture | Compare strand thickness to sewing thread | Fine: 120–140g, 16–18 inch max | Fine hair + coarse extensions = slippage & irritation |
Porosity | Drop a strand in water to check absorption | Low porosity: Virgin Indian or Russian hair | High-porosity extensions on low-porosity hair = frizz & dryness |
Pattern Consistency | Observe where curls start and their uniformity | Match the curl origin point for natural blending | Mismatched curl origins = unnatural “S-curls” and increased friction |
Tip: Matching the length, color, and texture of your micro loop extensions to your natural hair ensures a flawless blend and comfortable wear.
Tools and Accessories Needed
You need the right tools for a smooth installation. Gather these items before you begin:
Loop tool for threading hair through micro rings
Pliers for clamping micro bead hair extensions
Sectioning clips to divide hair
Fine-tooth comb for detangling
Mirror for visibility during installation
Alpha micro loop extensions in your chosen shade and length
Note: Having all tools ready streamlines the process and reduces installation time.
Hair Preparation Steps
Proper pre-installation preparation sets the foundation for long-lasting results. Follow these steps:
Shampoo and condition your hair to remove buildup.
Dry your hair completely to prevent moisture issues.
Detangle your hair with a fine-tooth comb.
Straighten your hair if needed for easier sectioning.
Pin up the crown section to expose the lower layers.
Divide your hair vertically and clip the sides.
Part the back horizontally above your neckline and secure the rest.
You ensure your natural hair is clean, dry, and ready for micro bead hair extensions. Careful preparation helps the extensions stay secure and look natural.
How to Install Micro Loop Hair Extensions?
Sectioning and Spacing
Proper sectioning of your hair ensures even distribution and a natural finish. You start by shampooing and conditioning your hair. Dry and untangle your strands, then straighten them for easier handling. Pin the crown section on top of your head. Divide your hair vertically and clip the sides.
Part the back horizontally a few inches above your neckline and secure the rest. Use the hanging section as the base for the first row of extensions.
Follow these steps for sectioning your hair:
Shampoo, condition, dry, and straighten your hair.
Pin the crown section upward.
Divide your hair vertically and clip the sides.
Part the back horizontally above your neckline and fasten the remaining hair.
Use the hanging section as the base for the first extension row.
Space bundles half an inch apart with rooted pieces in between.
Leave half an inch of hair next to your face to avoid obvious additions.
Release the clipped back hair and comb through to eliminate tangles.
Make another horizontal part above the first one and pin the remaining hair upward.
Repeat the parting and attachment stages until reaching the crown.
Tip: Careful sectioning of your hair prevents uneven fitting and helps you achieve a seamless look.
Installing Alpha Micro Loop Extensions
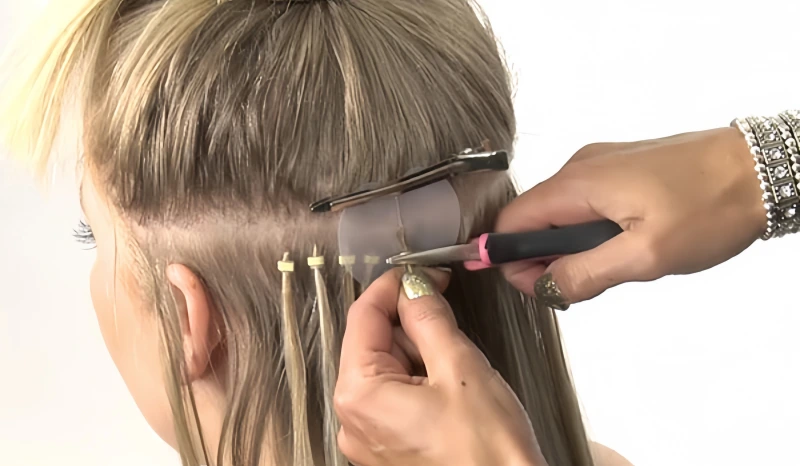
You can follow a step-by-step installation guide to install micro loop hair extensions efficiently. Begin with small, 1-inch sections at the nape. Pull the ends of your hair through the plastic loop attached to the extension. Thread your own hair through the micro ring.
Place a micro ring on a threading tool, then capture a thin strand of natural hair and a micro link hair extension strand. Use micro link pliers to crimp the ring gently but firmly. Move the attached segment upward until it sits half an inch below your scalp. Clamp the ring’s middle with pliers and crimp both ends for a secure fit.
Here is how to apply micro loop hair extensions:
Section your hair into small, 1-inch sections starting from the nape.
Pull the ends of your hair through the plastic loop.
Thread your hair through the micro ring.
Place a micro ring on a threading tool.
Capture a thin strand of natural hair and a micro-link hair extension strand.
Use micro link pliers to crimp the ring gently but firmly.
Move the attached segment upward until it’s half an inch below your scalp.
Clamp the ring’s middle and crimp both ends.
Space bundles half an inch apart for balanced fitting.
Follow your stylist’s aftercare instructions before the first wash; micro rings do not require an adhesive curing period.
Note: Completing the installation process requires patience and precision. Avoid rushing to ensure a secure fitting and a natural appearance.
Micro Link Hair Extensions Application
Micro-link hair extensions offer a gentle and secure fitting method. You do not need heat or glue, which protects your natural hair. The micro rings are color-coded for easy matching.
You can install micro-link hair extensions by threading your hair through the ring and crimping it with pliers. Always space the extensions evenly and avoid placing them too close to your scalp.
Common mistakes during installation include:
Not having the extensions installed by a professional hairdresser.
Failing to wash hair with a clarifying shampoo before installation.
Washing hair too soon after installation (before 48 hours).
Applying conditioner or oils directly to the roots.
Brushing hair extensions at the root.
Washing hair extensions too frequently.
Using heat styling tools near the beads.
Sleeping on wet hair extensions.
Alert: Avoid these mistakes to maintain the integrity of your micro link hair extensions and ensure long-lasting fitting.
Blending for a Natural Look
Blending your micro loop hair extensions with your natural hair creates a seamless finish. Choose extensions that match your color undertones and texture behavior. Balance the density of extensions with your natural hair for a uniform appearance.
Place extensions strategically based on your styling habits, such as parting or ponytails. Use a connection haircut to blend the extensions with your natural hair.
You can use these techniques for blending:
Match color undertones for a natural look.
Consider texture behavior to blend seamlessly.
Balance density for uniform fitting.
Place extensions strategically for your preferred styles.
Use a connection haircut for smooth blending.
Tip: Completing the installation process with proper blending ensures your micro loop hair extensions look and feel natural.
You achieve a flawless result by following the step-by-step installation guide, focusing on sectioning your hair, precise fitting, and blending techniques. Completing the installation process with Alpha Micro Loop Hair Extensions gives you a professional, natural appearance.
Maintenance for Micro Loop Extensions
Daily Care and Brushing
You maintain the beauty and longevity of your micro ring hair extensions with consistent daily care. Begin each morning by gently detangling your hair using a soft-bristle brush. Start at the ends and work upward, holding the roots to prevent tension at the attachment points.
This initial care routine reduces shedding and keeps your extensions smooth. Avoid tugging or brushing too close to the micro rings, as this preserves the secure fit and prevents slippage.
Tip: Use a wide-tooth comb for stubborn tangles and always brush before washing to minimize knots.
Washing and Styling Tips
Proper extension care starts with the right washing technique. Choose sulfate-free shampoos to protect both your natural hair and micro ring hair extensions. Apply a moisturizing conditioner from mid-lengths to ends, steering clear of the bonds.
When styling, select lightweight products and use low-heat tools to maintain the integrity of your extensions. Alcohol-free sprays and serums help you achieve shine without weakening the bonds. Schedule regular maintenance appointments every 4-6 weeks to keep your extensions looking fresh.
Wash with sulfate-free products.
Condition only from mid-lengths to ends.
Style with low-heat tools and lightweight products.
Avoid applying oils or conditioners near the micro rings.
Nighttime Protection
You prevent tangling and damage by securing your hair before bed. Braid your hair or create a loose bun at the nape of your neck. Use a soft, fabric-covered hair tie for a low ponytail.
Sleeping on a silk or satin pillowcase reduces friction and keeps your micro ring hair extensions smooth. Wrap your hair in a silk scarf or wear a silk cap for extra protection.
Braid or twist hair to minimize knots.
Use silk or satin pillowcases.
Secure hair with gentle accessories.
Sleep on your back to reduce contact with the pillow.
Regular Inspections and Adjustments
Post-installation maintenance ensures your extensions remain secure and natural-looking. Inspect your micro ring hair extensions every few weeks for signs of slippage or tangling. Schedule professional maintenance appointments monthly for washing, trimming, and adjusting micro bead hair extensions.
Schedule professional adjustments approximately every 6–8 weeks, depending on hair growth, slippage, and the condition of the attachment points. When removal or refitting is due, have a trained stylist assess the extensions and follow the dedicated removal guide rather than repeating the full process in this installation article.
Note: Consistent maintenance and regular inspections extend the lifespan of your extensions and keep your style fresh.
When to Schedule Micro Loop Extension Removal or Refitting?
Micro loop extensions may need professional adjustment, removal, or refitting when the beads have moved noticeably away from the scalp, slippage increases, tangling develops around the attachment points, or the wearer experiences discomfort. Do not force or pull the strands.
A trained stylist should assess the natural hair, open the beads with the correct tools, and determine whether the extensions are suitable for cleaning and reinstallation. For complete removal steps, safety precautions, aftercare, and reusability guidance, read our dedicated guide: How to Remove Micro Loop Hair Extensions Safely.
Troubleshooting and Expert Tips
Common Mistakes to Avoid
You may encounter several issues when installing or maintaining micro-loop hair extensions. Recognizing these problems early helps you keep your hair healthy and your extensions secure. The table below highlights the most common issues and their explanations:
Issue | Explanation |
|---|---|
Slippage | Loose rings, improper installation, or natural hair shedding can cause extensions to slip. |
Improper Installation | Extensions may not stay secure, leading to discomfort and slippage. |
Maintenance | Skipping regular appointments can result in loose rings and poor positioning. |
Product Choice | Using sulfate-free and paraben-free products prevents drying and slippage. |
Adjustment Frequency | Adjust extensions every 6-8 weeks to manage hair growth and maintain security. |
Warnings: Always schedule maintenance appointments and use the right products to avoid these issues.
Minimizing Shedding and Breakage
You want your extensions to last and look natural. Follow these tips to minimize shedding and breakage:
Avoid heat tools and harsh brushing.
Use sulfate-free shampoo and lukewarm water (86-95°F).
Massage your scalp lightly and pat your hair dry.
Apply a keratin or argan oil mask once or twice a week, but avoid the micro rings and attachment points.
Use lightweight oil on the ends to reduce frizz.
Carry detangling spray for dryness.
Use a wide-tooth comb, starting from the ends.
Finger-detangle wet hair.
Braid or loosely secure the hair before sleeping or exercising; do not attempt routine at-home removal of semi-permanent micro loop extensions.
Avoid saunas and pools unless you wear a silk cap.
Air-dry extensions and store them in a breathable bag.
Tip: Consistent care keeps your hair and extensions soft, smooth, and tangle-free.
Professional Advice for Beginners
If you are new to micro loop hair extensions, start with these expert recommendations:
Choose 100% cuticle-intact Remy human hair for the most natural look.
Match the texture and color of your extensions to your natural hair for seamless blending.
Store extensions in a dry, cool, and well-ventilated place when not in use.
Adjust extensions every 6-8 weeks to manage hair growth.
Never bleach extensions again after purchase.
Follow all wearing precautions for micro link hair extensions to protect your scalp and hair.
Remember: Proper installation and regular care help your extensions last 6 to 12 months.
You can achieve salon-quality results at home by following these expert tips and warnings. Regular maintenance and the right products ensure your hair and extensions stay healthy and beautiful.
Conclusion
Alpha Micro Loop Hair Extensions give you a simple way to achieve fuller, longer hair with a natural look. You can install them easily and enjoy lasting results with proper care. These extensions blend seamlessly and offer great value over time. For best results, follow this guide for safe application and maintenance.
For more tips and expert support, visit Alpha’s official website. Your perfect hair transformation starts here.
FAQ
How long do Alpha Micro Loop Hair Extensions last?
You can expect Alpha Micro Loop Hair Extensions to last 6 to 12 weeks with proper care. Regular maintenance and gentle handling help you maximize their lifespan.
Can you style Alpha Micro Loop Hair Extensions with heat tools?
You may use heat tools on Alpha Micro Loop Hair Extensions because they are made from 100% human hair. Always use a heat protectant spray and keep the temperature low for best results.
Are Alpha Micro Loop Hair Extensions reusable?
Alpha Micro Loop Hair Extensions may be reusable when the hair, attachment points, and overall strand condition pass a professional inspection. Reusability depends on wear, maintenance history, and the condition of each extension after removal. See our dedicated removal guide for removal, cleaning, aftercare, and reinstallation guidance.
How many strands do you need for a full head?
Hair Type | Recommended Strands |
|---|---|
Fine | 100–120 |
Medium | 120–150 |
Thick | 150–180 |
You should consult with your stylist to determine the exact number for your desired look.



