

You want a pre-bonded hair extension installation that delivers a natural, seamless finish and comfort you can trust. Choosing the right method and product matters for results that last. Alpha pre-bonded hair extensions use cuticle-intact Remy hair and original Italian glue, blending discreetly and providing softness.
The keratin bonds are small and hidden, making styling easy and comfortable. Before you begin, prepare your hair and workspace for a safe installation.
The table below shows why prebonded extensions stand out:
Feature | Pre-Bonded Hair Extensions | Other Types of Extensions |
|---|---|---|
Longevity | Lasts 3-6 months | Varies, often shorter |
Natural Appearance | Seamless blend with hair | Maybe more visible |
Application | Discreet and seamless | Can be bulky or noticeable |
Suitability for Hair Types | Wide range of compatibility | Limited options |
Key Takeaways
Choose high-quality pre-bonded hair extensions for a natural look and comfort. Alpha extensions use cuticle-intact Remy hair and original Italian glue for the best results.
Prepare your hair properly before installation. Wash with a clarifying shampoo, avoid conditioner, and ensure your scalp is clean and dry for optimal bond adhesion.
Follow precise sectioning techniques during installation. Thin, even sections help achieve a seamless blend and improve comfort while wearing extensions.
Maintain your extensions with a consistent daily routine. Use sulfate-free products, detangle gently, and schedule regular salon visits for touch-ups.
Consult a professional stylist for installation and removal. Proper guidance ensures the health of your natural hair and the longevity of your extensions.
Pre-Bonded Hair Extensions Installation Guide
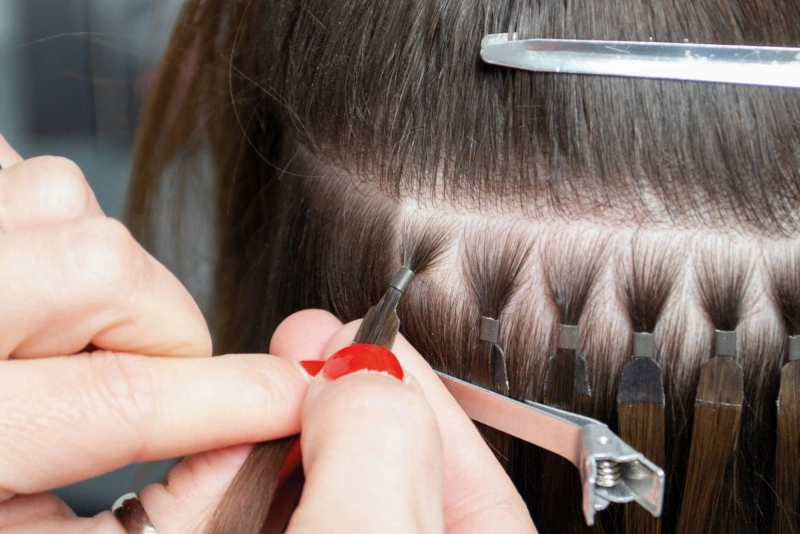
Types & Methods Overview
You have several options for pre-bonded hair extensions installation. Understanding the types and methods helps you choose the right approach for your hair and lifestyle. The most popular types include keratin bond extensions, tape-in extensions, and micro-link extensions.
Each method offers unique benefits and application steps.
Type of Extension | Application Method Description |
|---|---|
Keratin Bond Extensions (Fusion) | Select strands of natural hair. Melt keratin bonds using a fusion tool. Press melted keratin around natural hair. Allow bonds to cool and set. Roll bonds for secure attachment. |
Tape-In Extensions | Prepare clean, dry hair. Create horizontal sections for tape. Sandwich natural hair between adhesive wefts. Use heat to secure the adhesive. Cut and style for blending. |
Micro-Link/Micro-Ring Extensions | Pull natural hair through micro-rings. Insert extension hair through the same ring. Position rings close to the scalp. Clamp rings with special pliers. Ensure even weight distribution. |
Tip: Always match extensions to the mid-lengths and ends of your hair for a seamless, natural look.
Choosing Alpha Pre-Bonded Hair Extensions
Alpha pre-bonded hair extensions stand out for their quality and customization. You receive extensions made from cuticle-intact Remy human hair, which ensures softness and durability. The original Italian glue used in Alpha extensions reduces shedding and suits sensitive scalps.
You can select from a wide range of lengths, colors, and tip styles. Customization options allow you to tailor your extensions for volume, thickness, and color matching. Alpha’s strict quality control and ethical sourcing guarantee a product that blends naturally and lasts.
Note: Using the right amount of extensions prevents discomfort and breakage. Too many extensions can cause pain, while too few may look thin.
Hot Fusion vs Cold Fusion
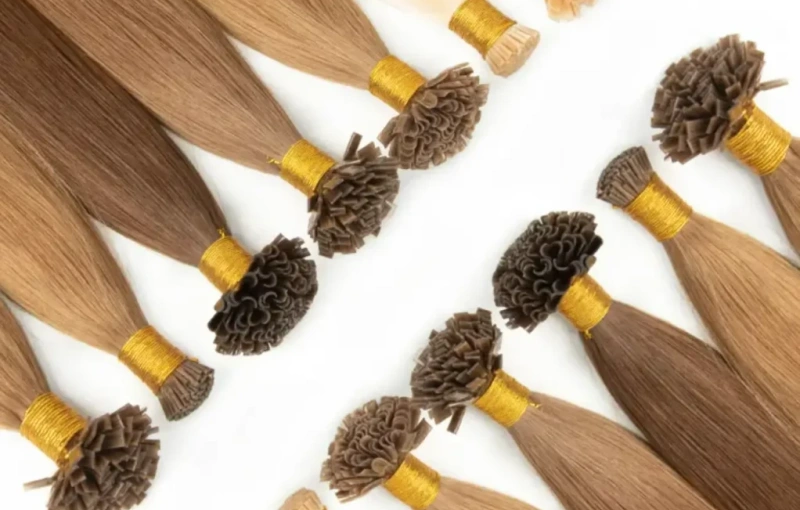
You must decide between hot fusion extensions and cold fusion extensions for your prebonded installation. Hot fusion uses heat to melt keratin bonds, attaching extensions securely. Cold fusion relies on ultrasonic waves or special adhesives, avoiding direct heat.
Method | Application Time | Longevity |
|---|---|---|
Hot Fusion | 4-6 hours | 3-6 months |
Cold Fusion | 2-4 hours | 2-4 months |
Hot fusion extensions last longer and provide a seamless finish. Cold fusion extensions suit sensitive scalps and reduce heat exposure. Choose the method that fits your hair type and comfort level. Consult a professional stylist for best results and to avoid common mistakes like poor placement or incorrect bead positioning.
Proper maintenance, including brushing and conditioning, keeps your extensions healthy and beautiful.
Preparation & Sectioning for Install Prebonded Hair Extensions
Hair Prep Steps
Proper preparation sets the foundation for a successful extension installation. Start by washing your hair with a clarifying shampoo to remove oils and product build-up. Avoid using conditioner or any styling products, as these can interfere with the bond.
Dry your hair completely and brush it thoroughly to eliminate knots. A clean, dry scalp ensures optimal adhesion and comfort. You should also cleanse your scalp to remove any residue and consider a gentle, nourishing scalp treatment to create an ideal base for the process.
Tip: Hydrate your scalp before installation to help it withstand the tension from extensions.
Sectioning Techniques
Sectioning your hair with precision is essential for a natural and seamless finish. Use a tail comb or sectioning clips to divide your hair into thin, manageable layers. Start at the nape of your neck and work upward. Thin sections allow each extension to blend smoothly with your natural hair.
Organized sectioning not only improves the final appearance but also enhances comfort. Clear, even sections help you place each extension securely and reduce the risk of discomfort during wear.
Proper sectioning leads to:
Precise placement of each extension
A more natural, seamless look
Improved comfort and secure attachment
Determining Extension Quantity
Choosing the right number of extensions depends on your hair’s density and your desired result. If you have thick hair, you may need more extensions to achieve a balanced look. For thinner hair, use fewer extensions to avoid adding excessive weight, which can strain your roots.
Consult with your stylist or refer to Alpha’s guidelines to estimate the ideal amount for your needs. This approach ensures your extensions look full without causing damage or discomfort.
Note: Always prioritize the health of your natural hair when deciding on the quantity of extensions.
Attachment Guide for Pre-Bonded Hair Extensions
Hot Fusion Installation Steps
You can achieve a seamless pre-bonded hair extension installation by following a precise step-by-step installation process. Hot fusion extensions use heat to bond the keratin tip to your natural hair, creating a secure and discreet attachment. Here is how you install prebonded hair extensions using the hot fusion method:
Clip up all of your hair except for a thin, horizontal row at your nape.
Grab a small clump of hair about the same width as the extension strand.
Place the extension next to your real hair, about 1 inch from your scalp.
Clip the pre-bonded hair extensions and your hair with the heat tool for 5 seconds.
Pinch and roll the hair at the bonded spot for a few seconds to form a smooth, cylindrical shape.
Continue applying prebonded hair extensions 2 inches apart until you reach the end of the row.
Pull down the next horizontal row of hair and repeat the process.
Apply the final row at the temple level and unclip the top of your hair.
Tip: Always use a heat protectant spray before applying hot tools. This protects your natural hair and maintains the integrity of the extensions.
Safety remains essential during pre-bonded hair extensions application. Avoid excessive heat and tension on the extensions. Use gentle, sulfate-free shampoos and conditioners after installation.
Brush the hair gently to prevent tugging. Schedule periodic visits to your hair technician for assessments and address any issues early.
Cold Fusion Installation Steps
Cold fusion extensions offer a gentle alternative for those with fine or fragile hair. This method uses an ultrasonic or mechanical tool to soften the keratin bond without direct heat. You secure the extension to your natural hair, achieving a seamless finish and reducing the risk of heat damage.
To install cold fusion extensions, you need the following tools: an ultrasonic/mechanical tool, sectioning clips, and a tail comb. The ultrasonic tool softens the keratin, allowing you to attach the extension securely. This process ensures that the bond remains strong and comfortable, especially for sensitive scalps.
Begin by sectioning your hair into thin, horizontal rows. Take a small strand of natural hair that matches the width of the K-tip hair extensions or U-tip hair extensions. Place the extension tip underneath the strand, about half an inch from the scalp.
Use the ultrasonic tool to soften the keratin, then roll the bond with your fingers to form a smooth, cylindrical shape. Repeat the process in a staggered pattern for a natural blend.
Note: Cold fusion extensions minimize heat exposure and suit those with delicate hair. The method delivers a long-lasting install with proper care.
Placement & Spacing Tips
Proper placement and spacing play a crucial role in achieving a natural look and ensuring comfort during pre-bonded hair extensions installation. You must follow best practices to avoid scalp irritation, breakage, or matting.
Take a small, precise strand of your natural hair that matches the width of the extension bond.
Place the keratin extension tip bond underneath the strand, about half an inch away from the scalp.
Use pre-heated fusion pliers or the ultrasonic tool to press the keratin tip for 3-5 seconds until melted.
Immediately roll the melted keratin around the natural hair with your fingers to form a smooth, cylindrical shape.
Repeat the process in a staggered pattern, not a straight line, to avoid stiffness and create a natural blend.
Improper placement can lead to traction alopecia, breakage at attachment points, scalp irritation, and matting. You must distribute the weight evenly and avoid placing extensions too close to the scalp. Always maintain proper spacing between each strand to ensure a comfortable and long-lasting install.
Tip: Consult a professional stylist for guidance on placement and spacing. This ensures your pre-bonded hair extensions blend seamlessly and remain comfortable.
A successful pre-bonded hair extensions installation depends on following the step-by-step installation process, using the right tools, and maintaining proper placement.
Whether you choose hot fusion extensions, cold fusion extensions, i-tip hair extensions, or k-tip hair extensions, you can achieve a natural, voluminous look with Alpha’s premium products.
Aftercare & Removal Guide

Immediate Aftercare Tips
You want your prebonded extensions to last and look beautiful. The first 48 hours after installation are critical. Follow these steps to protect your investment:
Do not wash your hair for 48 hours. This allows the bonds to set fully.
Use only sulfate-free shampoo with a low pH to prevent dryness and maintain softness.
Avoid shampoos with oils or harsh chemicals, which can weaken the bonds.
Refrain from brushing wet hair. Wait until it is dry to prevent pulling out the extensions.
Do not wear tight hairstyles that strain the bonds, such as ponytails or buns.
Tip: Schedule regular salon maintenance to keep your extensions secure and looking their best.
Daily Maintenance Routine
A consistent routine keeps your extensions smooth and tangle-free. You should use a sulfate-free shampoo and a rich, hydrating conditioner. Apply conditioner from mid-length to the ends, avoiding the roots to prevent build-up near the bonds. Always detangle your hair when it is wet and coated with conditioner.
Use a wide-tooth comb or a special detangling brush, starting at the ends and working up.
Gently squeeze out excess water with a towel. Do not rub.
Let your hair air dry when possible. Use a low heat setting if you must blow-dry.
Braid your hair or put it in a loose bun before sleeping. A satin or silk pillowcase reduces friction.
Avoid oil-based products near the bonds. These can weaken the adhesive.
Schedule routine visits to your stylist every 6–8 weeks for touch-ups and to check the condition of your extensions.
Note: Gentle handling and proper care maximize the lifespan of your prebonded extensions and keep them looking natural.
Safe Removal Process
You should always follow a professional guide for the safe removal of prebonded extensions. Improper removal can damage your natural hair. Schedule a consultation with a certified hair extension specialist. The stylist will section your hair and use specialized tools to soften the bonds.
Each extension is gently detached to avoid pulling. After removal, cleanse your hair and scalp thoroughly to remove any adhesive residue. Use a sulfate-free shampoo and conditioner to restore moisture and nourishment.
Tip: Never attempt removal on your own without proper tools or guidance. Professional support ensures the health of your natural hair and prepares it for future extensions.
Conclusion
You achieve the best results when you follow each step for installing pre-bonded hair extensions with care. High-quality extensions like Alpha protect your natural hair and deliver a seamless look. You must schedule regular maintenance to prevent breakage or traction alopecia as extensions grow out.
Always consult a professional for safe removal of extensions. For more guidance and support, visit Alpha’s official website and explore their full range of extensions.
FAQ
What are pre-bonded hair extensions?
Pre-bonded hair extensions use keratin or similar adhesives at the tip. You attach them strand by strand to your natural hair for a seamless, long-lasting result.
How long do pre-bonded hair extensions last?
You can expect pre-bonded extensions to last 3 to 6 months with proper care. Lifespan depends on your hair type, maintenance routine, and lifestyle.
Can you reuse pre-bonded hair extensions?
Yes, you can reuse them if you remove and re-tip them professionally. Proper care and gentle removal help preserve the hair for future applications.
Do pre-bonded hair extensions damage your hair?
You avoid damage by following the correct installation and removal steps. Always consult a professional stylist for the best results and to protect your natural hair.
How do you wash pre-bonded hair extensions?
Use sulfate-free shampoo.
Apply conditioner only from mid-length to ends.
Gently detangle with a wide-tooth comb.
Let your hair air dry when possible.



