

You can put in micro ring hair extensions at home. The steps are easy to follow. First, get ready and section your hair. Next, thread the rings onto your hair. Then, attach the extensions to your hair. Make sure to secure them well. Blend your hair for a smooth look.
After that, follow the aftercare steps. Alpha’s micro ring hair extensions use rings with silicone lining. This helps protect your hair from damage. They look natural and feel safe and comfy. The table below lists the certifications. These show Alpha cares about quality and safety:
Certification Name |
|---|
EMC |
SEDEX |
Inspection and Weighing Test Report |
CE |
RoHS |
FCC |
ISO 9001 |
ISO 45001 |
LVD |
DGM |
Key Takeaways
You can put in micro ring hair extensions at home if you have the right tools and get ready first.
Pick good extensions like Alpha’s to make your hair look real and last longer.
If you part your hair the right way and put in the extensions carefully, they will feel comfy and mix well with your own hair.
Take care of your extensions by tightening the rings and washing them gently so they stay nice and healthy.
Use aftercare tips to help your extensions last longer and keep your own hair safe.
What Are Micro Ring Hair Extensions?
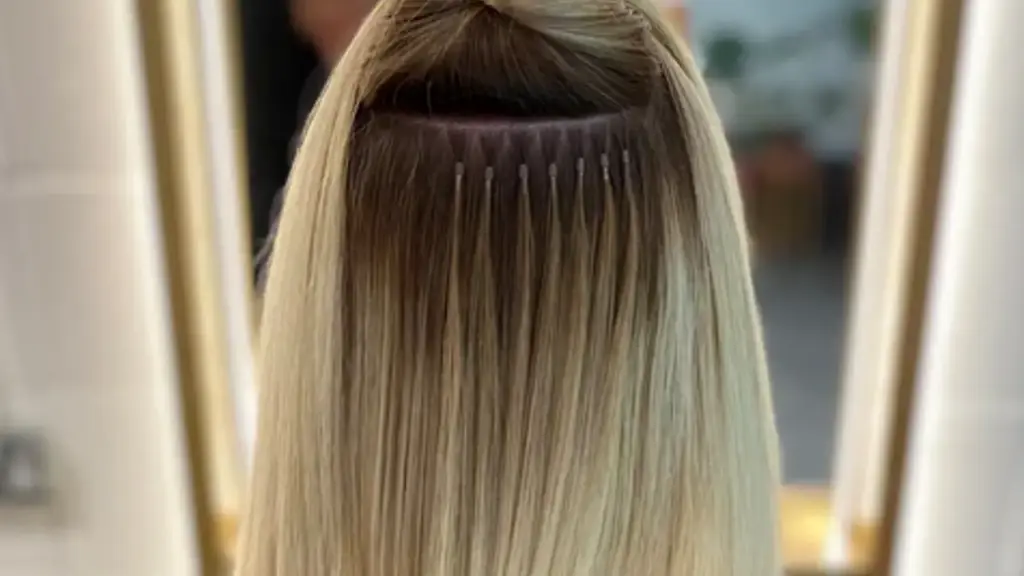
Alpha is known for high-quality micro ring hair extensions. These are made from 100% Remy human hair. The company checks the quality very carefully. They use special ways to make the hair soft and strong. The extensions mix well with your own hair.
Types: Loop vs Non-Loop
There are two main types you can pick. One is micro loop extensions, and the other is non-loop extensions.
Micro ring loop extensions have a plastic loop already attached. You use this loop to pull your hair through the small ring. This makes it easy and quick to put in, even if you are new to micro rings.
Non-loop extensions do not have a loop. You need a threading tool to pull your hair through the micro ring loop. This way, you can choose where to put the extensions.
Both types use tiny copper or aluminum rings to hold the extension to your hair. You do not need heat, glue, or chemicals. This keeps your hair safe from harm. To take them out, squeeze the ring back into a round shape.
Tip: Micro ring loop extensions are good for beginners. You can put them in at home with just a little practice.
Key Benefits
Micro ring extensions have many good points compared to other ways. You can see the main differences in the table below:
Feature | Micro Ring Extensions | Other Methods |
|---|---|---|
Application Time | 2-4 hours | Varies by method |
Removal Time | 45-90 minutes | Varies by method |
Damage to Hair | Damage-free | Varies by method |
Discretion | Virtually undetectable | Varies by method |
Refit Frequency | Every 8-12 weeks | Varies by method |
Here are the benefits you get:
They feel light and thin, so they are comfy.
They are safe for your hair because the cuticles stay safe.
You can style them in many ways. You can curl, dye, or straighten your micro ring loop extensions.
They last a long time. If you take care of them, they can last over a year.
They look natural. The extensions match your hair color and texture for a smooth look.
Alpha’s micro ring loop extensions use rings with silicone inside for a tight hold. You get a natural look and feel comfortable every day.
Tools and Materials for Installation
Before you start, you need the right tools and materials. These help you install micro ring extensions safely and easily. Good tools make the process smooth and help you get a natural look.
Essential Tools
You need a few special tools for installing hair extensions, such as micro rings. Here is a list to help you get ready:
Sectioning comb – This helps you part your hair into neat sections.
Hair clips – Use these to hold your hair out of the way.
Loop tool or threading needle – You use this to pull small sections of your hair through the micro rings.
Micro ring pliers – These pliers clamp the rings shut and open them when you want to remove the extensions.
Micro rings – These small rings hold the extensions in place.
Alpha micro ring extensions – These are the actual hair extensions you will attach.
Tip: Choose pliers with a precision tip design. This helps you place the rings exactly where you want them. Look for pliers with a strong, durable build and an ergonomic handle. These features make the tool comfortable to use and help you work faster.
Micro ring pliers are important. They give you control and help you avoid breaking the rings. You need them to secure the extensions without hurting your hair.
Choosing Alpha Micro Ring Extensions
Alpha micro ring extensions stand out for their quality. Each strand uses 100% Remy human hair. The cuticles stay intact, so the hair feels soft and blends well with your own hair. The silicone-lined rings give a secure fit. You do not need glue or heat, so your natural hair stays safe.
Alpha offers many colors and lengths. You can find the perfect match for your style. The extensions last up to two years with good care. You can curl or dye them with help from a professional. If you want hair extensions that look natural and last a long time, Alpha is a smart choice.
Preparation for Installation
Getting your hair ready is a key step before you install micro ring extensions. Good preparation helps your extensions last longer and look more natural. You want your hair to be clean, dry, and smooth. Follow these steps to make sure your hair is in the best condition.
Washing and Drying

Start with a fresh base. You should wash your hair with a clarifying shampoo. This removes oils, dirt, and any styling products. Do not use conditioner, masks, or oils. These can make your hair slippery and stop the rings from holding well.
Steps for washing and drying:
Wet your hair with warm water.
Apply clarifying shampoo and massage your scalp.
Rinse out all the shampoo.
Towel-dry your hair gently.
Let your hair air dry or use a blow dryer until it is completely dry.
Tip: Make sure your hair is 100% dry before you start. Damp hair can cause the rings to slip and may lead to scalp irritation.
Detangling and Straightening
You need to make your hair smooth and tangle-free. Use a wide-tooth comb or a brush to remove all knots. Work from the ends up to the roots. If your hair is curly or wavy, you can straighten it with a flat iron on a low setting. This makes sectioning easier and helps the extensions blend better.
Checklist for detangling and straightening:
Brush your hair until it feels smooth.
Check for any knots or tangles.
Straighten your hair if needed for a sleek base.
Proper preparation helps your hair extensions stay secure and last longer. When you start with clean, dry, and smooth hair, you get the best results. You also make it easier to check for slippage and keep your extensions looking great.
How to Section Hair for Micro Ring Extensions?
Sectioning Techniques
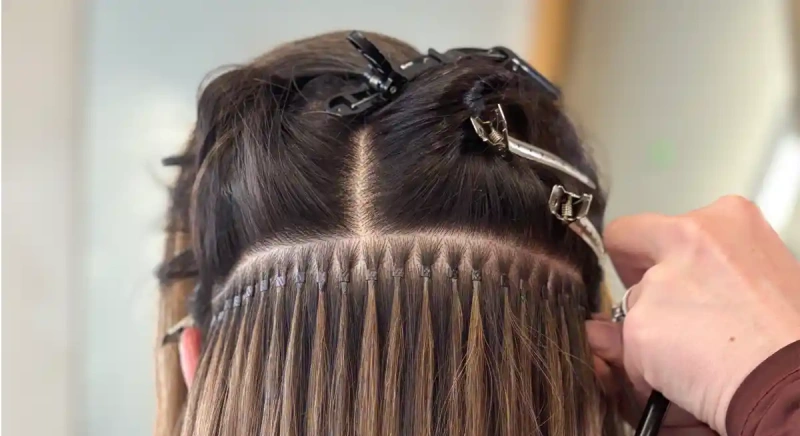
Sectioning your hair is the first step to a neat and comfortable installation. You want to make sure each extension sits in the right place. Start by parting your hair horizontally from ear to ear. Use a clip to hold the top part out of the way. This gives you a clear area to work with at the bottom.
Next, create vertical partings at the nape of your neck. Work upwards as you go. Each section should match the width of your chosen micro rings. This helps you keep the extensions even and secure. When you follow these steps, you make sectioning your hair simple and organized.
Here is a step-by-step guide for sectioning your hair:
Part your hair horizontally from ear to ear.
Clip the top section up and away.
Make vertical partings at the nape and move upward.
Match each section to the width of your micro rings.
Tip: Take your time with sectioning your hair. Careful sectioning leads to a better result and makes the process easier.
Placement and Spacing
Proper placement and spacing are important for comfort and a natural look. When you use the right sectioning, you spread the weight of the hair extensions evenly. This reduces tension on your scalp and helps you feel comfortable all day.
Good sectioning also helps your extensions blend with your natural hair. You want the extensions to look seamless and undetectable. An experienced stylist matches the size of each strand and the ring diameter to your hair. This makes sure the extensions feel light and look natural.
Even weight distribution keeps your scalp healthy.
Seamless blending makes the extensions invisible.
Matching strand size and ring diameter gives you comfort.
If you follow these tips, you will get the best results from your micro ring hair extensions.
How to Install Micro Ring Hair Extensions: Step-by-Step Guide
You can follow this installation tutorial to achieve a salon-quality look with micro ring hair extensions at home. This guide covers both the loop and non-loop methods, so you can choose the technique that fits your needs.
The process takes patience and attention to detail, but you will find it rewarding when you see the seamless results.
Loop Method
The loop method is popular for beginners because it makes threading a micro ring extension simple and efficient. You do not need extra tools since the loop comes attached to each strand. Here is how you can install micro loop extensions step by step:
Prepare your hair
Start with clean, dry, and tangle-free hair. Use a comb or brush to smooth out any knots. This step helps the micro ring hair extensions stay secure and look natural.Section your hair
Divide your hair into small, horizontal sections. Use hair clips to keep the upper layers out of the way. Begin at the nape of your neck and work upwards. Leave a thin section at the bottom as your foundation.Take a small section of hair
Release a small strand from the bottom section. Make sure the strand is slightly smaller than the micro ring. This ensures a snug fit and prevents slipping.Threading a micro ring extension
Hold the pre-attached loop at the end of the extension. Insert your natural hair through the loop. Gently pull the plastic loop, which will draw your hair through the micro ring attached to the extension.Attach the extension
Slide the micro ring up towards your scalp, stopping about 1 cm away from the roots. This prevents tension and keeps your scalp comfortable.Secure the micro ring
Use micro ring pliers to clamp the ring shut. Squeeze firmly but do not press too hard. The ring should hold both your hair and the extension securely.Repeat the process
Continue threading a micro ring extension and attaching hair extensions across each section. Move up your head, working in neat rows. Maintain even spacing for a natural look.Blend and style
Once you finish, gently comb through your hair. This helps blend the extensions with your natural hair. You can style as you wish, but avoid pulling or tugging.
⏱️ Tip: Installing a full head of micro ring hair extensions usually takes 2 to 4 hours. Take breaks if you need to, and check your progress in a mirror.
Non-Loop Method
The non-loop method gives you more control over placement and is often used by experienced users. You will need a threading tool for this technique. Here is how you can complete the installation process:
Prepare your hair
Wash and dry your hair thoroughly. Brush out all tangles to create a smooth base.Section your hair
Use a sectioning comb and clips to divide your hair into horizontal layers. Start at the bottom and work upwards.Threading a micro ring extension
Slide a micro ring onto the threading tool. Take a small section of your natural hair and hook it onto the tool. Pull the tool back through the ring, bringing your hair with it.Attach the extension
Insert the tip of the extension into the micro ring, next to your natural hair. Make sure the extension sits close to your scalp but not too tight.Secure the micro ring
Use pliers to clamp the ring closed. Check that the ring holds both your hair and the extension firmly.Repeat the process
Continue threading a micro ring extension and attaching hair extensions micro rings across each section. Work row by row, keeping the spacing even for a seamless finish.Blend and style
Comb through your hair to blend the extensions. Style as desired, being gentle near the roots.
💡 Note: Fitting micro ring loop extensions or non-loop extensions requires patience. If you feel unsure, ask a friend for help or visit a professional stylist.
You may face some challenges during installation. Tangling can happen if you rush or use large sections. To prevent this, tie your hair in a loose braid before sleeping and use a satin pillowcase. If you swim or exercise, secure your hair in a ponytail or braid to protect the extensions.
Regular maintenance helps prevent slipping and keeps your micro ring hair extensions looking fresh.
This installation tutorial helps you attach hair extensions safely and achieve a natural look. With practice, you will master threading a micro ring extension and enjoy beautiful, long-lasting results.
Securing and Blending Extensions
Using Pliers
You need to use pliers to secure the micro ring. This step keeps your extensions in place and helps them last longer. Hold the pliers in your hand and place the tip around the micro ring. Squeeze the ring gently but firmly. You want the ring to close flat and hold both your hair and the extension.
Do not press too hard, or you might damage the ring or your hair.
Here are some tips for using pliers the right way:
Use pliers made for micro rings. These have a smooth surface and fit the ring shape.
Work slowly and check each ring before moving to the next one.
Make sure the ring sits close to your scalp but does not pull on your hair.
If you need to remove an extension, use the pliers to squeeze the sides of the ring. This opens it up so you can slide the extension out.
To keep your extensions secure, follow these aftercare steps:
Wash your hair with gentle, sulphate-free shampoo and conditioner.
Brush your hair with a special extension brush to avoid pulling.
Use light, non-oil-based products to keep the rings strong.
Check your extensions often to make sure they stay in place.
Blending and Styling
Blending your extensions with your natural hair makes them look real and beautiful. You want the extensions to move and fall like your own hair. Start by matching the color and texture of your extensions to your hair. You can ask a stylist to blend up to five tones for a perfect match.
Follow these steps for the best blend:
Analyze your hair and scalp to pick the right method.
Match the color of the last five inches of your hair.
Choose the right extension type for your hair and lifestyle.
Place the extensions so they stay hidden and feel comfortable.
Cut and shape the extensions so they blend with your haircut.
Style your hair as you like—sleek, wavy, or bouncy.
Follow a care routine to keep your extensions looking fresh.
When you blend and style your hair extensions well, you get a seamless, natural look. You can enjoy your new hair with confidence every day.
How to Fit Micro Ring Extensions for Best Results?
Even Distribution
You want your micro ring extensions to look natural and feel comfortable. Even distribution is the key. Start by dividing your hair into small, equal sections. Use a sectioning comb and hair clips to keep each part neat. Place each extension in a row, making sure the space between them stays the same.
This helps your hair extensions blend with your own hair and prevents heavy spots.
If you spread the extensions evenly, you avoid pulling on your scalp. You also make sure your hairstyle looks full and balanced. Check each row in the mirror as you work. Move slowly and adjust the placement if you see any gaps or bunching. Even distribution is important for fitting micro ring extensions the right way.
Tips for Seamless Finish
You can achieve a flawless look with a few simple steps. First, choose high-quality materials. Pick 100% human hair extensions that match your hair color and texture. Use durable, non-corrosive microbeads for a secure hold.
Next, focus on proper sectioning. Specialized tools help you create clean partings. This makes fitting micro ring loop extensions easier and keeps the rows tidy. Place each bead close to your scalp, but not too tightly. Adjust the tension so you feel comfortable, but the extension stays in place.
Blending is the final step. Use more than one shade if your hair has highlights or lowlights. Ask a stylist to use texturizing scissors to blend the ends. This helps your micro ring extensions move like your real hair.
Here is a quick checklist for how to fit micro ring extensions for a seamless finish:
Select high-quality hair and beads.
Use precise sectioning tools.
Place beads close to the scalp with gentle tension.
Blend with multiple shades and texturizing methods.
If you follow these steps, you will master how to fit micro ring hair extensions at home. Your new style will look smooth and natural every day.
Micro Ring Hair Extensions Aftercare
Washing and Conditioning
You want your micro ring hair extensions to stay soft and beautiful. Start by washing your hair two to three times each week. Washing too often can cause dryness and make your extensions wear out faster.
Use gentle, sulfate-free shampoos like Moroccanoil Moisture Repair or Kérastase Resistance Bain Extentioniste. These products clean your hair without harming the bonds.
When you condition, focus on the mid-lengths and ends. Avoid putting conditioner near the roots. This helps prevent the rings from slipping. Try lightweight conditioners such as Beauty Mark Paraben Free Conditioner or Hairshop 909 Conditioner. These keep your hair smooth and easy to brush.
Tip: Use a soft bristle or loop brush to detangle your hair. Start at the ends and work up to the roots. This keeps your extensions safe from breakage.
At night, wrap your hair in a silk scarf. This reduces friction and protects your extensions while you sleep.
Adjustments and Longevity
You need regular maintenance to keep your extensions looking their best. Visit your stylist every six to eight weeks. The stylist will check the rings and move them closer to your scalp as your hair grows. Skipping these appointments can lead to tangles or damage.
If you follow the right care steps, your extensions will last several months. Always use low-heat tools when styling. Choose lightweight products to keep the bonds strong. Schedule regular checkups for your hair extensions. This helps you enjoy your micro ring hair extensions at home for a long time.
Note: Good aftercare means your extensions stay healthy and natural-looking. With the right routine, you can enjoy beautiful hair every day.
Troubleshooting and Best Practices
Common Mistakes
You may face some challenges during the installation process. Many people make mistakes that can affect how micro ring extensions look and feel. Here are some common errors you should avoid:
Using too little hair when securing the rings can cause slippage. Always use enough hair to hold the ring firmly.
Loose micro rings may slip out, while overly tight rings can pull on your scalp. Make sure each ring fits snugly but comfortably.
Not clamping the rings properly can lead to extensions falling out. Use the right pliers and check each ring after you clamp it.
Choosing low-quality hair extensions or skipping proper installation techniques increases the risk of problems.
Trying to install extensions without enough experience can result in uneven placement. If you feel unsure, ask for help from a qualified extensionist.
Tip: Check your work as you go. If you notice any rings slipping or pulling, adjust them right away.
Expert Tips
You can keep your micro ring extensions looking great and protect your natural hair by following these expert tips:
Re-tighten the rings every 4-6 weeks to maintain a secure hold.
Detangle your hair gently before styling. Use a wide-tooth comb to prevent breakage.
Wash your hair with a mild, sulfate-free shampoo and conditioner. Avoid vigorous scrubbing of your scalp.
Brush your hair before washing to prevent tangles. Use detangling sprays if needed.
Deep condition your natural hair weekly to keep it healthy.
Apply moisture-rich products and avoid those with alcohol to prevent dryness.
After washing, detangle your hair starting from the tips.
Avoid heat styling tools. If you must use them, apply a heat protectant spray.
Choose products from reputable brands designed for hair extensions.
Note: Regular care and gentle handling help your extensions last longer and keep your hair soft.
Conclusion
You can make your hair look real with micro ring hair extensions if you follow each step. Alpha micro ring extensions stay in place and feel good. If you put them in the right way and take care of them, they last longer.
Wash your hair often and brush it gently to keep your extensions nice.
Use styles that protect your hair from things like the sun or the wind.
Go to the salon for checkups so a pro can fix your extensions.
If you do these things, your hair will look pretty and last a long time.
FAQ
How long do Alpha micro ring hair extensions last?
Alpha micro ring hair extensions can last up to two years with proper care. You should follow the aftercare steps and visit your stylist for regular adjustments.
Can I style or dye my micro ring hair extensions?
You can curl or straighten your extensions using low heat. For coloring, always ask a professional stylist. This keeps your extensions healthy and looking natural.
Will micro ring extensions damage my natural hair?
Micro ring extensions do not use glue or heat. The silicone-lined rings protect your hair. If you install and maintain them correctly, you will not damage your natural hair.
How often should I wash my hair with extensions?
You should wash your hair two to three times a week. Use sulfate-free shampoo and conditioner. Avoid washing too often to keep your extensions soft and strong.
What should I do if a micro ring slips out?
If a ring slips out, you can reattach it using your pliers. Take a small section of hair, slide the ring back on, and clamp it gently. If you need help, visit your stylist.



