

If you want to handle U-tip hair extension removal, you need the right approach. You can safely and effectively take out your extensions by using a proper guide and the right tools.
Always work gently to protect your natural hair. Alpha offers premium U-tip hair extensions that make the process smooth from start to finish. Trust your hair to experts who care about quality and your confidence.
Key Takeaways
Recognize when to remove U-tip extensions. Signs include tangling, discomfort, and visible bonds. Timely removal protects your natural hair.
Use the right tools for safe removal. Essential items include keratin bond remover, fusion pliers, and sectioning clips. Quality tools prevent damage.
Follow a step-by-step process for removal. Section your hair, apply bond remover, and gently break the bonds. Patience is key to avoiding breakage.
After removal, deep condition your hair. This restores moisture and strength. Allow your hair to rest for a few days before reapplying extensions.
Consider professional help if unsure. Stylists have the expertise and tools to ensure safe removal, protecting your natural hair.
When to Start U-Tip Hair Extension Removal?
Signs Your Extensions Need Removal
You might wonder when it’s time for u-tip hair extension removal. Most people can wear U-tip extensions for about three to six months. The exact timing depends on how fast your hair grows and how well you care for your extensions. If you notice any of these signs, it’s probably time to start the removal process:
Split ends or rough texture on the extensions
Extensions no longer blend with your natural hair color or texture
Tangling and matting, especially near the bonds
Excessive shedding or finding clumps of hair in your brush
Visible bonds or tips showing through your hair
Itchiness, tightness, or discomfort on your scalp
Extensions that feel loose or start slipping
Dull, lifeless appearance that doesn’t improve with products
Brittle ends that break or thin out
Tip: If you find yourself fighting tangles every day or your scalp feels sore, don’t wait. These are clear signs your u-tip extensions need attention.
Risks of Delayed Removal
Waiting too long to remove your u-tip extensions can cause problems for your natural hair and scalp. When you leave extensions in past their recommended time, you risk:
More tangling and matting, which makes removal harder
Breakage or thinning of your natural hair
Scalp irritation or even small sores from tight or grown-out bonds
Extensions slipping out and taking your own hair with them
You want to keep your hair healthy and strong. Timely removal helps you avoid damage and keeps your hair ready for your next style.
U-Tip Hair Extension Removal Tools
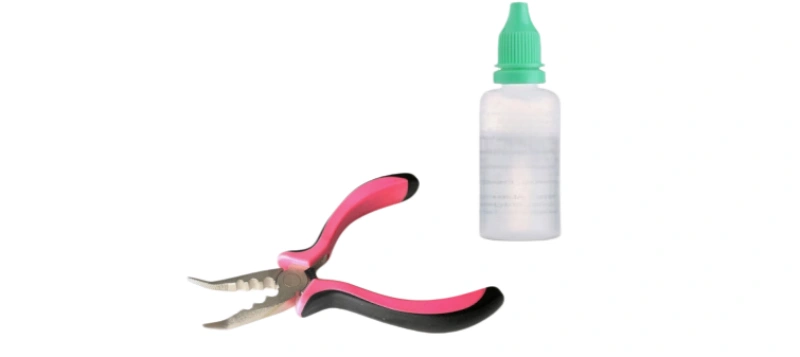
Essential Tools from Alpha
You want your U-tip hair extension removal to go smoothly. The right tools make all the difference. Alpha recommends using salon-grade tools that protect your natural hair and make the process easy. Here’s what you’ll need:
Fusion hair extension removal pliers
Keratin bond remover solution
Heat protector shields
Fine-tooth comb
Sectioning clips
U-shaped pliers
Soft towels
These tools help you break down the keratin bonds without pulling or damaging your hair. You’ll find that professional salons use similar items. For example, stylists often use the grooved part of a Multi Method Tool to clamp and break down the keratin bonds.
They also rely on bond removers and special pliers to gently slide out each extension.
Tip: Always use a heat protector shield to keep your scalp safe during removal. This small step can prevent discomfort and protect your roots.
Product Recommendations
Alpha offers high-quality removal tools designed for both home and salon use. You can trust these products to deliver safe and effective results:
Tool Name | Purpose | Why Choose Alpha? |
|---|---|---|
Fusion Removal Pliers | Breaks keratin bonds | Ergonomic, easy grip |
Keratin Bond Remover | Dissolves adhesive | Gentle on hair, fast-acting |
Heat Protector Shields | Protects the scalp from heat and removes | Comfortable, reusable |
Sectioning Clips | Keeps hair organized | Strong hold, no slipping |
You can find these tools on Alpha’s website. They work perfectly with Alpha’s U Tip Hair Extensions, making removal simple and stress-free. If you want a complete kit, Alpha’s Fusion Hair Extension Kit includes everything you need for a professional finish at home.
Preparation for U-Tip Removal
Sectioning and Organizing Hair
You want your U-tip removal to go smoothly. Start by sectioning your hair. This step helps you work in small areas and keeps everything neat. Grab your sectioning clips and a fine-tooth comb. Divide your hair into four main sections—top, left, right, and back. Clip each section away from the others.
You can work with one section at a time. This method prevents tangling and makes it easier to spot each U-tip bond.
Here’s a quick checklist for organizing your hair:
Detangle your hair with a wide-tooth comb.
Separate your hair into four sections.
Use sectioning clips to hold each part.
Make sure you can see the bonds clearly.
Tip: If you have thick hair, try splitting each section into smaller parts. You’ll find it easier to reach every bond and avoid missing any extensions.
Setting Up Your Workspace
You need a comfortable workspace for U-tip removal. Choose a spot with good lighting. A mirror helps you see the bonds and your progress. Lay out your tools so you can grab them easily. Place a towel over your shoulders to protect your clothes. Keep your keratin bond remover, pliers, comb, and clips within arm’s reach.
Here’s a simple table to help you set up:
Item | Purpose |
|---|---|
Mirror | See bonds and progress |
Towel | Protects clothes |
Sectioning clips | Organize hair |
Comb | Detangle and section |
Keratin remover | Break down bonds |
Pliers | Remove extensions |
Note: You want to stay relaxed. Take your time and work in a space where you feel comfortable. If you rush, you might miss a bond or pull your hair.
You’re ready to start the removal process. With your hair organized and your workspace set up, you can focus on safe and easy U-tip extension removal.
How to Remove U Tip Hair Extensions: Step-by-Step Guide
Taking out your extensions can feel overwhelming, but you can do it safely with the right removal guide. This step-by-step guide will walk you through the process, so you protect your natural hair and get the best results. Let’s break down each part of the u-tip hair extension removal.
Section the Hair
Start with dry, detangled hair. Use a loop brush or a wide-tooth comb to gently remove any knots. Divide your hair into small, manageable sections using sectioning clips.
Most people find it easiest to split their hair into three or four layers. Working in small sections helps you stay organized and prevents tangling. You’ll see every bond clearly, which makes removing u-tip extensions much easier.
Tip: Patience is key. Take your time with each section to avoid missing any bonds or causing breakage.
Apply Keratin Bond Remover
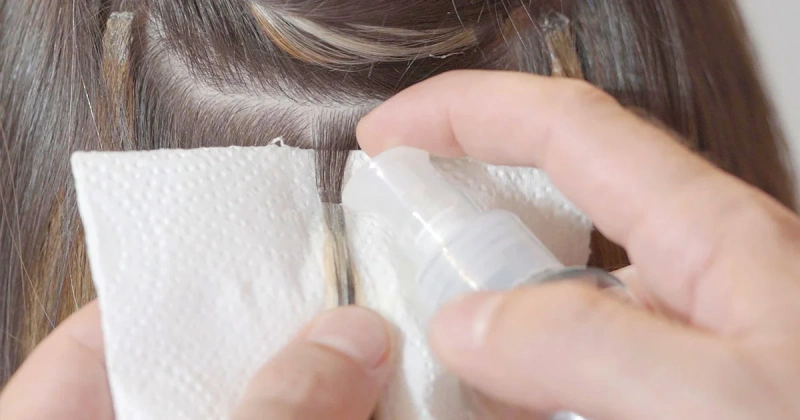
Now, focus on the bonds. Take a small section with about five bonds. Apply a few drops of keratin bond remover directly onto each keratin tip. Let the remover soak in for 20 to 30 seconds.
This step softens the bond, making it easier to break without pulling your hair. Never skip the remover—using pliers alone can damage your strands.
Break the Keratin Bond
Grab your fusion removal pliers. Gently squeeze and crack the softened keratin tip. You want to feel the bond turn powdery or crumbly. Don’t use too much force. If the bond feels stubborn, add a few more drops of remover and wait a bit longer.
Rotate the extension while clamping down with the pliers to help break down the keratin. Always act gently and avoid sudden movements to protect your natural hair.
Slide Out the Extension
Once the bond feels soft and crumbly, gently slide the extension strand down and out of your hair. If you feel resistance, don’t pull. Give the remover more time to work. Repeat these steps for each bond in your section. Continue until you finish all sections.
This method keeps your hair safe and makes the u-tip hair extension removal smooth.
Remove Adhesive Residue
After you finish removing u-tip hair extensions, you might notice some leftover residue or small keratin flakes. You want your hair clean and smooth before you wash it. Here are some effective ways to remove glue residue:
Method | Description | Usage Instructions |
|---|---|---|
Acetone-Based Remover | Dissolves tough bonding glues but can be drying. | Soak a cotton pad in acetone, apply for 30 seconds, rub gently, rinse, and deep condition. |
Oil-Based Solutions | Gentle and natural alternative for loosening glue bonds. | Warm oil, apply to glued areas, massage for 10-15 minutes, use a comb, shampoo thoroughly. |
Alcohol-Based Adhesive Spray | Quick and effective, evaporates quickly without residue. | Spray on glue, wait 1-2 minutes, slide extensions off, wash and condition hair. |
Dish Soap + Oil Combo | DIY method that cuts through adhesive while preventing dryness. | Mix dish soap, oil, and warm water, massage into glued area, let sit for 10 minutes, rinse thoroughly. |
Choose the method that works best for your hair type. Oil-based solutions are gentle and help keep your hair soft. Always comb through your hair with a fine-tooth comb to remove any remaining residue.
Wash and Condition
After you finish the removal guide, it’s time to wash your hair. Use a clarifying shampoo to get rid of any leftover product or residue. Rinse thoroughly. Follow up with a deep conditioner to restore moisture and softness. Let your hair air dry.
Check for any tangles or sticky spots. If you find any, repeat the cleaning process until your hair feels clean and smooth.
Note: Don’t rush to reinstall new extensions. Give your hair a break for at least three to five days. This rest period helps your scalp recover and keeps your hair healthy for your next style.
You’ve now completed the step-by-step instructions for u-tip hair extension removal. With this removal guide, you can keep your hair strong, healthy, and ready for your next look.
Aftercare for Natural Hair
Deep Conditioning Tips
Your hair needs some love after removing U-tip extensions. Deep conditioning brings back hydration and strength. You want your hair to feel soft and healthy again.
Start by choosing a mask that fits your hair’s needs. If your hair feels weak or limp, go for a protein-based mask. If it feels dry or rough, a moisturizing mask works best.
Apply the conditioner from the mid-lengths to the ends. The roots usually need less product.
Cover your hair with a shower cap. Let the mask sit for 15 to 30 minutes. This helps your hair absorb all the good stuff.
Rinse with cool water to lock in moisture.
Tip: Try deep conditioning once a week for the first month after removal. Your hair will thank you!
Rest Period Before Reinstalling
You might feel excited to put in new extensions right away. Give your hair a break first. Experts recommend waiting at least 3 to 5 days before reinstalling U-tip hair extensions. This rest period lets your scalp recover, and your hair regain its natural balance.
Use this time to let your hair breathe.
Avoid heavy styling or heat tools.
Focus on gentle care and moisture.
Maintaining Hair Health
Keeping your hair healthy after removal is all about good habits. You want to protect your natural hair and keep it looking its best. Here are some easy ways to do that:
Wear a loose ponytail or braid before bed. This prevents tangling.
Sleep on a satin or silk pillowcase. It reduces friction and breakage.
Brush your hair regularly, especially in the morning and before bed.
Wash your hair twice a week with sulfate-free shampoo and conditioner.
You can also create a personalized routine. Pick products that match your hair type. If you’re unsure, ask a professional for advice. Regular trims and gentle handling go a long way. When you care for your hair, you set yourself up for beautiful results—whether you wear extensions or not.
Safety Tips and Mistakes to Avoid
Common Removal Errors
You might feel tempted to rush through U-tip hair extension removal, but mistakes can lead to trouble. Many people make the same errors, so knowing what to avoid helps you protect your hair.
Pulling or tugging on bonds: If you yank on the extensions, you risk breaking your natural hair. Always let the bond remover do its job.
Skipping the bond remover: Some try to use pliers alone. This can cause pain and damage. The remover softens the keratin, making removal easy.
Working in large sections: Handling too much hair at once leads to tangles and missed bonds. Small sections keep things neat.
Using the wrong tools: Household pliers or scissors can harm your hair. Professional tools from Alpha make the process safe.
Ignoring residue: Leaving glue or keratin flakes behind can cause scalp irritation. Always clean your hair thoroughly.
Tip: If you notice resistance, stop and check your steps. Rushing increases the risk of breakage.
How to Prevent Hair Damage?
You want your hair to stay healthy and strong. Follow these safety tips to avoid damage during U-tip removal:
Be Gentle: Never force an extension off if it doesn’t slide easily. Patience keeps your hair safe.
Work in Small Sections: Focusing on small areas helps you avoid tangling and pulling.
Use Professional Tools: Invest in high-quality tools and bond removers designed for U Tip extensions. These make removal faster and safer.
Here’s a quick table to help you remember:
Safety Tip | Why It Matters |
|---|---|
Be Gentle | Prevents breakage |
Small Sections | Reduces tangling |
Professional Tools | Protects natural hair |
Note: You can always ask a stylist for advice if you feel unsure. Taking your time and using the right products makes all the difference.
DIY U-Tip Hair Extension Removal
Home Removal Steps
You can remove U-tip hair extensions at home if you have the right tools and a little patience. Here’s a simple step-by-step process you can follow:
Section your hair. Start by parting your hair into small sections. Use clips to keep each section neat and easy to manage.
Apply the keratin bond remover. Use an applicator to put the remover directly on each bond. Let it sit for 30 seconds to a minute so it can soften the keratin.
Break the bond. Grab a pair of flat-nose pliers. Gently squeeze and crack the softened bond. Don’t pull or tug—just let the remover do the work.
Slide the hair extension off. Once the bond feels loose, slide the extension out. If it doesn’t move easily, add a bit more remover and wait a few seconds.
Remove residual adhesive. Take a tail comb and gently scrape away any leftover glue. You can apply more remover if you need to.
Wash and condition your hair. Use a gentle clarifying shampoo to clean your hair. Follow up with a moisturizing conditioner to keep your hair soft and healthy.
Tip: Work slowly and check each section before moving on. This helps you avoid missing any bonds or causing damage.
When to Seek Professional Help?
If you feel unsure about removing U-tip hair extensions by yourself or run into any problems, you should reach out to a professional stylist. They know how to remove extensions safely and can help you avoid damage to your natural hair.
You don’t have to do it alone. Sometimes, getting help from an expert is the best way to protect your hair and get great results.
Professional U-Tip Removal Guide
Salon Techniques
When you walk into a salon for U-tip hair extension removal, you get a whole different experience. Stylists start by sectioning your hair with precision. They use professional-grade tools like fusion removal pliers and keratin bond remover. You see them work in small sections, making sure every bond gets the right treatment.
They apply the remover, wait for the keratin to soften, then gently crack the bond with pliers. You notice how they never rush. Each extension slides out smoothly, leaving your natural hair untouched.
Salons often use heat protector shields to keep your scalp safe. They check for leftover adhesive and use specialized products to clean your hair. You might see them use a fine-tooth comb to remove tiny keratin flakes. The process feels comfortable and stress-free. You can relax knowing your hair is in good hands.
Tip: If you have thick or tangled hair, a stylist can handle tricky spots without causing pain or breakage.
Benefits of Professional Removal
Choosing professional removal gives you several advantages. You avoid the risks that come with DIY methods. Here’s what you gain:
Stylists know how to remove extensions safely. They protect your natural hair from breakage.
You get access to specialized tools and products. These make the process gentle and effective.
Professionals remove all extensions evenly. They clean away adhesive residue so your hair feels fresh.
You save time and avoid stress. You leave the salon with healthy, clean hair, ready for your next style. If you want the best results, professional removal is the way to go.
Reusing U-Tip Hair Extensions
Is Reuse Recommended?
You might wonder if you can reuse your U-tip hair extensions after removal. The answer depends on the condition of your extensions and how well you cared for them. If you used gentle products, brushed regularly, and avoided heat damage, your extensions might still look great.
High-quality U-tip extensions, like those from Alpha, can last through more than one installation if you treat them right.
Here are a few things to check before you think about reusing your extensions:
The keratin tips should not be broken or worn down.
The hair should feel soft, smooth, and free from tangles.
The strands should not look thin or frayed at the ends.
The color should still match your natural hair.
Tip: If your extensions look dull, tangled, or have split ends, it’s better to invest in a new set. Healthy extensions blend better and feel more comfortable.
Alpha’s Advice on Re-Tipping
Alpha recommends a process called “re-tipping” if you want to reuse your U-tip hair extensions. Re-tipping means replacing the old keratin bond with a fresh one. This step helps your extensions stay secure and last longer during the next installation.
Here’s what you should know about re-tipping:
Step | What You Do |
|---|---|
Clean the Hair | Wash and dry the extensions thoroughly. |
Trim the Ends | Remove any split or damaged ends. |
Apply New Keratin | Attach a new U-shaped keratin tip. |
Let It Set | Allow the new bond to cool and harden. |
You can ask a professional stylist to re-tip your extensions. They have the right tools and experience. If you want to try it at home, make sure you use salon-grade keratin and follow safety tips.
Note: Alpha’s U-tip hair extensions use premium Remy human hair, so they hold up well to re-tipping. For best results, always follow Alpha’s care instructions and reach out to their support team if you have questions.
Alpha’s Commitment to Quality
Why Choose Alpha U Tip Hair Extensions?
You want hair extensions that look natural and last. Alpha delivers exactly that. You get 100% Remy human hair with intact cuticles. This means your extensions feel soft, blend seamlessly, and stay strong for months. Alpha uses a cold bleaching process, so the hair keeps its shine and texture.
You can curl, straighten, or color your extensions without worry.
Alpha stands out because of its ethical sourcing. You know your hair comes from trusted suppliers. The company checks every batch for quality. You get extensions that are safe, comfortable, and lightweight.
The U-shaped keratin bonds hold tight but never pull on your scalp. You can wear your extensions all day and feel confident.
Here’s a quick look at what makes Alpha special:
Feature | Benefit for You |
|---|---|
Full cuticle Remy hair | Natural look and feel |
Ethical sourcing | Peace of mind |
Cold bleaching | Softness and durability |
Rigorous QC | Consistent quality |
Lightweight design | Comfortable wear |
Tip: If you want extensions that last and look amazing, Alpha U Tip Hair Extensions are a smart choice.
Brand Support and Resources
You never feel alone with Alpha. The brand offers expert advice and fast answers to your questions. You can reach out for help with installation, removal, or aftercare. Alpha’s team guides you through every step. You get access to tutorials, product guides, and personalized recommendations.
Alpha supports salons, brands, and individuals. You can customize your order, choose your color, and get the right length for your style. The website gives you detailed information and easy ordering. You find resources for both beginners and professionals.
If you want to learn more or need help, visit Alpha’s official website. You’ll discover more tips, tools, and hair care solutions that fit your needs.
Conclusion
You want your hair to stay healthy and beautiful. Following the right guide makes U-tip hair extension removal safe and easy. Take your time and care for your hair after removal. Alpha’s products help you get the best results. If you feel unsure, ask a professional for help.
Ready for your next look? Visit Alpha’s website for more hair care tips and solutions.
FAQ
How long does it take to remove U Tip hair extensions?
You can expect the removal process to take 1 to 2 hours. The time depends on how many extensions you have and your experience level. Working in small sections helps you avoid tangles and makes the process smoother.
Can I reuse my U Tip hair extensions?
Yes, you can reuse your extensions if they stay in good condition. Clean and re-tip them before reinstalling. Many people choose to reuse high-quality nail-tipped hair extensions for multiple applications.
Will removing U Tip extensions damage my natural hair?
You won’t damage your hair if you use the right tools and follow each step carefully. Always use a keratin bond remover and avoid pulling. If you feel unsure, ask a stylist for help.
What’s the difference between U Tip and keratin bond extensions?
U Tip extensions use a U-shaped keratin tip for bonding. Keratin bond extensions are a broader term that includes U Tip and other types that use keratin adhesive. Both give you secure, natural-looking results.
Can I remove U Tip extensions by myself at home?
You can remove them at home if you have the right tools and patience. Follow a step-by-step guide and work slowly. If you run into trouble, don’t hesitate to contact a professional.



