

Fusion extensions can look seamless for months, but the removal stage is where patience matters most. The safest process is not to pull harder. It is to identify the attachment, use the remover and tool designed for that system, and release each strand only when the bond is ready to slide.
This guide explains the broad process for removing fusion hair extensions, including hot-fusion keratin bonds, ultrasonic cold-fusion bonds, and ring-based methods that are sometimes marketed as cold fusion. If you already know that your installation is K-tip, U-tip, or another specific format, use the linked method guide for the details that are unique to that tip shape.
Quick Answer: How Are Fusion Hair Extensions Removed?
Quick answer: On dry, detangled hair, isolate a small section and apply a compatible fusion bond remover to the keratin attachment. Once the product has worked as directed, use professional removal pliers to crack the bond from more than one angle.
Support the natural hair above the attachment and slide the extension down only when it releases without force. Then separate trapped shed hair, comb away loose residue, clarify, and condition.
If a bond will not slide, stop. Add remover as directed, wait, and crack it again. Resistance is a signal that the bond is not fully released, not an invitation to pull harder.
Before You Start: Identify Your Fusion Method
“Fusion” describes a family of strand-by-strand services, not one universal attachment. From a manufacturing perspective, the material and hardware you can see at the root are more useful than the marketing name. Check the service record, product packaging, or ask the installer before choosing a removal method.
| Attachment you can see | Likely method | Correct removal path |
| A hard keratin tip wrapped around a small hair section | Hot fusion, K-tip, U-tip, V-tip, flat tip, or pre-bonded keratin | Compatible keratin remover plus bond-cracking pliers |
| A small keratin attachment installed with ultrasonic energy | Ultrasonic cold fusion | Use the removal process specified by that keratin system; installation used no heat, but removal may still require remover and pliers |
| A metal or silicone-lined ring holding an I-tip strand | Micro-ring or bead-based “cold fusion” | Open the ring in the reverse direction with the correct ring pliers; do not dissolve it as if it were keratin |
| Tape, sewn thread, glue track, or an unfamiliar adhesive | Not a standard fusion bond | Stop and use the removal guide for that attachment or consult a stylist |
If you are unsure whether the installation is hot or cold fusion, compare the systems in our hot-vs-cold fusion guide. Do not assume every “cold fusion” service uses the same attachment.
Can You Remove Fusion Hair Extensions at Home?

Professional removal is the safest choice, particularly for a full head of individual bonds. A stylist can see the back of the head, keep natural hairs out of the pliers, recognize the bond formula, and work through matting without transferring tension to the scalp.
An at-home attempt is lower risk only when all of the following are true:
- You know the exact attachment system and have the matching professional remover and tool.
- The hair is not heavily matted at the roots, and the scalp has no sores, tenderness, or active irritation.
- The bonds are visible and accessible, preferably with a capable helper for the back of the head.
- You can work slowly and stop whenever an extension resists.
Book a trained extension stylist if the attachment is unknown, several bonds have fused together, there is dense matting above the bond, your natural hair is very fragile, or removal causes pain. Cutting through a bond or pulling a strand to “get it over with” can cut or snap the natural hair enclosed inside it.
Tools You Need for Fusion Hair Extension Removal
- A bond remover approved for the installed keratin or resin system. Follow its label for application, ventilation, contact time, and cleanup.
- Fusion removal pliers or a bond-cracking tool made for keratin attachments. Grooved or flat jaws may be specified by the system; they should crush the bond without cutting the hair.
- A rat-tail comb, sectioning clips, and an extension-safe detangling brush or wide-tooth comb.
- A cape or old towel, cotton pads, and gloves if the remover label recommends them.
- Clarifying shampoo and a moisturizing conditioner or mask for aftercare.
Salons and extension businesses can review Alpha’s hair extension tools and accessories when building a service kit. The remover still needs to be compatible with the bond formula used on the client.
How to Remove Hot Fusion Hair Extensions Step by Step
The process below covers heat-applied keratin bonds such as many K-tip, U-tip, V-tip, flat-tip, and pre-bonded systems. It is the removal counterpart to professional fusion extension application, but the objective is different: you are making the hardened bond brittle enough to release, not reheating it into a new attachment.
1. Work on Dry, Detangled Hair
Begin with completely dry hair. Gently brush the mid-lengths and ends first, then work upward without dragging through the root area. Dry hair is easier to separate from the extension strand, and the bond is easier to assess than it is on wet, elastic hair.
Create clean horizontal sections and start at the nape. Clip the remaining hair away so loose strands cannot enter the jaws of the removal tool.
2. Isolate a Small Working Section
Expose only a few bonds at a time. Place a towel or cotton pad behind the bond if needed to protect the client’s clothing and limit remover contact with the surrounding hair or scalp. Keep the natural hair above the attachment supported between your fingers.
3. Apply the Compatible Bond Remover
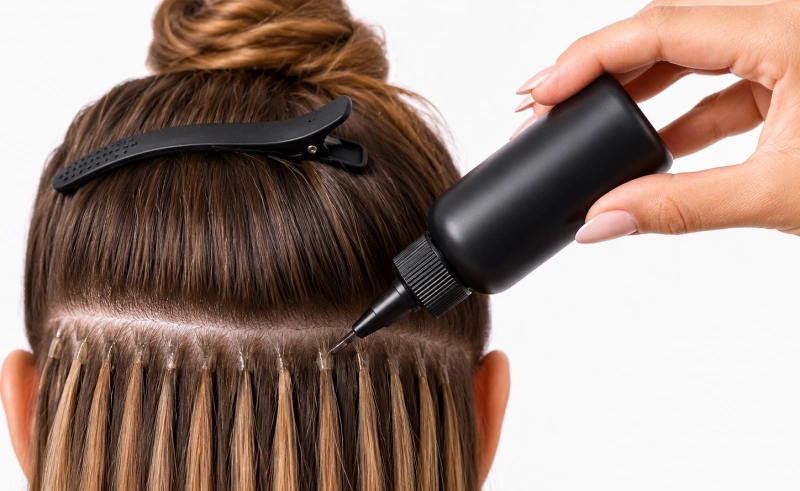
Apply the remover directly to the bond, not across the scalp or full hair section. Use the amount and contact time printed on the product. Some systems instruct you to apply remover before cracking; others use a crack-apply-crack sequence. Follow one matched system rather than combining advice from different brands.
When the bond starts to change texture or become brittle, test it with the correct pliers. If it remains solid, apply more product only as the instructions allow and give it additional time.
4. Crack the Bond from Different Angles
Position the removal pliers on the keratin, keeping loose natural hairs outside the jaws. Squeeze gently, release, rotate the tool, and squeeze again. Working around the attachment breaks the bond into smaller fragments instead of flattening it in one direction.
This is the critical action missing from many simplified tutorials. Remover alone may soften the material, but the pliers create the fractures that allow the natural hair to separate from the bond.
5. Support the Root and Slide the Extension Out
Hold the natural hair above the attachment to prevent tension at the scalp. With the other hand, test the extension with a gentle downward movement. A properly released bond should slide away with little resistance.
Stop rule: If the extension catches, do not twist, yank, or use the comb as a lever. Return to the remover-and-cracking step until the bond releases.
6. Separate Shed Hair and Remove Loose Residue
After the strand slides out, you may see a small cone of hair near the old attachment. Much of this can be normal daily shedding that was trapped inside the bond and could not fall away during wear. Hold the section above the tangle, loosen it with your fingers, and comb gently from below the knot upward.
Short snapped hairs, thinning patches, scalp soreness, or a dense felted mat are different from normal trapped shedding. Stop and ask a stylist to assess the section if you see those signs.
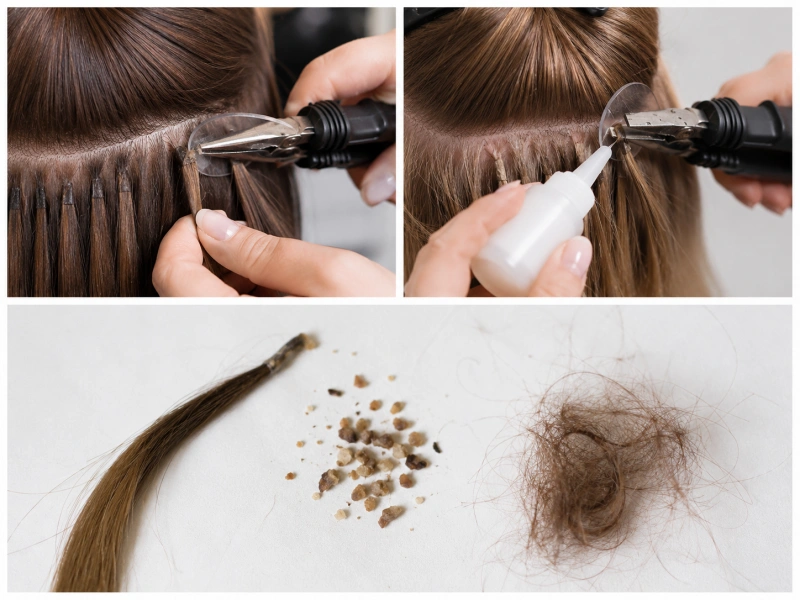
7. Repeat Methodically and Account for Every Strand
Continue row by row and keep removed extensions separate from the natural hair. Counting or laying out the strands by row helps a stylist confirm that no bond has been missed and makes it easier to assess whether the hair is suitable for professional rebonding.
How to Remove Cold Fusion Hair Extensions?
The phrase “cold fusion” is used for more than one service, so the removal path must follow the attachment—not the name on the appointment menu.
Ultrasonic Keratin Cold Fusion
Ultrasonic systems attach a keratin tip without a conventional hot fusion iron. Once installed, however, the client still has a keratin-based attachment. Use the remover and removal tool specified by that system. In many cases, the release pattern is similar to hot-fusion keratin: treat the bond, break it carefully, support the root, and slide the extension away only when free.
Do not place an ultrasonic installation tool back on the head unless the manufacturer’s professional protocol specifically uses it for removal. Installation technology and removal technology are not automatically the same.
Ring- or Bead-Based Cold Fusion
I-tip, micro-ring, and nano-ring services may also be described as cold fusion because no heat melts a keratin bond. These attachments need mechanical release. A trained stylist locates the seam or flattened direction of the ring and uses the correct pliers to open it in reverse. The extension can then slide out without bond solvent.
If you see a metal or silicone-lined bead, do not crush it randomly. Closing it further can trap the natural hair and make removal harder.
What to Do When a Fusion Bond Will Not Release?
- Confirm the attachment. A ring, adhesive track, and keratin tip require different tools.
- Check that the remover matches the brand or bond chemistry and has been used according to the label.
- Reapply only as directed and crack the bond from another angle; one squeeze may simply flatten it.
- Keep shed hair and neighboring strands out of the jaws before trying again.
- Stop if several bonds are stuck together, the root area is matted, or the client feels pain.
A stubborn bond is a troubleshooting problem, not a strength test. When the safe next step is unclear, preserve the natural hair and let a professional complete the service.
What Not to Use on Fusion Bonds?
- Do not pull, twist, or peel an extension from the root.
- Do not cut across a bond; natural hairs run through the attachment and can be cut at the same time.
- Do not use a flat iron, open flame, or uncontrolled heat to melt a bond off the hair.
- Do not substitute household glue remover, lash remover, or nail-polish remover for a product approved for the extension system.
- Do not flood the scalp with solvent or ignore the product’s ventilation and skin-contact warnings.
- Do not force a fine-tooth comb through a tight root mat. Loosen the section gradually or refer it to a stylist.
Oil or conditioner may add slip around loose residue, but neither is a universal replacement for a compatible keratin bond remover. If the installer cannot identify the product system, professional assessment is the safer route.
Aftercare After Fusion Extension Removal
- Finish removing loose keratin fragments and trapped shed hair before shampooing. Water can tighten an unresolved tangle.
- Wash with a clarifying shampoo as appropriate for the remover system, concentrating on residue rather than scrubbing the scalp aggressively.
- Apply conditioner or a moisturizing mask through the mid-lengths and ends. Detangle gently, starting at the ends.
- Inspect the scalp and natural hair in good light. Give tender, irritated, or visibly weakened areas time to recover and seek professional advice if symptoms persist.
- Before reinstalling, confirm that the hair is clean, dry, free of residue, and suitable for another service. A stylist should match the new bond weight and section size to the client’s current density.
Good removal begins before the appointment. Following a consistent fusion hair extension care routine helps limit root tangling, while understanding how long fusion extensions last helps clients schedule removal before excessive grow-out makes the service more difficult.
Hot Fusion, K-Tip, U-Tip, and Pre-Bonded Removal Differences
These methods share the remover-crack-slide principle when they use a keratin bond. Their dedicated pages should explain the tip-specific details; this page remains the broad decision and safety hub.
| Method | What is different during removal | Detailed Alpha guide |
| Hot fusion | Broad category: confirm the bond formula and use the matched remover and pliers. | This guide |
| K-tip | Small rolled bond; tool placement and the “released bond should slide” test are especially important. | K-tip removal guide |
| U-tip / nail tip | Cup-shaped starting tip becomes a formed bond after installation; work around the full attachment. | U-tip removal guide |
| Pre-bonded keratin | A product category that can include several tip shapes; identify the actual bond before removal. | Pre-bonded removal guide |
| Ultrasonic cold fusion | No installation heat, but the finished keratin attachment may still need system-specific remover and pliers. | Hot vs cold fusion guide |
| I-tip / ring method | Open the ring mechanically; do not treat metal hardware as a dissolvable keratin bond. | I-tip product guide |
Frequently Asked Questions
How long does it take to remove fusion hair extensions?
Removal time depends on the number of bonds, the product system, the installer’s technique, grow-out, and the amount of root tangling. A full head can take much longer than a small volume service. Schedule enough time to work without rushing; a bond that needs repeated treatment should get repeated treatment.
Can you remove fusion hair extensions without pliers?
For most hardened keratin bonds, professional removal pliers are part of the intended release process. Remover may change the bond texture, but the tool breaks the softened material into pieces. Trying to slide an intact bond can transfer force to the natural hair. Ring-based attachments also require pliers, but they need ring-opening pliers rather than a keratin bond cracker.
Why does so much hair come out after fusion extension removal?
Hair normally sheds every day. A bonded extension traps some of those released hairs until the attachment is removed, so they can appear together as a small cone. That is not automatically damage. Short broken pieces, visible thinning, bald areas, or scalp pain are warning signs that deserve professional assessment.
Can fusion hair extensions be reused?
The removed keratin bond itself is not reused. Depending on the hair quality, condition, length, and brand system, a professional may cut away the old attachment and rebond the extension hair with new keratin. Read whether keratin extensions can be reused and have the strands inspected before planning a reinstall.
Should hair be wet or dry for fusion bond removal?
Work on dry hair unless the specific manufacturer gives different professional instructions. Dry hair makes the attachment easier to see and keeps wet, elastic natural hair from stretching while the bond is being tested. Shampoo after all bonds and loose residue have been removed.
Can oil or conditioner remove fusion hair extensions?
Oil and conditioner can add slip and may help with loose residue or tangling, but they do not reliably replace a remover designed for the installed bond. Using them as the only release method can encourage pulling when the keratin remains intact. Identify the system and use the compatible product.
When should fusion hair extensions be removed?
Follow the service schedule given by the installer and act earlier if the bonds have significant grow-out, tangling, slipping, discomfort, or matting. Wear time varies with the system, natural growth, bond placement, and home care, so the condition of the attachment is more useful than a single universal month count.
Final Advice
Safe fusion removal follows one simple principle: release the attachment before asking the natural hair to move through it. Identify the method, use the matched remover and tool, crack keratin bonds from different angles, support the root, and never force a strand that resists. Careful cleanup and aftercare then prepare the client’s hair for rest, assessment, or a future installation.
For salons, distributors, and hair brands, Alpha manufactures 100% full-cuticle Remy fusion hair extensions with K-tip, U-tip, I-tip, flat-tip, V-tip, and customized pre-bonded options. Contact Alpha to discuss bond shape, strand weight, color range, samples, private-label packaging, and professional product requirements for your market.



