

Weft hair extension installation can add length, volume, and density while keeping the finish natural when the weft construction, attachment method, and row tension are matched to the client. The most reliable installs start before any sewing or clamping: evaluate the natural hair, choose the right weft hair extensions, plan clean sections, and confirm how the selected track should be secured.
Not every weft behaves the same during installation. Machine Weft, Genius Weft, and Hand-Tied Weft differ in track profile, strength, and whether the seam can be cut. This guide focuses on the universal process and the practical differences between weft constructions, while routing product-specific techniques to dedicated guides so each topic stays clear and useful.
Quick answer — How do you install weft hair extensions?
Start with a consultation and clean, dry, detangled hair. Section according to density and concealment needs, build the correct foundation (for example a braid or beaded row), measure and secure the weft, check tension and end anchors, blend the hair, then give aftercare and maintenance instructions.
Semi-permanent weft systems are best installed and maintained by a trained professional.
How to Install Weft Hair Extensions: Universal Professional Steps
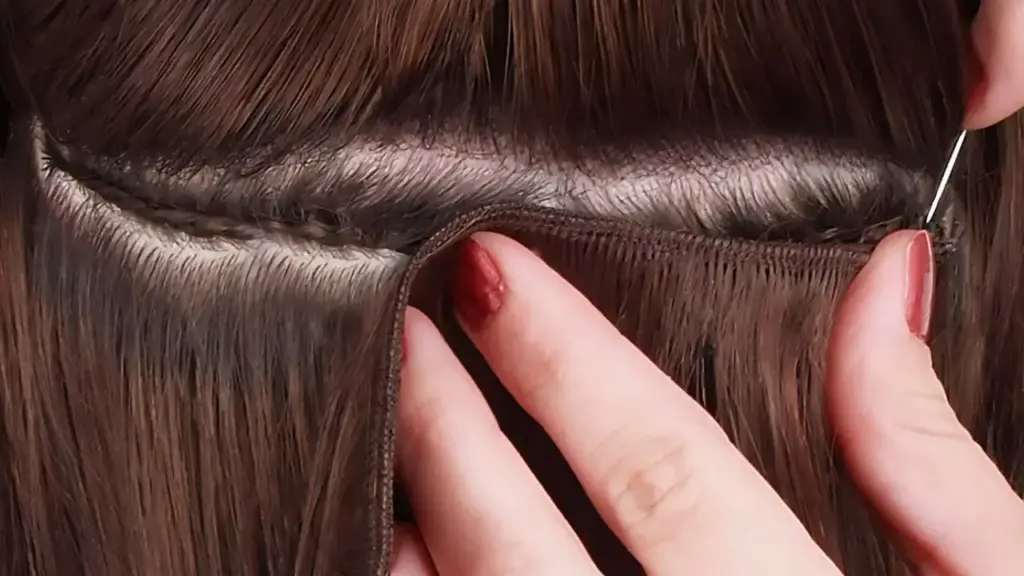
The attachment technique changes by weft type, but a professional weft extension installation usually follows the same decision sequence. Treat these as universal checkpoints rather than a one-size-fits-all row map.
Step 1: Consultation and Weft Selection
Check natural hair density, scalp condition, breakage risk, haircut shape, lifestyle, desired volume, and the client’s ability to maintain the extensions. The goal is to choose a weft weight and track construction the natural hair can support comfortably. For a broader overview of construction options, see types of weft hair extensions.
- Confirm the service goal: volume only, length and volume, or a full transformation.
- Assess support: fine or fragile areas may need less weight, fewer layers, or a different method.
- Plan maintenance: semi-permanent rows require follow-up, move-ups, and professional removal.
Step 2: Prepare the Hair and Tools
Wash as appropriate for the chosen method, dry the hair completely, and detangle from ends to roots. Keep the work area organized so sectioning stays clean and the stylist does not need to interrupt the row once attachment begins.
- Core tools: rat-tail comb, sectioning clips, extension brush, and clean shears for blending.
- For beaded or bead-and-sew methods: loop/threader tool, silicone-lined beads, extension pliers, curved needle, and strong color-matched thread.
- For cuttable wefts: sharp shears plus the manufacturer-recommended edge-sealing procedure when required.
- For adhesive systems: use adhesive and remover only when the specific weft system is designed for adhesive application; glue is not a universal installation rule for every weft construction.
Step 3: Section for Coverage, Movement, and Comfort
Create clean sections that follow the client’s head shape and leave enough natural hair to conceal the track in normal styling. Section thickness and row position should reflect density rather than a fixed measurement copied from another client. Avoid cross hairs that can become trapped in beads or stitches and create pulling as the hair moves.
For detailed Hand-Tied row mapping, perimeter clearance, and placement logic, use the dedicated hand-tied extensions placement guide instead of duplicating those measurements on this general hub.
Step 4: Build the Correct Foundation
The foundation must be stable enough to support the row but flexible enough to move with the head. Common professional foundations include a braided base for a traditional sew-in or a silicone-lined beaded row for a braidless sew-in. Keep pickups consistent, avoid fragile perimeter hairs, and check that the client can move the head without sharp pulling before the weft is fully secured.
Step 5: Measure, Position, and Secure the Weft
Measure the weft against the prepared row before cutting or sewing. Keep the track flat without stretching it across the head. Secure the ends, then work across the row with even tension so the weft stays balanced rather than bunching at one point.
- Machine Weft: may be cut to the required width; Alpha recommends sealing the cut edge to help prevent shedding.
- Genius Weft: designed as a cuttable, ultra-thin track for flexible row customization.
- Traditional Hand-Tied Weft: generally should not be cut through the hand-tied seam because the construction can loosen or unravel.
Step 6: Blend, Style, and Perform a Final Check
Release the natural hair and evaluate the blend from the back, sides, and front. Refine the haircut as needed so the natural ends connect with the extension length, then style the hair together with appropriate heat protection. Finish by checking every row for visibility, slipping, trapped hairs, uneven weight, loose anchors, or pressure points. Secure should not mean painful.
Weft Installation Methods by Weft Construction
A useful distinction for stylists is that the weft construction and the attachment method are not the same thing. “Machine,” “Genius,” and “Hand-Tied” describe how the track is built; “beaded row,” “braided sew-in,” or another system describes how that track is attached. Matching both decisions gives a cleaner installation plan.
Machine Weft: Strong, Cuttable Track for Volume-Focused Installs
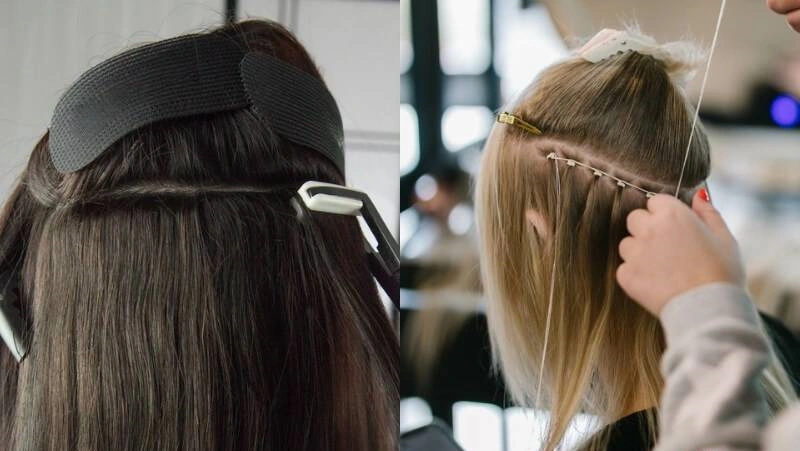
Machine Weft extensions use a machine-sewn, reinforced track. Alpha’s current product specifications describe the construction as stronger and thicker than Hand-Tied or Genius Weft, which can make it practical for volume-focused services and repeated salon handling.
The track can be trimmed to the row width, but the cut edge should be sealed according to the product specification to control shedding.
Common attachment options include braided sew-in and beaded-row sew-in. For clients with fine hair, the stylist should not assume that a strong track automatically means more hair can be added; grams, row count, concealment, and tension still need to match natural density.
Genius Weft: Ultra-Thin, Cuttable and Flexible
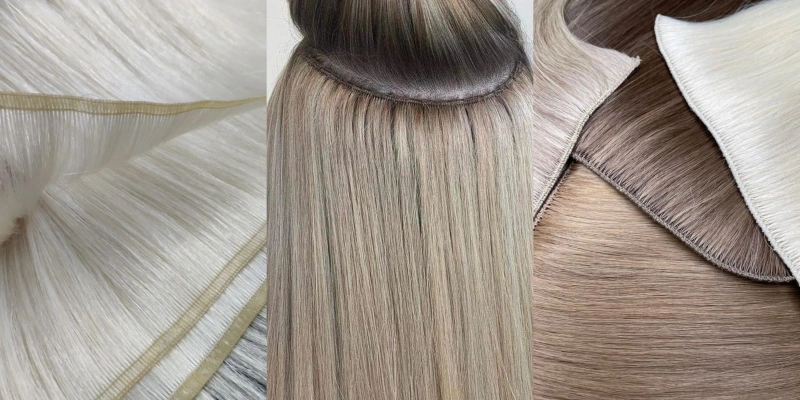
Genius Weft is designed for a flatter, more discreet track. Alpha’s current specification page lists an ultra-thin seam of about 0.4–0.7 mm and states that the weft can be cut to customize the row. This combination makes it useful when a stylist wants a low-profile result without the folding that may be required by a traditional non-cuttable Hand-Tied seam.
Genius Weft can be used with beaded-row, sew-in, flat-track, or hybrid professional approaches depending on the system and stylist training. Fine-hair suitability still depends on selecting appropriate grams, section size, row position, and tension rather than the seam thickness alone.
Hand-Tied Weft: Lightweight Seam with Product-Specific Handling
Traditional Hand-Tied Wefts use a very thin, flexible hand-knotted seam that can sit close to the head and is often selected for lightweight, discreet salon work. A common professional approach uses a beaded foundation and sewing thread to distribute the row across multiple attachment points.
The important installation rule is handling the seam correctly: traditional Hand-Tied wefts generally should not be cut through the seam unless that exact product is documented as cuttable.
Because Hand-Tied installation has its own row planning, bead foundation, stitching, end-anchor, tension, and removal details, this page intentionally does not repeat the full tutorial. For the complete professional sequence, use how to install hand-tied extensions. That guide is the dedicated owner of Hand-Tied installation intent.
For salons or brands evaluating the product itself rather than the technique, review Alpha’s hand-tied weft hair extensions page for current product specifications, samples, and wholesale/OEM options.
Weft Installation Method Comparison
Use this table as a selection framework. Final suitability depends on the client’s natural hair, the exact product specification, and the installer’s trained method.
| Weft construction | Often chosen for | Track profile | Can it be cut? | Common professional securing methods | Maintenance focus |
| Machine Weft | Medium-to-thick hair, stronger volume-focused services; fine hair requires conservative weight planning | Stronger, thicker machine-sewn track | Yes; cut as needed and seal the edge when specified | Braided sew-in; beaded-row sew-in; system-specific conversions | Watch cut edges, shedding, row weight, dryness at the track and grow-out |
| Genius Weft | Fine-to-medium hair or clients needing a flatter, customizable track | Ultra-thin, flexible seam; Alpha lists ~0.4–0.7 mm | Yes; designed for cut-to-fit customization | Beaded row, sew-in, flat-track or hybrid professional methods | Control grams and tension, keep attachment area clean/dry, inspect seam before reuse |
| Traditional Hand-Tied Weft | Fine-to-medium density when a lightweight, flexible seam is appropriate | Very thin, hand-knotted seam | Generally no; do not cut unless that exact product is documented as cuttable | Commonly bead-and-sew; other trained sew-in systems may vary | Avoid cross hairs and over-tension, protect the seam, schedule move-ups based on grow-out |
Common Attachment Methods for Weft Extensions
Once the weft construction is selected, choose the attachment system that fits the client, the product, and the stylist’s training. The following are method summaries, not substitutes for hands-on professional education.
Beaded Row / Braidless Sew-In
Small, even sections of natural hair are secured with silicone-lined beads to create a foundation. The weft is then positioned against the row and sewn into the foundation with controlled tension. This is a common modern approach for many professional weft systems because the row can be moved up as the natural hair grows. For product-specific beaded options, see beaded weft extensions.
Braided Sew-In
Natural hair is braided into a stable base and the weft is sewn to the braid. This traditional method can provide a secure foundation, especially for clients with enough density to support the braid and row. The braid should be neat and secure without excessive scalp tension, and the track should still be measured and balanced before sewing.
Clip-In or Adhesive Weft Systems
Clip-in wefts are removable and follow a different wear-and-care routine from semi-permanent sewn rows. Adhesive should only be used on products engineered for adhesive application. If the product uses an adhesive or PU skin base, route the client to the correct skin weft hair extensions or tape-based product instructions rather than treating glue-in as a generic rule for every weft.
Professional Tension, Blending and Aftercare Checks
Installation quality is not only about whether the weft stays attached. Comfort, movement, concealment, and maintenance determine how the row performs after the client leaves the salon.
- Avoid excessive tension. Sharp pain, persistent pulling, scalp puckering, or a single pressure point is a reason to reassess the row.
- Remove cross hairs. Stray hairs caught in the wrong bead or stitch can pinch as the client moves and complicate maintenance.
- Do not cut the wrong seam. Confirm the construction before trimming; Genius and Machine Wefts may be cut under their product rules, while traditional Hand-Tied seams generally should not be cut.
- Balance row weight. A thin seam does not mean unlimited hair can be stacked on one foundation.
- Dry attachment areas thoroughly. Moisture around tracks, beads, or thread can contribute to tangling, slipping, or odor.
- Brush with support. Hold the attachment area while detangling and work from the ends upward.
- Keep heavy oils away from attachment points. Apply lightweight conditioning products mainly through the mid-lengths and ends unless the product system says otherwise.
Many professional weft systems are checked or moved up around every 6–8 weeks, but the correct schedule depends on growth, attachment method, comfort, and the stylist’s system. For a dedicated care schedule, see weft extensions maintenance.
Weft Hair Extension Installation FAQ
Can I install weft hair extensions at home?
Removable clip-in wefts can be suitable for at-home use when the product instructions are followed. Semi-permanent beaded, sewn, or hybrid installations require sectioning, weight distribution, tension control, and safe removal, so professional installation is recommended.
Can all weft hair extensions be cut?
No. Genius Weft is designed to be cut for row customization. Machine Weft can generally be cut and should be sealed at the cut edge when specified. Traditional Hand-Tied Weft seams generally should not be cut because the seam can loosen or unravel. Always follow the exact product specification.
What is the difference between beaded weft and sew-in installation?
“Beaded row” describes a foundation made with beads; “sew-in” describes securing the weft with thread. Many modern braidless installs use both: beads create the foundation and the weft is sewn to that foundation. A traditional sew-in may instead use a braided base.
How long does a weft installation last before maintenance?
A common professional maintenance window is around 6–8 weeks, but it varies by natural growth, row method, product construction, lifestyle, and aftercare. Do not wait for severe slipping, matting, or discomfort before scheduling a check.
How many wefts do I need for a full install?
The answer depends on natural density, desired length, weft grams, end fullness, haircut, and the number of rows the hair can support. Avoid choosing pack count from a universal number. Use the dedicated guide on how many weft extensions you need for quantity planning.
Which weft is best for fine hair?
There is no single best construction for every fine-hair client. Low-profile options such as Genius Weft or traditional Hand-Tied Weft may be considered, but safe results depend more on the selected grams, section size, row position, concealment, and tension than on the product name alone. A professional consultation should make the final decision.
For Salons and Hair Brands: Installation Starts with Track Quality
For professional buyers, installation performance starts before the salon service. Sample approval should check seam consistency, actual gram weight, color match, end density, shedding behavior, and cut performance where the construction is intended to be cut. A strong installation guide cannot compensate for an inconsistent track.
Alpha Hair Extension has manufactured full-cuticle Remy hair extensions since 1990 and supports OEM/ODM programs for hair brands, salon chains, wholesalers, retailers, and new entrants. If you are testing Hand-Tied construction for a salon or private-label line, review current Hand-Tied Weft samples and specifications before finalizing the installation protocol.
Conclusion
A reliable weft hair extension installation combines the right construction with the right attachment method. Start with consultation and sectioning, build a stable foundation, follow the product’s cut-and-seam rules, secure the row with even tension, then blend and maintain it on an appropriate schedule.
Use this page for the general method overview and move into the dedicated product or Hand-Tied guides when the client or service requires deeper, product-specific instructions.



